Pack201 | Maintenance | Section 6
EN | 19
© Bosch Packaging Technology, Inc.
All rights reserved 2012
6.4.10 Crimpers - Set Heat and Clear-
ance
NOTE: This procedure applies to both
vertical- and horizontal-style crimpers.
Only perform this procedure after the mesh
has been properly set.
1. Remove the knife from the crimpers.
2. Turn the main power ON and set
the heat controllers to 280 degrees
Fahrenheit (ignore for cold-seal film).
Wait for about 15 minutes for the
crimpers to heat and stabilize.
3. Open the operator guard and place a
sheet of carbon paper and a sheet of
white paper in the crimpers.
4. Close the operator guard and jog the
machine to make a carbon impression
of the crimper pattern.
5. Use the pattern to adjust the crimpers
until a good impression is made.
6. Thread film through the machine.
7. Jog the wrapper to test the film seal.
•
If the crimper seal pulls apart
too easily, increase the crimper
temperature 5-10 degrees. Wait for
about 15 minutes before performing
a new seal test.
•
Raise or lower the crimper shaft as
needed to fine-tune the seal. The
crimper should form a good seal
with the least amount of contact
with the lower crimper.
6.4.11 Crimpers - Center
The crimpers must be on the centerline of
the package when they close to seal and cut.
This is adjusted in the following manner:
1. Set the sealing temperature at room temp
and allow time for the crimpers to cool.
2. Jog a product into the endseal and stop
the wrapper with the crimpers in the
seal/cut position.
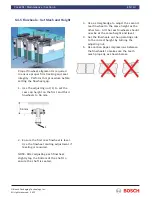
3. Check the location of the endseal in
relation to the product height (see
diagram below).
4. If adjustment is necessary, loosen four
capscrews in the back of the endseal
frame.
5. Turn the capscrew at the top of the
endseal to raise or lower the crimpers as
necessary.
6. Tighten the capscrews securely.
7. Make sure the appropriate product spacer
is installed.

