background image

 27 

[email protected]

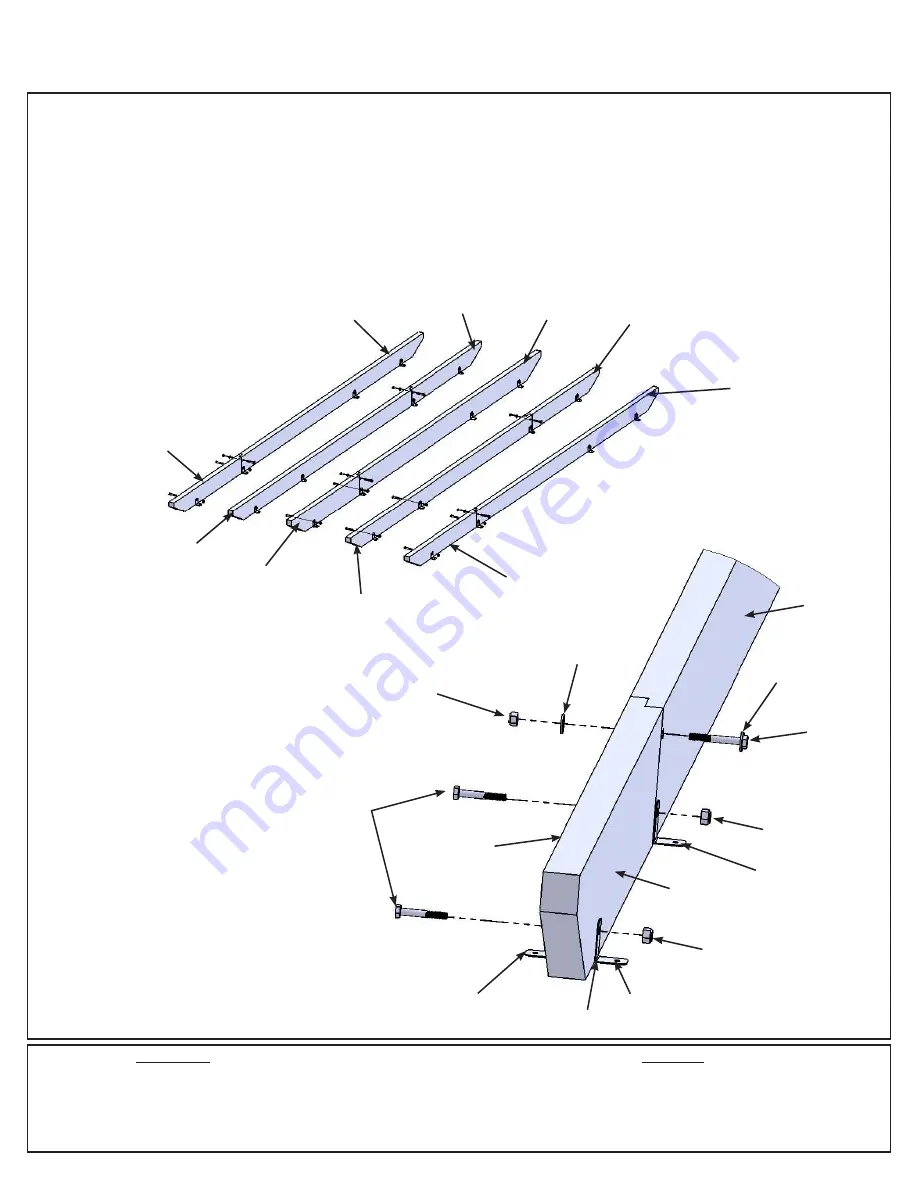
Step 11: Trellis Assembly 

Part 1

A:  

Interlock one (490) Short Trellis A  with one (491) Long Trellis A then attach with one 1/4 x 1-3/4” Hex Bolt 

(with 

two 

5/16” flat washer

 and one 1/4” lock nut) in the top hole and one 

Trellis Clip, in the bottom hole, on each side 

connecting with one 1/4 x 1-3/4” Hex Bolt 

(with one 1/4” lock nut).  Trellis Clip should be flush to the bottom of the 

board.

  (fig. 11.1 and 11.2)

B:

  Place three more Trellis Clips on each side of the Trellis A Asssembly and attach with one 1/4 x 1-3/4” Hex Bolt 

(with one 1/4” lock nut) per pair of clips.

   (fig. 11.1 and 11.2)

C:

  Repeat Steps A and B with four (492) Short Trellis B and four (493) Long Trellis B to create four Trellis B 

Assemblies.   (fig. 11.1 and 11.2)

Hardware

5 x  1/4 x 1-3/4” Hex Bolt (

5/16” flat washer

 x 2, 1/4” lock nut)

20 x  1/4 x 1-3/4” Hex Bolt (1/4” lock nut)
40 x  Trellis Clip

1 x (490) Short Trellis A  34.9 x 133.4 x 857.2 mm (1-3/8 x 5-1/4 x 33-3/4”)
1 x (491) Long Trellis A  34.9 x 133.4 x 2203.5 mm (1-3/8 x 5-1/4 x 86-3/4”)
4 x (492) Short Trellis B  34.9 x 108 x 857.2 mm (1-3/8 x 4-1/4 x 33-3/4”)
4 x (493) Long Trellis B  34.9 x 108 x 2203.5 mm (1-3/8 x 4-1/4 x 86-3/4”)

Wood Parts

Fig. 11.1

Fig. 11.2

(490) Short 

Trellis A

(491) Long 

Trellis A

(492) Short 

Trellis B

(493) Long 

Trellis B

(492) Short 

Trellis B

(493) Long 

Trellis B

(492) Short 

Trellis B

(493) Long 

Trellis B

(492) Short 

Trellis B

(493) Long 

Trellis B

Trellis Clip

1/4 x 1-3/4” 

Hex Bolt

1/4” Lock 

Nut

5/16” Flat 

Washer

Trellis Clip

5/16” Flat 

Washer

Trellis 

Clip

Trellis Clip 

(hidden)

1/4 x 1-3/4” 

Hex Bolt

1/4” Lock 

Nut

Long 

Trellis

Short 

Trellis

There are eight (8) 

Trellis Clips per 

Trellis Assembly

1/4” Lock 

Nut

Flush

Содержание CHARLESTON PERGOLA YM11762

Страница 1: ...ions YM11762 Revised 12 07 2017 HEIGHT 8 2 or 2 44m Height 8 2 2 44 m IMPORTANT RETAIN FOR FUTURE REFERENCE READ CAREFULLY Borrowed Spaces North America Toll Free Consumer Relations 1 833 455 9002 www...

Страница 2: ...chimnea for safe distances from combustible materials Wear gloves to avoid injury from possible sharp edges of individual elements before assembly During installation follow all safety warnings provi...

Страница 3: ...the warranty This warranty does not cover any inspection costs This Limited Warranty does not cover Labour for replacment of any defective item s Incidental or consequential damages Cosmetic defects...

Страница 4: ...ers if required WOOD PARTS Applying a water repellent or stain water based on a yearly basis is important maintenance to maintain maximum life and performance of the product Check all wood members for...

Страница 5: ...re mounting to concrete footers see below for the correct locations and placement Please double check for possibility of any underground utilities such as gas telephone cable or sprinkler lines Follow...

Страница 6: ...cluded Anchoring Hardware not included Concrete Patio min 13 x 9 with 6 clearance on all sides Wood Deck min 13 x 9 with 6 clearance on all sides Panel Post Corner Panel Post Corner Post Panel Post Co...

Страница 7: ...4 x 2295 5mm 5 8 x 5 1 4 x 90 3 8 Long Bar Top Y50132 513 2 512 31 8 x 69 9 x 406 5mm 1 x 2 x 16 Side Joist Y50132 512 3 501 15 9 x 85 7 x 1384 3mm 5 8 x 3 3 8 x 54 1 2 Front Back Shelf Y50132 501 1...

Страница 8: ...857 2mm 1 3 8 x 2 x 33 Short Trellis D Y50132 497 2 495 34 9 x 82 6 x 857 2mm 1 3 8 x 3 x 33 Short Trellis C Y50132 495 1 499 15 9 x 133 4 x 381mm 5 8 x 5 x 15 Plaque Y50132 499 Dimensions are approxi...

Страница 9: ...Lock Washer 16 5 16 Y05318 300 8 Hex Bolt 1 4 x 5 Y07718 250 T Nut 16 5 16 Y08518 300 Lock Nut 43 1 4 Y08318 203 16 1 4 Y08518 200 T Nut 96pc Wood Screw 8 x 1 1 2 Y06091 512 32pc Wood Screw 8 x 2 Y060...

Страница 10: ...7 smaller or larger Dimensions are approximate and are shown to assist in the identification of parts for assembly Actual dimensions may be Hardware Identification 1 2 x 2 Y00400 005 Robertson Driver...

Страница 11: ...r sprinkler line locations prior to excavating any holes D Before you discard your cartons fill out the form below The carton I D stamp is located on the end of each carton Please retain this informat...

Страница 12: ...ach all three 580 Ballusters to both Rail T Bs with two 10 x 4 Wood Screws per balluster fig 2 1 B Repeat Step A seven more times to make eight Balluster Assemblies Step 2 Post Panel Assemblies Part 1...

Страница 13: ...nel Post measure 14 down then place one 581 Top Horizontal with the bottom at the 14 mark Attach 581 Top Horizontal to both posts with three 8 x 3 Wood Screws per post fig 2 2 and 2 3 E There will be...

Страница 14: ...Part 1 Hardware A On each Post Panel Assembly install one Room L Mount flush to the inside bottom of 528 Panel Post with one 10 x 1 1 4 Pan Screw fig 3 1 and 3 2 Fig 3 1 8 x 10 x 1 1 4 Pan Screw Room...

Страница 15: ...it then attach 527 Corner Panel Posts to 190 Corner Posts with two 8 x 2 1 2 Wood Screws per Corner Post Assembly fig 3 3 and 3 4 E Repeat Steps B D to create four Corner Post Assemblies Repeat for 3...

Страница 16: ...5 8 x 10 x 2 1 2 Pan Screw Room L Mount 10 x 2 1 2 Pan Screw Fig 3 6 Components 8 x Room L Mount Flush 527 Corner Panel Post 527 Corner Panel Post 528 Panel Post 190 Corner Post 190 Corner Post F Plac...

Страница 17: ...out make sure it is square then attach with three 10 x 4 Wood Screws Repeat for a fourth Beam End Assembly fig 4 2 There should be two Beam End Assemblies with 485 Beam End 10 1 2 on the cut out side...

Страница 18: ...x 489 Front Beam 38 1 x 139 7 x 1898 7 mm 1 1 2 x 5 1 2 x 74 3 4 4 x 026 Splice 34 9 x 34 9 x 1016 mm 1 3 8 x 1 3 8 x 40 1 x 499 Plaque 15 9 x 133 4 x 381 mm 5 8 x 5 1 4 x 15 Hardware Wood Parts 8 x 5...

Страница 19: ...6 1 Each shorter end should measure 8 from 190 Corner Post to 190 Corner Post and 4 6 1 2 from 528 Panel Post to 528 Panel Post fig 6 2 Each longer end should measure 12 from 190 Corner Post to 190 C...

Страница 20: ...0 1 2 faces out fig 7 1 and 7 2 B Repeat Step A for the second Corner Post Assembly on the same side 485 Beam End 10 1 2 faces out fig 7 1 and 7 2 C With a helper place one 486 Beam 57 1 2 in between...

Страница 21: ...with 1 4 lock washer 5 16 flat washer and 1 4 t nut per post fig 7 3 and 7 4 H Make sure Front Beam Assembly is level then attach to Corner Post Assemblies with six 8 x 2 1 2 Wood Screws fig 7 3 and 7...

Страница 22: ...ng a 1 8 drill bit pre drill a hole using the countersunk holes as a guide and attach with two 5 16 x 3 Lag Screws with 5 16 flat washer and four 8 x 3 Wood Screws Turn 488 Inner Beams over and repeat...

Страница 23: ...semblies to 067 Beam 20 3 4 with six 10 x 4 Wood Screws per 067 Beam 20 3 4 fig 9 1 and 9 3 C Attach each 528 Panel Post on the short and long side to 067 Beam 20 3 4 and Inner Beam Assembly with one...

Страница 24: ...sset to 486 Beam 57 1 2 with two 8 x 2 1 2 Wood Screws and to 528 Panel Post with one 8 x 3 Wood Screw Repeat for the left hand side with one 484 Arch Gusset Left fig 10 1 10 2 and 10 3 Step 10 Attach...

Страница 25: ...Top Horizontal Attach gusset to Front Beam Assembly with two 8 x 2 1 2 Wood Screws and to 528 Panel Post with one 8 x 3 Wood Screw Repeat for the left hand side with one 484 Arch Gusset Left fig 10 4...

Страница 26: ...et Right on the right hand side so the top fits tight to Inner Beam Assembly and the bottom fits tight to the side and flush to the front of 528 Panel Post and bottom of 581 Top Horizontal and other g...

Страница 27: ...s fig 11 1 and 11 2 Hardware 5 x 1 4 x 1 3 4 Hex Bolt 5 16 flat washer x 2 1 4 lock nut 20 x 1 4 x 1 3 4 Hex Bolt 1 4 lock nut 40 x Trellis Clip 1 x 490 Short Trellis A 34 9 x 133 4 x 857 2 mm 1 3 8 x...

Страница 28: ...ips with 1 4 x 1 3 4 Hex Bolt with one 1 4 lock nut fig 11 3 11 4 and 11 5 E Each Trellis Assembly will be placed in the order and staggered when attaching to the Pergola as shown in fig 11 3 495 Shor...

Страница 29: ...ellis Clips with one 10 x 1 1 4 Pan Screw per clip fig 11 6 and 11 7 Hardware 8 x 10 x 1 1 4 Pan Screw Hardware 72 S12 10 x 1 1 4 Pan Screw Trellis Clip Trellis Clip 10 x 1 1 4 Pan Screw 10 x 1 1 4 Pa...

Страница 30: ...rests on 026 Splice the remaining Trellis Assemblies rest directly on the Front and Inner Beam Assemblies Hardware 64 x 10 x 1 1 4 Pan Screw PG 15 Trellis Assembly B Front Beam Assembly Trellis Clip...

Страница 31: ...498 Shelf Gusset A On one short side place one 516 Bar Gusset against 528 Panel Post so the top meaures 40 1 8 from the bottom of 528 Panel Post The longer end over hangs the outside of 528 Panel Pos...

Страница 32: ...at the top of 501 Front Back Shelf fig 13 1 C Flush to the bottom of each joist and outside of each 502 Shelf Side Joist attach one 501 Front Back Shelf with eight 8 x 1 1 2 Wood Screws There will be...

Страница 33: ...f both 498 Shelf Gussets so the front of the frame overhangs the gussets by 5 8 Attach each 502 Shelf Side Joist to each 528 Panel Post with three 8 x 2 Wood Screws per joist fig 13 2 13 3 and 13 4 St...

Страница 34: ...5 1 4 x 54 1 2 E Place two 503 Shelf Tops in between 501 Front Back Shelves so the ends are flush with the outside of each 502 Shelf Side Joist then attach to each 500 Shelf Joist and 502 Shelf Side...

Страница 35: ...two 8 x 1 1 2 Wood Screws per joist There will be a 5 8 overhang at the top of 501 Front Back Shelf The distance between joist should be 16 1 2 fig 14 1 C Place one 510 Bar Back agaist each joist so...

Страница 36: ...5 8 Attach each 512 Side Joist to each 528 Panel Post with three 8 x 2 Wood Screws per joist fig 14 2 and 14 3 11 8 X 2 W S sets tice Bar overhangs 5 8 in front of RDWARE tach Bar Frame 5 8 8 x 2 Woo...

Страница 37: ...509 End Joist to 579 Rail T B with three 8 x 2 1 2 Wood Screws Repeat for the other end of 510 Bar Back fig 14 4 and 14 5 F Attach 510 Bar Back to both 509 End Joists with two 8 x 1 1 2 Wood Screws pe...

Страница 38: ...Joist with two 8 x 3 Wood Screws per gusset fig 14 6 and 14 7 H Attach both 516 Bar Gussets to each 512 Side Joist with two 8 x 3 Wood Screws per gusset fig 14 6 and 14 7 516 Bar Gusset Fig 14 6 Fig...

Страница 39: ...and 501 Front Back Shelf so the tops are flush and are tight Attach 583 Bar Right to 190 Corner Post with two 8 x 1 1 2 Wood Screws and to 512 Side Joist with two 8 x 2 1 2 Wood Screws fig 14 8 and 1...

Страница 40: ...510 Bar Back Attach each board to joists with twelve 8 x 1 1 2 Wood Screws per board fig 14 10 and 14 11 514 Mid Bar Top Fig 14 11 Fig 14 10 Step 14 Bar Assembly Bar Frame Part 6 515 Short Bar Top 8 x...

Страница 41: ...s fig 15 1 15 2 15 3 and 15 4 Step 15 Attach Canopy Part 1 PG 26 Charleston Canopy Components 1 x Charleston Canopy with hardware Fig 15 1 Fig 15 2 Trellis Assembly A Trellis Assembly A Male Snap Fema...

Страница 42: ...female snaps as a guide mark location then install the male snaps along both Beam End Assemblies and 486 Beam 57 1 2 Connect male and female snaps On the other short side repeat this step fig 15 6 an...

Страница 43: ...ation on your Pergola with two 10 x 1 1 4 Pan Screws This provides warnings concerning safety and important contact information A tracking number is provided to allow you to get critical information o...

Страница 44: ...44 support borrowedspaces com NOTES...

Страница 45: ...45 support borrowedspaces com NOTES...

Страница 46: ...mbre del Modelo Nom du mod le Model Number from front cover N mero de Modelo de la portada No du mod le page de couverture Comments Comentarios Commentaires Mail To Enviar por Correo a Envoyer par cou...

Отзывы: