EN
WWW.BORMANNTOOLS.COM
3
Technical Data
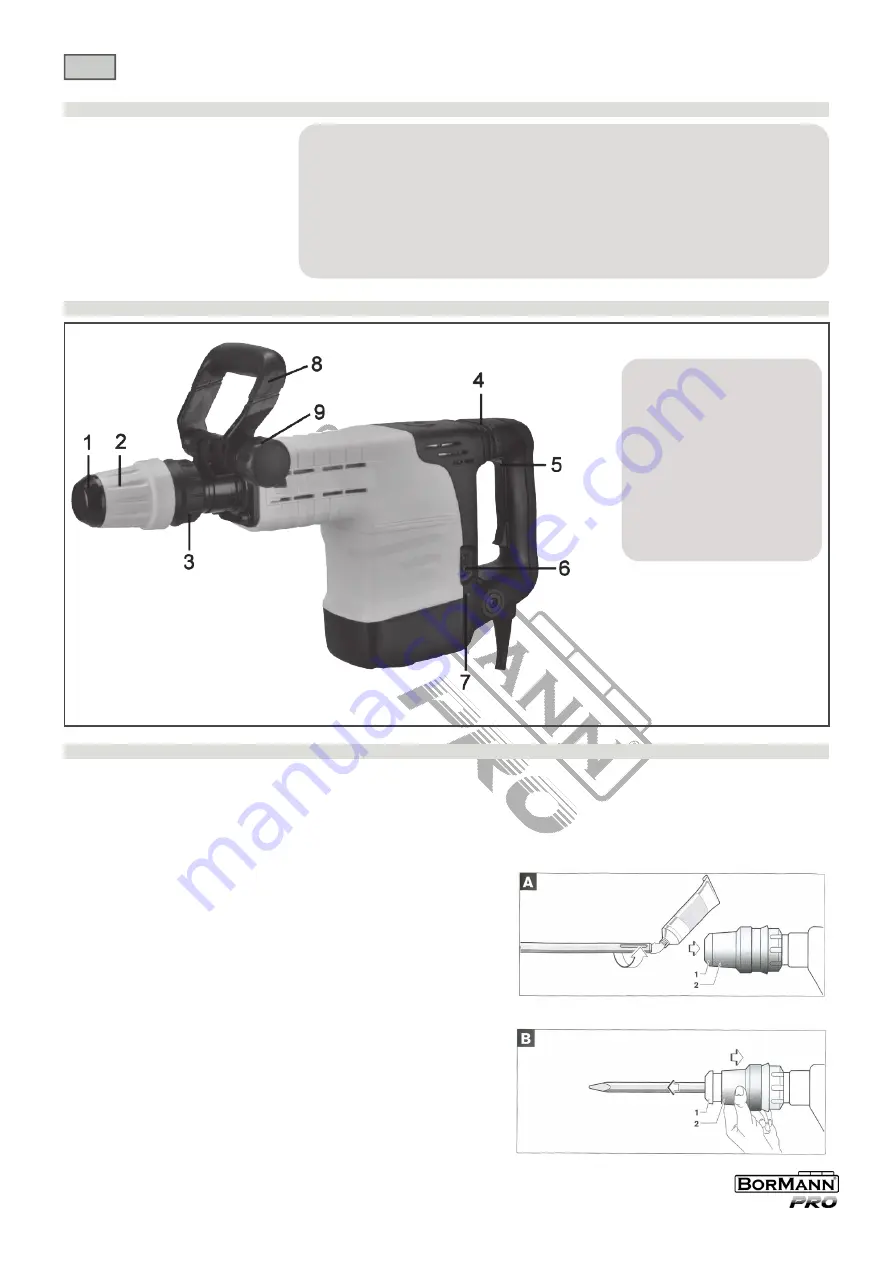
Description of main parts
Assembly instructions
● Power: 1500W
● Impact Rate: 25 Joule
● HEX type: SDS max
● Weight: 10Kg
* The manufacturer reserves the right to make minor changes to product design and technical specifications without prior notice unless these
changes significantly affect the performance and safety of the products. The parts described / illustrated in the pages of the manual that you
hold in your hands may also concern other models of the manufacturer's product line with similar features and may not be included in the
product you just acquired.
* Please note that our equipment has not been designed for use in commercial, trade or industrial applications. Our warranty will be voided
if the machine is used in commercial, trade or industrial businesses or for equivalent purposes.
* To ensure the safety and reliability of the product and the warranty validity, all repair, inspection, repair or replacement work, including
maintenance and special adjustments, must only be carried out by technicians of the authorized service department of the manufacturer.
1. Hammer rod protector
2. Protective lining
3. Limited ring
4. Shock Absorption Jacket
5. Switch
6. Speed Adjuster Function Knob
7. Indicator
8. Side Handle
9. Function Knob
Auxiliary handle
Operate your power tool only with the Side Handle8.
The Side Handle 8 can be set to any position for a secure and low-fatigue working posture.
Loosen the Function Knob 9, rotate the Side Handle 8 around the axis of the power tool to the required position and tighten the Function Knob 9 again.
The Side Handle 8 can be mounted to a different position. For this, completely unscrew the Function Knob 9 and then pull out the hexagon bolt upward. Pull off
the Side Handle 8 to the side and turn around the remaining clamping element by 1800. Mount the Side Handle 8 in reverse order.
Changing the tool
Before any work on the power tool itself, pull the mains plug.
With the SDS-max tool holder. Simpler and easier tool changing is possible without addi-
tional aids.
The Hammer rod protector 1 largely prevents the entry of drilling dust into the tool holder
during operation. When inserting the tool, take care that the Hammer rod protector 1 is
not damaged.
A damaged Hammer rod protector should be changed immediately. We recommend having
this carried out by an after-sales service.
Inserting (see figure A)
Clean and lightly grease the shank end of the tool.
Insert the tool in a twisting manner into the tool holder until it latches itself.
Check the latching by pulling the tool.
Removing (see figure B)
Push back the Protective lining2 and remove the tool.
CAUTION: The insert tool may become hot during Use. There is a risk of burning the hands.
Wear Protective gloves when changing insert
Содержание 035251
Страница 1: ...Art Nr WWW BORMANNTOOLS COM en el BDH3300 v2 1 035251...
Страница 5: ...WWW BORMANNTOOLS COM 5 EL RCD ON OFF...
Страница 8: ...WWW BORMANNTOOLS COM 8 EL 6 Vario lock 12 3 3 1 2 3 4 7 7 8 5 6 Bormann Bormann...
Страница 9: ......


