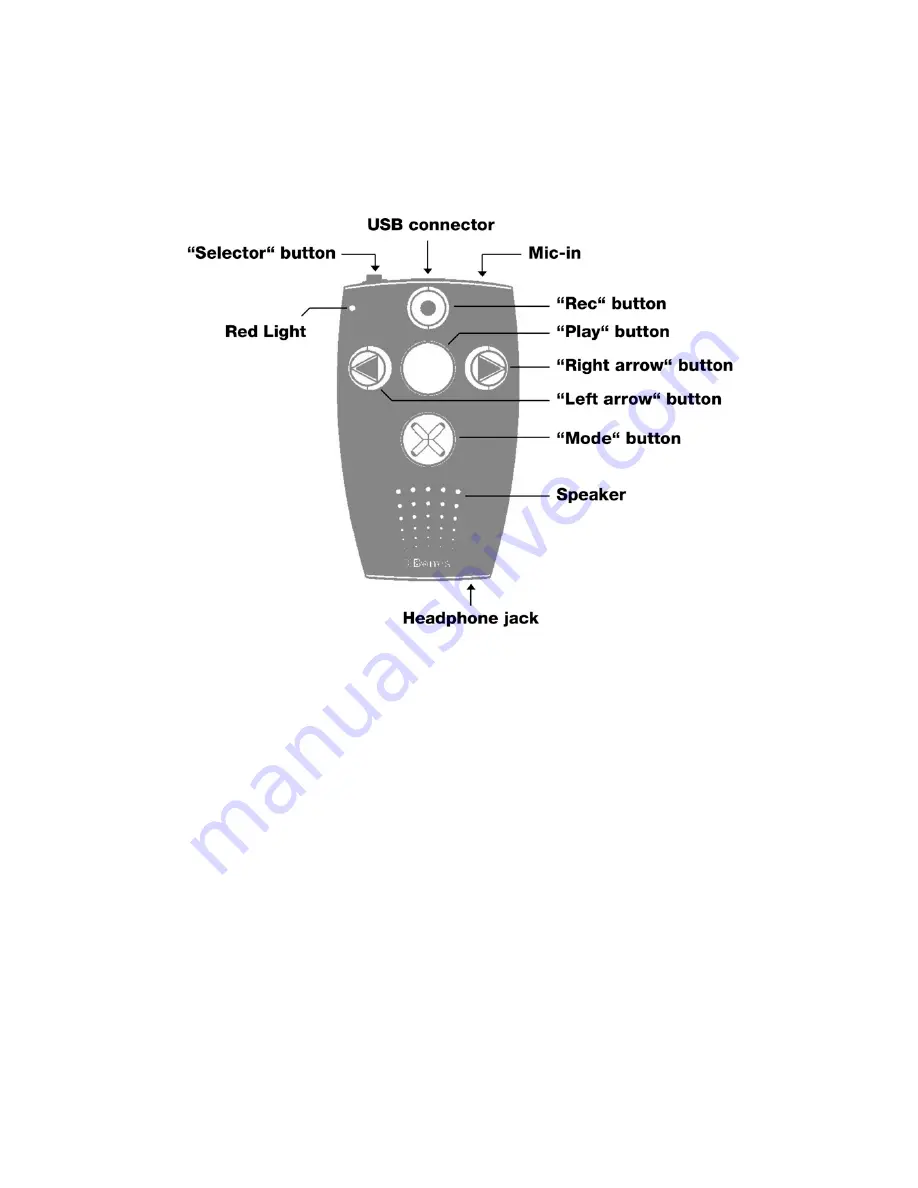
1. Milestone 212 layout description
This chapter explains Milestone
ʼ
s push buttons, connectors and other tactile parts.
1.1. Visual layout
1.2. Written layout description
1.2.1. Get to know the operator surface
On the operator surface you can discover 5 push buttons. There is a big button in the
center and 4 buttons around it arranged in the shape of a cross. The one in the middle can
not only be identified by its size and central positioning, furthermore it is the only one
which has a clean surface, so it has no integrated sign. The name of this central button is
“Play”. Now we go to the other buttons around the “Play” button. Therefore glide down with
your fingers. The next push button is as big as “Play” but has an integrated X-sign you can
feel. This one is the “Mode” button. It is the lowest one. If you slide down again with your
fingers, you reach the round vents of the speaker. But let us stay with the buttons. The
remaining three are smaller. If you go from the central “Play” button to the left, you reach
the “Left arrow” button. You recognize it by its arrowhead, which faces to the left. The “Left
arrow” has an opponent, which is located across from it. So when you go to the right,
starting from the “Play” button, you reach the “Right arrow” button. This one has also an
arrow but it is directed to the right. Finally there is only one push button left on the operator
surface. When you slide up from the “Play” button, you will reach the “Rec” button. This is
the highest of these 5 buttons and it has a round indentation in the centre. The four
buttons around “Play” you often use like a directional pad. So with the “Right arrow” you
navigate to the right. With the top “Rec” button you go up. “Right arrow” is used to go to
the right and accordingly the lowest “Mode” button is used to go down.
1
/15
Содержание Milestone 212
Страница 1: ...Milestone 212 Manual www bones ch 3 46...


