background image

29 


Operation Using the Infrared Remote Controller 


Pan/Tilt and Zoom Operation 


Panning and Tilting 

1.


Press the POWER switch. 

The camera will turn on and perform the pan/tilt reset operation 
automatically.  
2.


Press the arrow button to pan or tilt the camera. 

While checking the picture on the screen, press the desired arrow 
button. 

To move the camera in short increments, 

press the button just for 

a moment. 

To move the camera in long increments, 

press and hold the 

button. 

To move the camera diagonally, 

press the “

←, →” 

button while 

holding down the “

↑, ↓” 

button. 


Restore to starting position 

Press the HOME button. 


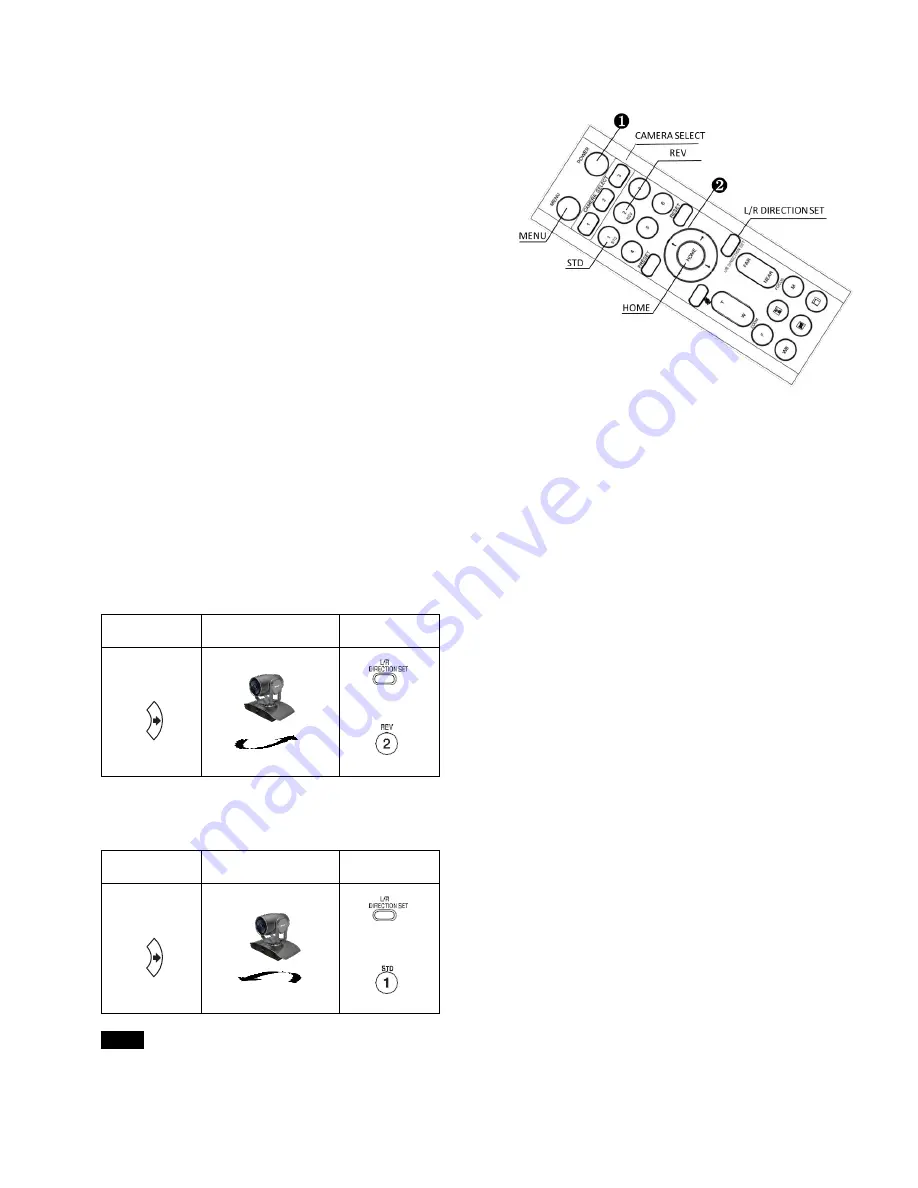
If the camera moves in a different direction from the one that you intended 

The camera is preset so that the image output from the camera is rotated toward the right whenever you press 
the 

←, →” button. 


To face the camera toward the opposite direction 

You might wish to face the camera toward the opposite direction from that of the button you pressed, for example, when 
you change the direction of the camera while checking the picture on the screen. In such a case, press the 2 (REV) button 
while holding down the L/R DIRECTION SET button. 
 

Arrow button


Movement of the 

camera


Setting


While holding 
down 


Press 


To reset the setting 

To reset the setting, press the 1 (STD) button while holding down the L/R DIRECTION SET button. 
 

Arrow button


Movement of the 

camera


Setting


While holding 
down 


Press 


  Note 


The above setting only changes the signal emitted from the infrared remote controller, and does not change the setting of 
the camera itself. Therefore, repeat the setting for each infrared remote controller if you are using more than one infrared 
remote controller. 


Содержание VCC-7HD30S-3SMN

Страница 1: ...1 7 Series HD SDI IP Dual Output PTZ Camera USER MANUAL VERSION VCC 7HD M 12222018 VCC 7HD20S 3SMN VCC 7HD30S 3SMN 2018 Bolin Technology ...

Страница 2: ... CONNECTION 17 HOW TO MAKE THE CONNECTION WITH BOLIN PRODUCTS 18 VISCA OVER IP CONTROL 19 VISCA OVER IP NETWORK CONFIGURATION 19 DIP SWITCH SETTINGS 20 ADJUSTING AND SETTING WITH MENUS 22 EXPOSURE MENU 23 WHITE BALANCE MENU 24 PICTURE1 MENU 25 PICTURE2 26 PAN TILT ZOOM MENU 26 SYSTEM MENU 27 UPGRADING MCU FIRMWARE 28 OPERATION USING THE INFRARED REMOTE CONTROLLER 29 PAN TILT AND ZOOM OPERATION 29 ...

Страница 3: ...LIO LICENSE FOR THE PERSONAL AND NON COMMERCIAL USE OF A CONSUMER TO I ENCODE VIDEO IN COMPLIANCE WITH THE AVC STANDARD AVC VIDEO AND OR II DECODE AVC VIDEO THAT WAS ENCODED BY A CONSUMER ENGAGED IN A PERSONAL AND NON COMMERCIAL ACTIVITY AND OR WAS OBTAINED FROM A VIDEO PROVIDER LICENSED TO PROVIDE AVC VIDEO NO LICENSE IS GRANTED OR SHALL BE IMPLIED FOR ANY OTHER USE ADDITIONAL INFORMATION MAY BE ...

Страница 4: ... informationabout the use of product Safety Information WARNING Installation and removal of the unit and its accessories must be carried out by qualified personnel You must read all of the Safety Instructions supplied with your equipment before installation andoperation Warnings If the product does not work properly please contact your dealer Never attempt to disassemble the camera yourself We wil...

Страница 5: ...ency energy and if not installed and used in accordance with the instruction manual may cause harmful interference to radio communications Operation of this equipment in a residential area is likely to cause harmful interference in which case the user will be required to correct the interference at his own expense This product complies with Part 15 of the FCC Rules Operation is subject to the foll...

Страница 6: ...6 WHAT S IN THE BOX Note The camera color may be in white or black per the item that is purchased Accessories Optional ...

Страница 7: ...unting with E Flip function Control supports RS 232 control RS 422 485 control VISCA over IP IP Onvif CGI IP control software IR Remote Controller Presets store camera directions and image parameters Up to 6 presets on remote controller or 128 presets via protocol programming Image parameter setting restore with presets and quick access operation IP Protocol RTSP RTMP for online video streaming Lo...

Страница 8: ...lector Camera ID for IR remote controller 7 Micro SD Card Port 8 IP Network RJ45 Port For VISCA over IP control and IP video streaming with POE IEEE802 3at 9 Audio Output Input 10 HDMI Port HDMI 1 4 11 CVBS Video Output 12 3G SDI Video Output 13 IR Remote Controller Sensors These are sensors to receive commands from infrared remote controller 14 Power LED Indicator Turns green when the camera is c...

Страница 9: ...ection control HOME Home position Resolution reset 5 L R Direction Set Left and right orientation setting 6 ZOOM FOCUS Far Near 7 Auto Manual Focus 8 Back Light 9 Video Format Switching You can change the video format by keep pressing the button When video format is changed the camera would restart and the screen turns black for few seconds 10 MENU On screen menu display ON OFF 11 Audio Switch You...

Страница 10: ...dget to power the camera or some features may not function properly Cable Requirements Network Cable 10 100 Mbps Ethernet CAT 5 5E 6 UTP cables are applicable to the ANSI EIA TIA 568A B and ISO D Eight wires in the network cable need to be inserted in parallel into the top of the cable connector The cable connector needs to be crimped in position When the cable connector is in position ensure that...

Страница 11: ...eo output with HDMI video output 1 Connect SDI cable in between the camera your SDI Device display 2 You now have SDI video output 3 SDI video only supports 1080P IP Video Signal The camera can simultaneously stream IP video output and SDI video output and HDMI video output 1 Connect the camera to the network using Cat5 Cat6 network cable 2 You need to have a web browser or VMS client software rea...

Страница 12: ...g Ensure that the Micro SD card s pins are faced downward logo faced up Slide the card into the slot and click into place To remove the card click inward and it will pop outward and may be removed See Manual part 2 for more information regarding SD recording Currently the following Micro SD cards are supported Brand Size Format Type Class Transfer Bus Kingston 16GB exFAT SDHC 10 IU1 Kingston 32GB ...

Страница 13: ...ontrol keyboard control PC station to operate the camera To perform pan tilt and zoom operations using the joystick of the control keyboard and to perform the Preset operation using the control buttons An application software that supports this unit is needed if you use PC station RS232 Connection 1 Set RS232 control method on Bottom Dip Switch 2 Set Baud Rate on Bottom Dip Switch to the same as B...

Страница 14: ...5 to RS232 8 pin Mini Din adaptor to make RS232 connection for your control device 10 Use extension cables included RJ45 to RS422 232 Phoenix terminal contact adaptor to make RS232 connection for your control device 11 Or you can use CAT5 6 network cable to make RS232 connection by following the pin definition below ...

Страница 15: ...ation RS422 VISCA connection 1 Set RS422 control method on Bottom Dip Switch 2 Set Baud Rate on Bottom Dip Switch to the same as Baud Rate setting on the keyboard you are using 3 Set specific camera address that you want to control the camera for on Bottom Dip Switch 4 If you want to have the camera address to be automatically assigned by VISCA controller set camera Dip Switch address to 0 5 Reboo...

Страница 16: ...n multiple cameras connection with Non Sony controller as below VISCA Non Sony Keyboard RS422 Connection 11 Use extension cables RJ45 to RS422 Phoenix connecter adaptor included to make RS422 connection for your control device 12 Or you can use CAT5 6 T 568B Standard Ethernet cable direct connect between the camera and the controller to make RS422 connection by following the pin definition below ...

Страница 17: ...on OSD menu by remote controller Reboot the camera by turning it Off On after the Bottom Dip Switch has been set up correctly Use PELCO P D compatible keyboard Use preset 95 on the keyboard to bring up exit camera OSD menu Use joystick and Button OPEN or CLOSE to navigate OSD menu To operate keyboard please refer to the user manual of the keyboard you are using PELCO RS485 Connection Use extension...

Страница 18: ...the joystick controller You cannot use the RS 232 connections while you are using the RS422 485 connection Operating Multiple Cameras Using RS 232 422 485 Using RS 232 VISCA you can connect to 7 cameras Using RS 422 VISCA you can connect to 7 cameras Using RS 485 PELCO you can connect to 255 cameras Using RS 485 PELCO all camera addresses must be set up before the connection You can set the camera...

Страница 19: ...on appropriately to communicate on your network Connect the VISCA over IP compatible controller to the network Configure the controller to access the camera s IP address and VISCA over IP port The IP port within on your control must be set to 52381 to communicate with the camera Select VISCA protocol on your IP control device Recommended way to re assign the IP address 1 Create a local network wit...

Страница 20: ...n camera OSD menu as well The camera takes either the way of OSD menu setting or the way of bottom DIP switch setting They override each other After the camera is turned on the camera takes the last setting before it is turned on either set through the OSD or bottom DIP switch The Bottom DIP Switch Settings Bit 1 3 Camera Address setting for VISCA protocol Bit 4 Video Output Video Color Space Bit ...

Страница 21: ...mera to 1 2 or 3 which is the camera ID number that you want to operate on the Remote Controller Numbers Letters Video Resolution 0 1080i59 94 1 1080P29 97 2 720P59 94 3 1080P59 94 4 1080P50 5 1080I60 6 1080P30 7 1080P60 8 1080I50 9 1080P25 A 720P50 B 1080P50 C 720P25 D 720P30 E 720P60 F ...

Страница 22: ...d remote controller Setting Menus The setting menu selected on the main menu is displayed 1 Setting Menu The name of the setting menu currently selected is displayed here 2 Selected Item Selects a setting item The selected item is shown by thecursor Move the cursor up or down by pressing the button on the infrared remote controller 3 SettingItems The setting items for this setting menu are display...

Страница 23: ...ith a strong gain up to 10 the captured image will contain a lot of noise SPEED Select the electronic shutter speed from the following When video format is set to 720P25 1080P50 1080i50 1080P25 720P50 Speed can be selected from the following 1 1 1 2 1 3 1 6 1 12 1 25 1 50 1 75 1 100 1 120 1 150 1 215 1 300 1 425 1 600 1 1000 1 1250 1 1750 1 2500 1 3500 1 6000 1 10K When video format is set to 720P...

Страница 24: ...er value using the color temperature radiating from a black subject based on a range of values from 2500K to 7500K This mode is the initial setting INDOOR 3200K Base Mode OUTDOOR 5800K Base Mode OPW One Push White Balance The One Push White Balance mode is a fixed white balance mode that may be automatically readjusted only at the request of the user One Push Trigger assuming that a white subject ...

Страница 25: ...g Set to OFF is upright mode set to ON is for ceiling mount MIRROR You can have the image as seen in a mirror with the right side as though it were the left DE FLICKER You can turn it ON if the Video output format frame rate is difference from your country s electricity Frequency WDR Wide dynamic range mode WDR feature is available on certain product models Wide Dynamic ON OFF The camera distingui...

Страница 26: ...side reducing the blur GAMMA In this mode the gamma can be set to value from 0 to 1 PAN TILT ZOOM Menu The PAN TILT ZOOM menu is used to select the pan tilt zoom mode DIGITAL ZOOM Set to DIGITAL ZOOM ON 12X digital zoom is activated You can set digital zoom to ON or OFF When set to OFF digital zoom does not operate and only optical zoom is available When set to ON digital zoom takes over after opt...

Страница 27: ...tting by pressing HOME button to confirm the action All data of the camera that have been set will be deleted RELOAD PRESET 1 When this item is set to ON preset 1 is set to Home position The camera goes to Home position when it is powered on or reset AUTO FOCUS Set speed of auto focusing from Low to Normal VIDEO FORMAT You can change the video format by adjusting this item Select the item press bu...

Страница 28: ...lens will turn red for a few seconds while the upgrade takes place Once the upgrade is finished the light will turn green and the camera will proceed through a normal boot cycle Check the data on the OSD boot screen NOTE The firmware upgrade process is intended to be performed under the supervision of a BOLIN Authorized repair technician For assistance with this please contact your authorized BOLI...

Страница 29: ... the camera is rotated toward the right whenever you press the button To face the camera toward the opposite direction You might wish to face the camera toward the opposite direction from that of the button you pressed for example when you change the direction of the camera while checking the picture on the screen In such a case press the 2 REV button while holding down the L R DIRECTION SET butto...

Страница 30: ...te controller that corresponds to the number set in step Then you can operate the camera s specified by number Every time you operate the camera s using the infrared remote controller the CAMERA SELECT button pressed in step 2 lights Adjusting the Camera Focusing on a Subject Focusing the camera on a subject automatically Press the AUTO button The camera focuses on the subject at the center of the...

Страница 31: ...WhileholdingdownthePRESET button press anyof the POSITION buttons 1 to 6 in which you want to store the settings Recalling the stored settings Press any of the POSITION buttons 1 to 6 in which you have stored the settings Cancelling the preset memory While holding down the RESET button press the POSITION button from which you want to cancel the settings Notes When the power is turned on the camera...

Страница 32: ...0 F3 4 F2 8 F2 4 F2 0 F1 6 HIGH SENSITIVITY OFF ON IRIS IRIS PRI IRIS CLOSE F14 F11 F9 6 F8 0 F6 8 F5 6 F4 8 F4 0 F3 4 F2 8 F2 4 F2 0 F1 6 GAIN LIMIT 10 7dB 14 3dB 17 8dB 21 4dB 25dB 28 6dB 32 1dB 35 7dB 39 3dB 42 8dB 46 4dB 50dB SHUTTER PRI SPEED 1 1 1 2 1 4 1 8 1 15 1 30 1 60 1 90 1 100 1 125 1 180 1 250 1 350 1 500 1 725 1 1000 1 1500 1 2000 1 3000 1 4000 1 6000 1 10K sec GAIN LIMIT 10 7dB 14 3...

Страница 33: ... 1 6m 2 0m 2 5m 3 1m 4 2m 6m 10m 20m ADAPTIVE PT OFF ON P Z SPEED 0 5 PRESET SPEED 0 5 PAN DIR NORMAL INVERT TILT DIR NORMAL INVERT SYSTEM PELCO ID 001 255 IR RECEIVE OFF ON DISPLAY INFO OFF ON PRESET MEMORY OFF ON FACTORY RESET RELOAD PRESET 1 OFF ON VIDEO FMT 1080p 60 59 94 50 30 29 97 25 1080i 60 59 94 50 720p 60 59 94 50 30 25 SV V0B1100S36040AD04 ...

Страница 34: ...34 www bolintechnology com 2082 TECHNOLOGY LLC dba BOLIN TECHNOLOGY ...

Отзывы: