background image

TOOLS REQUIRED FOR THE

 INSTALLATION

ITEM

DESCRIPTION

QTY

1

KIOSK QX7

1

2

BACK MOUNT FRAME

1

3

POWER DRILL

1

4

1/4” BIT

1

5

HAMMER

1

6

CONCRETE DROP-IN ANCHORS (FEMALE) 

12

7

HEX BOLTS 1/4” X 3/4

12

8

7/16” WRENCH

1

SUPPORT FRAME 

PAGE 2 OF 21

Содержание Inmate QX7

Страница 1: ...QX7 Inmate Mounting Instructions VER 4 January 25 2006...

Страница 2: ...THE INSTALLATION ITEM DESCRIPTION QTY 1 KIOSK QX7 1 2 BACK MOUNT FRAME 1 3 POWER DRILL 1 4 1 4 BIT 1 5 HAMMER 1 6 CONCRETE DROP IN ANCHORS FEMALE 12 7 HEX BOLTS 1 4 X 3 4 12 8 7 16 WRENCH 1 SUPPORT F...

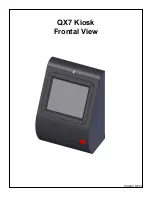
Страница 3: ...QX7 Kiosk Frontal View PAGE 3 OF 21...

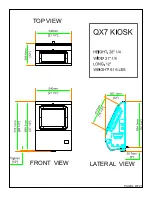
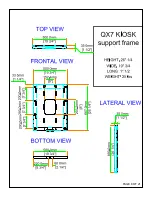
Страница 4: ...TOP VIEW FRONT VIEW LATERAL VIEW PAGE 4 OF 21...

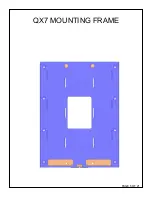
Страница 5: ...QX7 MOUNTING FRAME PAGE 5 OF 21...

Страница 6: ...PAGE 6 OF 21...

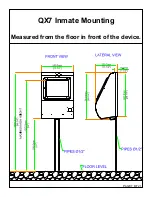
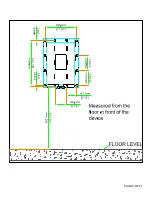
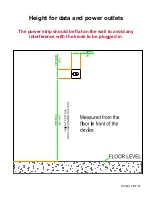
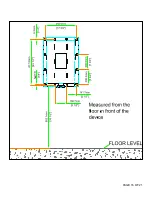
Страница 7: ...QX7 Inmate Mounting Measured from the oor in front of the device PAGE 7 OF 21...

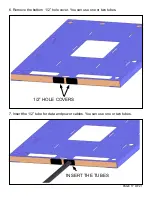
Страница 8: ...PAGE 8 OF 21...

Страница 9: ...ALLATION SPECIFICATIONS VPN ACCESS HUB ETHERNET OR DSL CONNECTION QX7 CONVENTIONS SURFACE RACEWAY SURFACE JUNCTION BOX POWER DOUBLE OUTLET UTP CATEGORY 5 REGULATED DOUBLE STRAIGHT BLADE RECEPTACLE 15...

Страница 10: ...Height for data and power outlets The power strip should be at on the wall to avoid any interference with the kiosk to be plugged in PAGE 10 OF 21...

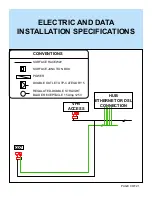
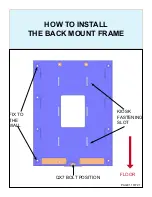
Страница 11: ...HOW TO INSTALL THE BACK MOUNT FRAME PAGE 11 OF 21 FIX TO THE WALL KIOSK FASTENING SLOT QX7 BOLT POSITION FLOOR...

Страница 12: ...the tubes through 1 Locate the holes to insert the electrical and data tubes through either the ceil ing or the oor depending where the cables come out from PAGE 12 OF 21 REFERENCE POINT 2 Find the r...

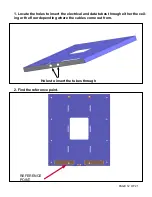
Страница 13: ...PAGE 13 OF 21 REFERENCE POINT...

Страница 14: ...it with a 1 4 bit In stall the anchor drop it into a pre drilled hole and then expand it using a setting tool REFERENCE POINT Concrete Drop In Anchors are female anchors designed for use in concrete...

Страница 15: ...tool for the anchor expand anchor by inserting the set ting tool into the anchor and set with several solid hammer blows The anchor is set properly when shoulder of setting tool is ushed with the top...

Страница 16: ...PAGE 16 OF 21...

Страница 17: ...6 Remove the bottom 1 2 hole cover You can use one or two tubes PAGE 17 OF 21 1 2 HOLE COVERS 7 Insert the 1 2 tube for data and power cables You can use one or two tubes INSERT THE TUBES...

Страница 18: ...8 When the nails are tted on the back mount frame push down on the QX7 kiosk PAGE 18 OF 21...

Страница 19: ...PAGE 19 OF 21...

Страница 20: ...POWER AND DATA OUTLETS LATERAL VIEW QX7 BACK MOUNT PLATE QX7 BOTTOM VIEW 10 Place the bolt in its locked position 9 Connect the data and power cable BOLT PAGE 20 OF 21...

Страница 21: ...PAGE 17 OF 21 11 Lock the kiosk with the padlock 12 Close the lock PAGE 21 OF 21...

Отзывы: