bObsweep WP260011 Скачать руководство пользователя страница 96

IMPORTANT - READ BEFORE USING. Do not use the robot (“Bobsweep”) accompanying this license agreement (“Agreement”) until you have carefully 

read and agreed to the following terms and conditions.

By using the Bobsweep, you agree to the terms of this End User License Agreement (“EULA”) and any amendment or addenda accompanying this 

Agreement. If you do not agree to the terms of this EULA, you may not use the Bobsweep. The Bobsweep contains an electronic and software interface 

that allows you to control or modify its behavior, and remotely monitor its sensors.

THIS IS A LEGAL AGREEMENT. BY ACCESSING AND USING THE PRODUCT AND PRODUCT SOFTWARE, YOU ARE ACCEPTING AND AGREEING 

TO THIS EULA ON BEHALF OF YOURSELF OR THE ENTITY YOU REPRESENT IN CONNECTION WITH THE ACCESS. YOU REPRESENT AND WAR-

RANT THAT YOU HAVE THE RIGHT, AUTHORITY, AND CAPACITY TO ACCEPT AND AGREE TO THIS EULA ON BEHALF OF YOURSELF OR THE 

ENTITY YOU REPRESENT. YOU REPRESENT THAT YOU ARE OF SUFFICIENT LEGAL AGE IN YOURJURISDICTION OR RESIDENCE TO USE OR 

ACCESS THE PRODUCT SOFTWARE AND TO ENTER INTO THIS EULA. IF YOU DO NOT AGREE WITH ANY OF THE PROVISIONS OF THESE TERMS, 

YOU SHOULD CEASE USING THE PRODUCT AND PRODUCT SOFTWARE. Terms and Conditions

LICENSE: Subject to all of the terms of this Agreement, Bobsweep Inc. (“Bobsweep”) grants to you one (1) revocable, royalty-free, personal, non- exclu-

sive, nontransferable, non-assignable, non-commercial intellectual property license to use the Bobsweep software contained on the Bobsweep, including 

the protocol for communicating with the Bobsweep software contained on the Bobsweep (“Bobsweep Software”), to use the Bobsweep.

NONCOMMERCIAL LICENSE: You may use the Bobsweep Software and the Bobsweep only for personal, noncommercial, educational, and research 

purposes. The Bobsweep Software and the Bobsweep may not be used for any other purpose, whether “for prot” or “not for prot.” Any work performed 

or produced using the Bobsweep, including Your Software, cannot be performed or produced for the benet of other parties for a fee, compensation, or 

any other reimbursement or remuneration. A separate license is required for each additional use and/or individual user in all other cases. If you are an 

entity, Bobsweep grants you the right to designate one individual within your organization to have the sole right to use the Bobsweep Software and the 

Bobsweep in the manner provided above. RESTRICTIONS: You agree not to: (i) use or copy the Bobsweep Software or the Bobsweep except as provid-

ed in this Agreement; (ii) rent or lease the Bobsweep Software or the Bobsweep to any third party; (iii) assign this Agreement or transfer the Bobsweep 

Software or the Bobsweep except as provided in this Agreement; (iv) modify, adapt, or translate the Bobsweep Software or the Bobsweep in whole or in 

part except as expressly provided in this Agreement; (v) reverse engineer, reverse compile, or disassemble the Bobsweep Software or the Bobsweep; or 

(vi) distribute, sublicense or transfer the source code form of Your Software and derivatives thereof to any third party except as provided in this Agreement. 

YOUR SOFTWARE : Use and distribution of any software that you create for your Bobsweep (“Your Software”) is also subject to the following limitations: 

You (i) shall be solely responsible for any update or support obligation or other liability which may arise from your use or distribution, (ii) shall not make 

any statement that Your Software is “certied,” or that its performance is guaranteed, by Bobsweep, (iii) shall not use Bobsweep’s name or trademarks, 

(iv) shall prohibit disassembly and reverse engineering of the Bobsweep Software and the Bobsweep, (v) shall not publish reviews of Bobsweep products 

designated as beta without written permission from Bobsweep, and (vi) shall indemnify, hold harmless, and defend Bobsweep and its suppliers from and 

against any claims or lawsuits, including attorney’s fees, that arise or result from Your Software, including your use and your distribution. TITLE: Title to 

the Bobsweep Software remains with Bobsweep or its suppliers. The Bobsweep Software is licensed, not sold. Except as expressly provided herein, 

Bobsweep does not grant any express or implied right to you under Bobsweep patents, copyrights, trademarks, or trade secret information. You will 

not remove any copyright or patent notice from the Bobsweep Software or the Bobsweep. ONE-TIME TRANSFER: The initial user of the Bobsweep 

Software and the Bobsweep may make a one-time permanent transfer of this Agreement, the Bobsweep Software, and the Bobsweep to another end 

user, provided that the initial user retains no copies of the Bobsweep Software and the Bobsweep. This transfer must include the Bobsweep Software, 

the Bobsweep, and all of the materials accompanying the Bobsweep (including all component parts and printed materials, any upgrades, and this End 

User License Agreement document). The transfer may not be an indirect transfer, such as a consignment. Prior to the transfer, the end user receiving 

the Bobsweep Software and the Bobsweep must agree to all the terms of this Agreement. NO WARRANTY AND LIMITED REPLACEMENT: EXCEPT AS 

STATED IN THE LIMITED WARRANTY TO THE ORIGINAL PURCHASER, THE BOBSWEEP SOFTWARE AND THE BOBSWEEP ARE PROVIDED “AS 

IS” WITH NO WARRANTIES, EXPRESS OR IMPLIED, INCLUDING BUT NOT LIMITED TO ANY IMPLIED WARRANTY OF MERCHANTABILITY, FITNESS 

FOR A PARTICULAR PURPOSE, NON-INFRINGEMENT OF INTELLECTUALPROPERTY RIGHTS, OR ANY WARRANTY OTHERWISE ARISING OUT 

OF ANY PROPOSAL, SPECIFICATION, OR SAMPLE. NO ORAL OR WRITTEN INFORMATION OR ADVICE GIVEN BY BOBSWEEP OR ITS AGENTS 

SHALL CREATE A WARRANTY. If the Bobsweep Software or the Bobsweep is found to be defective in material or workmanship under normal use for a 

period of one (1) year from the date of receipt, Bobsweep’s entire liability and your exclusive remedy shall be the replacement of the Bobsweep Software 

or the Bobsweep.

This offer is void if the defect results from accident, abuse, misapplication, or software that you developed for your Bobsweep. Any updates or supple-

ments to the Bobsweep Software or the Bobsweep provided to you after the expiration of the one (1) year period are not covered by 

Содержание WP260011

Страница 1: ...OWNER S MANUAL How to employ your intelligent floor cleaner bObsweep PetHair Model WP260011...

Страница 2: ...aner Bob is now at your service To see Bob at his best please read the Quick Start Guide and this manual thoroughly Welcome to the bObsweep family and happy cleaning If you have any questions or conce...

Страница 3: ...afety Instructions Cleaning Schedule 17 36 Troubleshooting Checkup Test 64 4 Charging Box Contents Anatomy Parts Maintenance 21 45 6 Warranty FAQs 88 Senors Get Bob Ready to Clean 58 29 11 Cleaning Mo...

Страница 4: ...ing station by the cord use the cord as a handle close a door on the cord or pull the cord around sharp edges or corners Keep the cord away from heated surfaces To unplug the cord grasp the plug not t...

Страница 5: ...ipment This equipment has been tested and found to comply with the limits for a Class B digital device pursuant to part 15 of the FCC Rules These limits are designed to provide reasonable protection a...

Страница 6: ...sh 4 Charging Adapter 5 Remote Control 6 Flat Head Screwdriver 7 2 Side Brushes 1 Spare 8 Cleaning Tool 9 Pack of Screws and Blindfold Stickers 10 Mop Attachment 11 2 Microfiber Mopping Cloths 12 HEPA...

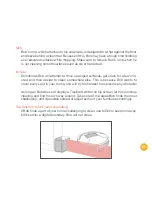
Страница 7: ...7 4 2 1 3 Top View 1 Bumper 2 Transmitter 3 Cover Buttons 4 Display Screen Anatomy...

Страница 8: ...8 R L 1 2 4 7 3 5 8 9 10 6 1 Bottom View 1 Charging Plates 2 Front Wheel 3 Side Brush 4 Main Brush 5 ON OFF Switch 6 Dustbin 7 UV Lamp 8 Battery 9 Left Wheel 10 Right Wheel...

Страница 9: ...9 1 2 1 Remote Control 2 Charging Station...

Страница 10: ...OT WALL FOLLOW DOCK MIN CLEANING CHARGING READY 5 4 3 2 1 Cover Buttons 1 UV Turn UV lamp OFF ON 2 PROGRAM Select Bob s cleaning program 3 MODE Select Bob s cleaning mode 4 CHARGE Send Bob to his char...

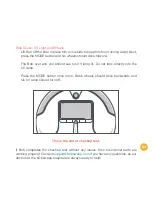
Страница 11: ...Get Bob Ready to Clean Install Bob s Side Brush 12 Charge Bob 13 Bob s First Clean 14 Standby Mode 15...

Страница 12: ...ers walls and other hard to reach places Install Bob s Side Brush You may use the additional side brush and screws as spares 1 2 Flip Bob over onto a flat surface Place the side brush over the empty s...

Страница 13: ...the charging station Place Bob on his charging station with the metal plates on his underside sit ting on top of the nodes on his station If Bob can t find his charging station on his own the station...

Страница 14: ...O SPOT WALL FOLLOW DOCK MIN CLEANING CHARGING READY Bob is now ready to clean First flip his power switch ON Then press START on his cover or AUTO on his remote and he will clean on his default settin...

Страница 15: ...harging or cleaning his screen will go blank and he will enter standby mode to preserve his battery In standby mode Bob will remain asleep You can also put Bob in and out of standby mode by pressing t...

Страница 16: ...CLEANING CHARGING READY UV DIRT TROUBLE NR CAPACITY AUTO SPOT WALL FOLLOW DOCK MIN CLEANING CHARGING READY To send Bob to his charging station To wake Bob press any button on his cover or the power b...

Страница 17: ...Remote Control Remote Control Buttons 18 Syncing Bob s Remote 20...

Страница 18: ...e requires 2 AAA batteries not included Remove the batteries if you are not using it on a regular basis Keep the remote at room temperature 1 Power 2 Auto 3 Corners 4 UV 5 Spot 6 Charge 7 Speed 8 Navi...

Страница 19: ...rget a small area by traveling in a circle Spiral Track mode Charge Sends Bob to his charging station Speed Alternates between Bob s two speeds Navigational Buttons Guide Bob forward backward left or...

Страница 20: ...re Bob is not on his charging station To sync Bob s remote Syncing Bob s Remote Flip Bob s power switch OFF While holding down the PAUSE button on Bob s remote flip Bob s power switch ON Bob will chir...

Страница 21: ...Charging Charging Station Placement 22 Auto Charging 23 Syncing Bob s Charging Station 24 Manual Charging 26 Charging Time 27 Conserving Battery 28...

Страница 22: ...harging station against a wall on a hard flat surface Make sure there is at least 10 feet 3 m of open space to the front and 2 feet 0 5 m to the sides Charging Station Placement The transmitter on Bob...

Страница 23: ...FOLLOW DOCK MIN CLEANING CHARGING READY Bob automatically returns to his charging station when his battery reaches 15 capacity You can also send him to his charging station at any time by pressing CH...

Страница 24: ...l need to sync the charging station if Bob has trouble finding it To sync the charging station Syncing Bob s Charging Station 1 2 Flip Bob s power switch OFF Plug the charging adapter into the chargin...

Страница 25: ...25 SET Su Mo Tu We Th Fr Sa CLK 1 2 3 4 While holding down the Adjust Select button on the charging station flip Bob s power switch ON Bob will chirp twice to let you know the sync was successful...

Страница 26: ...m the charging station and plug it directly into the inlet above Bob s power switch Manual Charging To charge Bob manually place him on his charging station with the metal plates on his underside sitt...

Страница 27: ...MIN CLEANING CHARGING READY UV DIRT TROUBLE NR CAPACITY AUTO SPOT WALL FOLLOW DOCK MIN CLEANING CHARGING READY As soon as his battery is full Bob will display the word READY only When Bob is charging...

Страница 28: ...days with his power switch ON If you will not be using him at least once every 5 days flip his power switch OFF and remove him from his station Conserving Bob s Battery 5 days To conserve Bob s batte...

Страница 29: ...Cleaning Modes Cleaning Modes Overview 30 Auto 1 Robot Mode 31 Auto 2 Quick Clean 32 Auto 3 Touch up 33 Spot Cleaning 34 UV Light 35...

Страница 30: ...with three automatic cleaning modes Auto 1 Robot 60 min Auto 2 Quick Clean 30 min Auto 3 Touch Up 15 min Bob will return to his charging station after every cleaning mode Choose the setting that best...

Страница 31: ...OT WALL FOLLOW DOCK MIN CLEANING CHARGING READY Auto 1 Robot This is Bob s default cleaning mode Bob will thoroughly cover a large area for about an hour To select this setting Press START on Bob s co...

Страница 32: ...Y UV DIRT TROUBLE NR CAPACITY AUTO SPOT WALL FOLLOW DOCK MIN CLEANING CHARGING READY Auto 2 Quick Clean 30 min Bob will quickly and efficiently clean a medium sized area for 30 minutes To select this...

Страница 33: ...CHARGING READY UV DIRT TROUBLE NR CAPACITY AUTO SPOT WALL FOLLOW DOCK MIN CLEANING CHARGING READY Auto 3 Touch Up 15 min Bob will dash across a small area for 15 minutes To select this setting Press...

Страница 34: ...DIRT TROUBLE NR CAPACITY AUTO SPOT WALL FOLLOW DOCK MIN CLEANING CHARGING READY Spot Cleaning Select Bob s targeted cleaning pattern Press MODE on Bob s cover until you see the word SPOT appear on hi...

Страница 35: ...is cover Bob s UV light can also be toggled on and off while Bob is cleaning Spiral Track 4 min Bob will target a 5 x 5 in 1 5 x 1 5 m spill zone by spiraling outward from the center and then re versi...

Страница 36: ...Cleaning Schedule Set Schedule on Charging Station 37 Set Current Time Day 38 Set Bob s Cleaning Schedule 41 Auto Resume 44...

Страница 37: ...start cleaning on the time and days of your choosing through his charging station There are 5 buttons on Bob s charging station 1 On Off 2 OK Cycle 3 Time 4 Schedule 5 Adjust Select Set Schedule on C...

Страница 38: ...he charging station s default time is 8 00 am The station displays 08 00 when plugged in for the first time or after being disconnected for over 8 hours To set the current time and day on Bob s chargi...

Страница 39: ...39 SET Su Mo Tu We Th Fr Sa CLK 1 2 SET Su Mo Tu We Th Fr Sa CLK 1 2 Set the hour 3 4 Press the button until the digits for hours blink Use the Adjust Select button to select the current hour...

Страница 40: ...s Su Sunday Mo Monday Tu Tuesday We Wednesday Th Thursday Fr Friday Sa Saturday Only press OK Cycle after you ve completely finished choosing your desired settings Press the button until the icon for...

Страница 41: ...ent time and day on Bob s station you can program Bob s cleaning schedule To set Bob s cleaning schedule Set the minutes Set Bob s Cleaning Schedule 1 2 Press the button The digits for minutes will bl...

Страница 42: ...Tu We Th Fr Sa CLK 1 2 SET Su Mo Tu We Th Fr Sa CLK 1 2 Set the hours 3 4 Press the button until the digits for hours blink Use the Adjust Select button to select the desired hour Move quickly on to...

Страница 43: ...hasn t finished charging Press the button until the icon for the first weekday blinks Each weekday blinks for 5 seconds and then remains solid Once solid the day is selected Use the Adjust Select but...

Страница 44: ...tion A broom icon and the word GO will light up at the bottom of the station s screen This means Bob is on auto resume and will automatically resume cleaning when his battery reaches full charge While...

Страница 45: ...Parts Maintenance Mop 46 Dustbin 48 Filters 50 Main Brush 52 Side Brush 54 Battery 56 Storing Bob 57...

Страница 46: ...g cloth with water or cleaning liquid before placing it on his mop attachment To install Bob s mop attachment Mop Press down on the mop attachment until both sides are secured Hold the mop with the pr...

Страница 47: ...when Bob is cleaning carpets or rugs To do so gently press the prongs inward and lift the attachment up Bob s microfiber mopping cloth can be washed manually or in the washing machine A spare cloth i...

Страница 48: ...48 To empty the dustbin Dustbin Push the center button on Bob s back to release the dustbin then slide the dustbin on Open the transparent gate to empty the bin 1 2...

Страница 49: ...bin Wipe the dustbin with a dry cloth or brush it with Bob s cleaning tool When done replace the transparent gate and slide the dustbin back into Bob 1 2 Never wash the dustbin nor fill it with water...

Страница 50: ...located inside the dustbin s ceiling These filters capture fine particles and allergens and prevent them from escaping the dustbin To remove the filters Filters First eject the dustbin Then pull the...

Страница 51: ...for sub micron particles 2 Electrostatic Filter for fine particles 3 Mesh Filter for larger particles Use the cleaning tool to brush dust off the filters If you are using Bob regularly it is recommend...

Страница 52: ...Bob s main brush using a flat head screwdriver Use the cleaning tool to re move debris from the ends of the brush as well as the brush compartment You may use a pair of scissors to cut away hair or t...

Страница 53: ...53 To reinstall the main brush Replace the brush cap and insert the square end of the brush into the square notch inside the brush compartment Lower the brush into place and re tighten the screw 1 2...

Страница 54: ...to sweep along corners and walls When Bob is first delivered to you his side brush is not installed To do so Use the flat head screwdriver and short screw included in Bob s box to secure the side brus...

Страница 55: ...s side brush on a weekly basis To do so Remove the side brush using a flat head screw driver Replace the side brush and re tighten the screw Use the cleaning tool to remove debris on the side brush a...

Страница 56: ...b s underside using a Phillips head screw driver Lift the battery out of its compartment and unplug the connecting wires 1 2 Do not let Bob sit idly with his power switch ON for more than 5 days switc...

Страница 57: ...od of time unplug his charging station remove his battery and store everything in a dry place at room temperature Plug the new battery in and slide it into the empty compartment Re tighten the screws...

Страница 58: ...Sensors Maintenance 59 Deactivate Edge Sensors 61 Reactivate Edge Sensors 62 Blindfold Stickers 63...

Страница 59: ...wall sensors are located along his bumper and his edge sensors are located on his underside Regularly cleaning these sensors ensures that Bob keeps working at his best To do so Wipe the wall and edge...

Страница 60: ...particularly dirty spot while cleaning his dirt sensors will activate the word DIRT will appear on his screen and Bob will focus his attention on the spot Bob s dirt sensors are located on the back wa...

Страница 61: ...king on your carpet then you may need to temporarily deactivate his sensors To deactivate Bob s edge sensors Deactivate Edge Sensors Flip Bob s power switch ON Hold down the UV button on Bob s cover T...

Страница 62: ...ARGING READY To reactivate Bob s edge sensors Hold down the UV button on Bob s cover The 5 bars on top of the screen will begin to flash After the 5 bars flash 7 times and dis appear release the UV bu...

Страница 63: ...the blindfold stickers that came in his box to cover his sensors Peel off the backs of each blindfold sticker and place one onto each of Bob s four sensors Make sure each sensor is completely covered...

Страница 64: ...Troubleshooting Checkup Test Trouble Numbers 65 Home Checkup Test 77 Cleaning Behavior 85 Bob s Challenges 86...

Страница 65: ...ed with a two digit number on his screen Each number corresponds to a certain issue Bob is having If after attempting the suggested solutions Bob s problem persists you may want to perform a home chec...

Страница 66: ...ber 00 Left Wheel What to do Start by checking the wheel for jamming Use the cleaning tool or compressed air to remove any debris that may be jamming the wheel If this does not solve the problem and B...

Страница 67: ...er 01 Right Wheel What to do Start by checking the wheel for jamming Use the cleaning tool or compressed air to remove any debris that may be jamming the wheel If this does not solve the problem and B...

Страница 68: ...crewdriver and clean it thoroughly from end to end see page 52 You may use a pair of scissors to cut hair or thread wrapped around the brush or a pair of tweezers to remove congestion from the notches...

Страница 69: ...cleaning tool or compressed air to remove debris congesting the front wheel If the congestion is not removable from the outside detach the front wheel and remove the obstruction For a comprehensive h...

Страница 70: ...rs Bob s four oval shaped edge sensors are located on his underside near his bumper What to do Wipe the sensors using a clean cloth or dust them using compressed air If Bob displays Trouble Number 04...

Страница 71: ...NING CHARGING READY Trouble Number 05 Wall Sensors What to do Use a clean damp cloth to wipe away any debris from the strip on Bob s bumper Gently tap the bumper or use compressed air to clear it of d...

Страница 72: ...rouble Number 06 Touch Sensors What to do Gently tap on Bob s bumper to clear out any obstructions Use compressed air to clear it of debris Press on both ends of the bumper until you hear a tiny click...

Страница 73: ...rush Installation What to do Use a flat head screwdriver to remove the main brush and clean the ends You may use a pair of tweezers to remove congestion from the notches where the main brush is held M...

Страница 74: ...08 Dustbin What to do Remove Bob s dustbin and empty it Turn the dustbin around and gently wipe the two metal connectors on its bottom with a dry cloth If the two metal con nectors seem damaged they m...

Страница 75: ...o do Do a mainboard reset by flipping Bob s power switch OFF and plugging the adapter from his station into the inlet above his power switch Allow Bob to charge for 2 hours before asking him to clean...

Страница 76: ...be below the threshold needed to properly function Remove him from the station and check his battery connection Open the battery compartment and unplug the battery Wait 30 seconds then reinstall the...

Страница 77: ...case please call our customer care center at 1 888 549 8847 for toll free support in the US and Canada or email us at support bobsweep com Put Bob in checkup mode Bob will chirp three times to let you...

Страница 78: ...CLEANING CAPACITY and CHARGING lit on Bob s screen If all four lights do not turn on flip Bob over and clean his edge sensors See if all four lights turn on now Lift Bob about 6 inches 15 cm off the g...

Страница 79: ...ll Sensors Use a thick flat and white surface to imitate a wall in front of Bob Drag the imitation wall from the left side of Bob s bumper around to the right side UV AUTO SPOT WALL FOLLOW and DOCK wi...

Страница 80: ...n with the middle of his bumper directly facing the sensor on top of his station Bob s screen should display the number 77 If you see a different number make sure that Bob s bumper is perfectly aligne...

Страница 81: ...r Touch Sensors Press the UV button once more Bob s screen remains blank Press the left side of Bob s bumper and DIRT should light up on his screen release the left side and DIRT should disappear Pres...

Страница 82: ...EADY Step Five Display Screen Press the UV button one more time Each icon on the screen should light up in a repeating rotation Press the UV button again and every light on Bob s screen should light u...

Страница 83: ...uld spin and air should flow out of the back of Bob s dustbin If you do not feel air flowing out of the dustbin then Bob s vacuum motor may need to be replaced If the brushes are not moving remove and...

Страница 84: ...ve forward Flip Bob over and you should see his UV lamp lit Do not look directly into the UV lamp Press the MODE button once more Bob s wheels should drive backwards and his UV lamp should turn off Th...

Страница 85: ...Rest assured Bob will efficiently clean your home within the course of a full cycle just check his dustbin for the evidence It is best to let Bob work in his own way even if his movements appear odd M...

Страница 86: ...ect edges and stairs because dark colored carpet absorbs most light it may seem like an edge to Bob s sensors If Bob displays TROUBLE NR 04 while working on dark colored carpet you may need to tempo r...

Страница 87: ...ck for a few min utes and then decide to clean somewhere else This is because Bob wants to cover every spot in your home and will try his hardest to overcome any obstacle As long as Bob does not displ...

Страница 88: ...Warranty FAQs Warranty Information 89 FAQs 90...

Страница 89: ...ing cloths Postal charges are not covered by the warranty Additional coverage plans are available for purchase at owners bobsweep com collections coverage plans After Bob s 1 year warranty expires all...

Страница 90: ...READY appears on his screen 4 How often should I empty the dustbin Bob s dustbin has a 1000 mL capacity three times larger than most robotic vacuum cleaners on the market This means you may not need...

Страница 91: ...s charging station Where is the best place to put his station Bob will find his station more easily if you place it in a central location with plenty of space around it so that he may detect it from a...

Страница 92: ...ll start up on his own when he is scheduled to clean or when he is on auto resume mode Bob s cleaning schedule is displayed on his charging station Bob will automatically start cleaning on the time an...

Страница 93: ...R on his screen How can I fix this Bob s Trouble Number let s you know the specific reason his work has been interrupted This allows you to identify the source of the problem quickly A Trouble Number...

Страница 94: ...nboard reset To do so flip his power switch OFF and plug the charging adapter directly into the inlet above his power switch Leave him to charge overnight to fully refresh his system 16 I have a quest...

Страница 95: ...End User License Agreement...

Страница 96: ...form of Your Software and derivatives thereof to any third party except as provided in this Agreement YOUR SOFTWARE Use and distribution of any software that you create for your Bobsweep Your Software...

Страница 97: ...e you accept this Agreement and will continue until terminated as provided for in this Agree ment You may terminate this Agreement voluntarily at any time Bobsweep may terminate this Agreement at any...

Страница 98: ...and bObsweep Inc All rights reserved...

Отзывы: