background image


1


History 

The Leeb measuring method was first brought into measurement technology in 1978. It is defined as the 
quotient of an impact body’s rebound velocity over its impact velocity, multiplied by 1000. Harder materials 
produce a higher rebound velocity than softer materials. For a specific group of material (e.g. steel, 
aluminum. etc.), Leeb hardness value represents a direct relationship to its hardness properties. For ordinary 
metal, conversion curves of hardness HL versus other standard static hardness (HB, HV, HRC, etc.) are 
available, enabling you to convert HL into other hardness values.   
Leeb Hardness Test (definition) 
An impact body with a spherical test tip made of tungsten carbide is propelled against the sample surface by 
a spring force and then rebounds back. At a distance of 1mm from the sample surface, the impact and 
rebound velocity of the impact body are measured by the following method: A permanent magnet embedded 
in the impact body, when passing through the coil in its coil holder, induces in the coil an electric voltage 
proportional to the velocities of the magnet. Leeb hardness is expressed by the following formula: 
HL=1000

×

(V

B

/V

A

Where: HL is Leeb Hardness 
V

B

 is the rebound velocity of the impact body 

V

A

 is the impact velocity of the impact body 

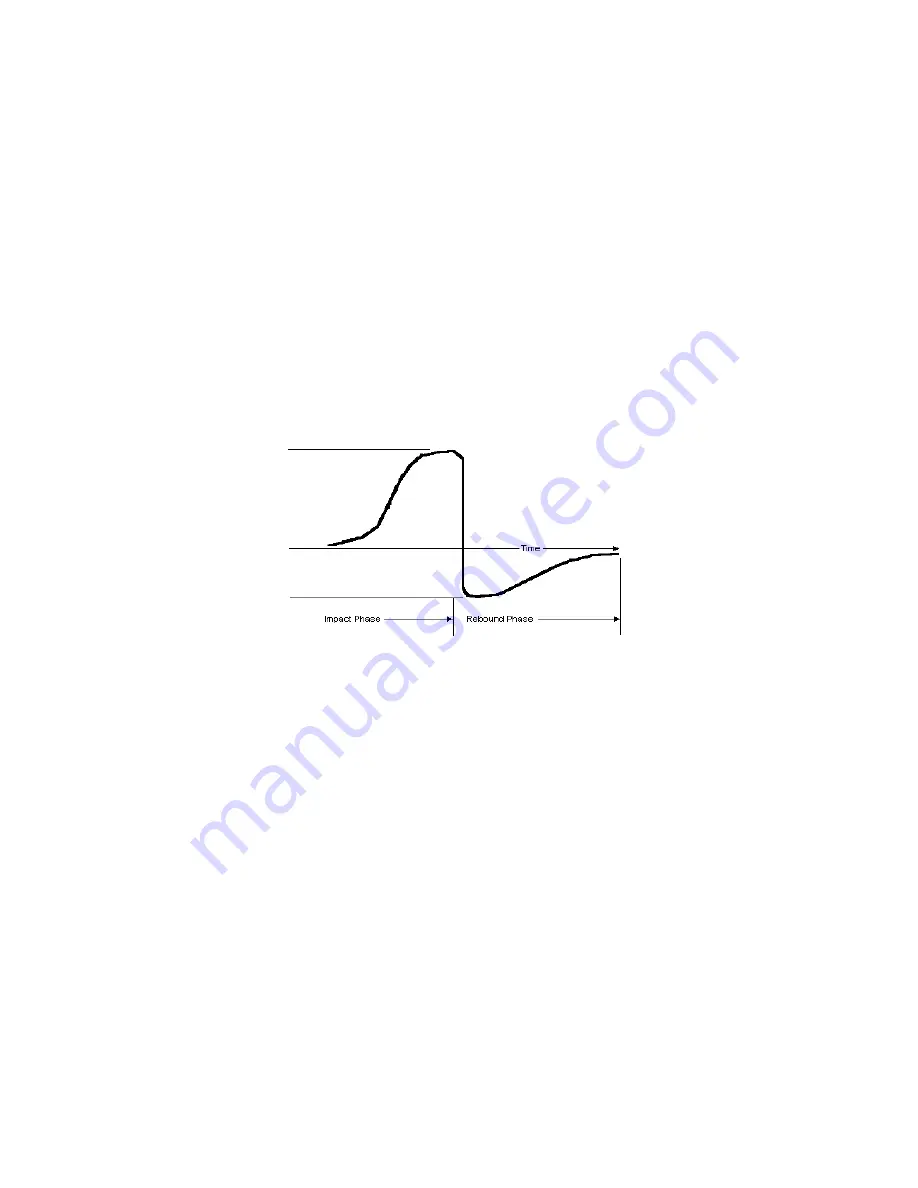
The voltage characteristic of output signal, when the impact body passes through the induction coil is 
illustrated in the following figure: 


Voltage characteristic of output signal 


A Leeb’s Hardness Tester measures the hardness of sample material in terms of Hardness Leeb (HL), which 
can be converted into other Hardness units (Rockwell B and C, Vicker, Brinell and Shore D). 
Notation of Leeb Hardness 
When measuring the hardness of a sample material using the traditional static hardness testing method, a 
change of applied pressure will result in a change in the hardness reading.   
 
For example: 720HLD

720HLC 

Because different converting curves are obtained from different impact devices, when converting hardness L 
into another hardness value the notation for the converted hardness value should include the impact device 
used. 

2


Features and Applications 

Specifications 


Display: LCD 


Accuracy: +/-3HL at HL=800 (0.4%) 


Measuring range: 170-960HL 


Conversion: HL-HRC-HRB-HB-HV-HS-HRA-σb 


Materials: 9 different common materials 


Memory: 99 data can be stored and re-readable   


Impact device: D 


Power on/off: Auto 


Power supply: DC 9V Ni-MH rechargeable battery 

Содержание HARTIP-1500

Страница 1: ...Makina Sanayi Ve Ticaret Ltd Şti İkitelli Organize Sanayi Bölgesi Dolapdere Sanayi Sitesi Ada 4 No 7 9 Başakşehir İSTANBUL TÜRKİYE Phone 90 212 671 02 24 671 02 25 Fax 90 212 671 02 26 web www bulutmak com e mail bms bulutmak com OPERATIONAL MANUAL ...

Страница 2: ...h Curved Surfaces 5 6 Operation 6 6 1 Turn on the tester 6 6 2 Menu 6 6 3 Impact Directions 6 6 4 Materials 6 6 5 Hardness Scales 7 6 6 Average times 7 6 7 Memory 7 6 8 Review Stored Data Delete Stored Data 7 6 9 Check Serial Number 7 6 10 Restore Default Settings 7 6 11 Take Measurement 8 7 Calibration 8 8 Maintenance and Repair 9 8 1 Charging Battery 9 9 Optional Accessories 10 ...

Страница 3: ...s expressed by the following formula HL 1000 VB VA Where HL is Leeb Hardness VB is the rebound velocity of the impact body VA is the impact velocity of the impact body The voltage characteristic of output signal when the impact body passes through the induction coil is illustrated in the following figure Voltage characteristic of output signal A Leeb s Hardness Tester measures the hardness of samp...

Страница 4: ...ed system parts Rapid testing of multiple measuring areas for examination of hardness variations over larger regions Measuring hardness for produced parts at production line Identifying metallic material stored in a warehouse Ineffectiveness analysis of permanent parts pressure vessel turbo generator 3 Designation of Individual Parts Key M Manu Calculate data AVE MAX MIN Increment when adjusting K...

Страница 5: ... kg and also for heavier samples with protruding parts or thin walls should be placed on a solid support in such a manner that they do not bend or move by the impact force Samples weighing less than 2 kg should be firmly coupled with a stable support weighing over 5 kg For coupling purposes The coupling surface between the sample and base plate should be flat plane parallel and ground A thin prope...

Страница 6: ...alue may be too small or too large In many situations potential problems can be checked in the following manner a Medium weight samples and also heavier samples with protruding parts or thin walls should be placed on a solid support in such a manner that they do not move or flex during the test impact b Light weight samples should be rigidly coupled with a non yielding support such as a heavy base...

Страница 7: ...and hold key M till MENU flashes then enter DIRE item By pressing key M in turn to enter into item MATE CONV AVER respectively Finally come back to the mode of measurement 6 3 Impact Directions After pressing and hold key M to enter item DIRE press C in turn to change the impact direction 6 4 Materials After pressing key M into item MATE press C in turn to change the materials setting M1 M2 M9 ...

Страница 8: ...alues can be read after work After memory is activated 00 will be displayed on down left corner of LCD while measuring Take measurements all values will be stored automatically in memory 6 8 Review Stored Data Delete Stored Data After pressing key M into item MEMR press C to read stored data At same time press key M or C to recall stored values forwards and backwards If no data stored NOD displaye...

Страница 9: ...verage times press M in turn LCD displays mean value max value and min value Please note If a value is not realistic during measuring press key C to delete it on LCD in order not to influence the calculating of average 7 Calibration After a long period of use especially for measuring harder materials the ball tip of impact body will be worn which may lead the HARTIP 1500 have more or less error on...

Страница 10: ...dust from the impact body and the spherical test tip Clean guide tube with the special brush provided Do not apply oil to any parts for the impact device 8 1 Charging Battery When a battery indicator displays on LCD which reminds you to charge the battery However it is still possible to measure for some time Please make sure to obtain additional or replacing battery from the manufacturer Otherwise...

Страница 11: ...cial Support Rings Cylindrical Z 10 15 20 20 7 5mm R 10mm 15mm R 10mm not possible R 30mm D6 D6a Z 14 5 30 20 20 6 5mm R 14 5mm 30mm Z 25 50 20 20 6 5mm R 25mm 50mm hollow cylindrical HZ 11 13 20 18 5mm R 11mm 13mm R 11mm not possible R 30mm D6a HZ 12 5 17 20 20 5mm R 12 5mm 17mm HZ 16 5 30 20 20 5mm R 16 5mm 30mm spherical K 10 15 Φ 20 7 7mm R 10mm 13mm R 10mm not possible R 30mm D6 D6a K 14 5 30...

Отзывы: