background image

28

2. 

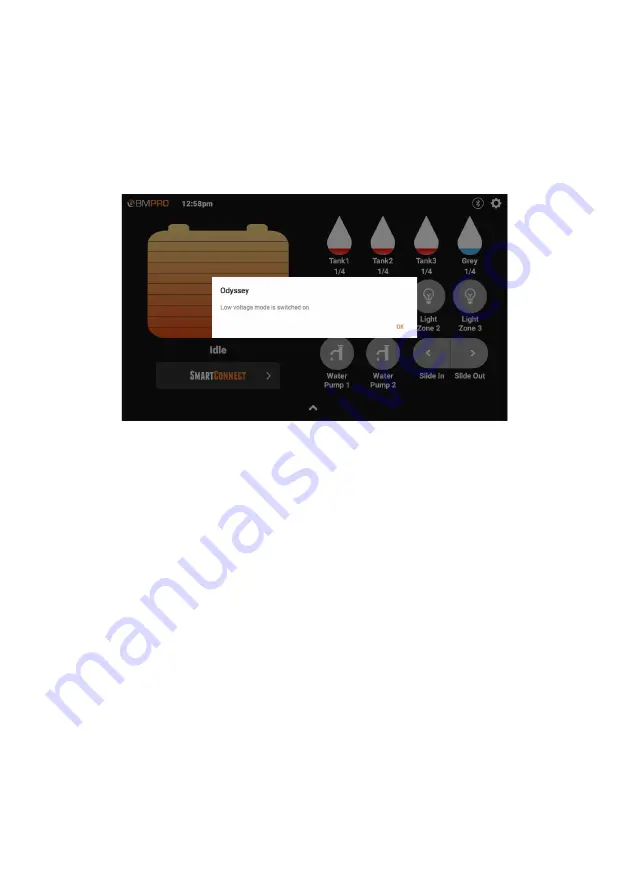
Low Voltage Mode is Switched On 

This pop-up message will display if the BatteryPlus35 has entered ECO 
Mode, which is the first stage of a low voltage disconnection. All icons in the 
OdysseyControl will be dark grey. The Pairing Status Icon will indicate that the 
OdysseyControl is paired to the OdysseyLink. 
Connect the BatteryPlus35 to a power source and begin battery charging. 

Figure 16:

 Low voltage mode is switched on

Содержание OdysseyControl

Страница 1: ...OWNER S MANUAL OdysseyControl OdysseyLink INCLUDING TEAMBMPRO COM ...

Страница 2: ...2 ...

Страница 3: ...e great outdoors we have created a range of rugged smart and reliable products to power your adventures Our range of battery power and RV management and control systems gives you peace of mind when you are on the road so that you can relax in even the most far flung destinations knowing you have control over your power needs To learn more about the BMPRO range of products please visit our website ...

Страница 4: ...fter it has been fully charged and discharged two or three times Keep this product and your battery dry and do not expose it to water or water vapour Do not use this product in areas where it can fall into water such as for example near a pool pond or bath Do not operate this product or your battery with wet hands Contact with water will cause the product or your battery to short circuit or corrod...

Страница 5: ...5 ...

Страница 6: ...2022 MANUAL PART 036092 REV 4 0 CONTENTS SAFETY PRECAUTIONS 4 ABOUT THE ODYSSEYCONTROL 8 SMARTCONNECT 8 ODYSSEY SYSTEM DIAGRAM 9 DESCRIPTION OF PARTS 10 ODYSSEYCONTROL APP 10 ODYSSEYLINK 14 USING THE ODYSSEY 15 PAIRING THE ODYSSEYLINK 15 REGISTERING YOUR ODYSSEY 16 CONFIGURING A NEW BATTERY 18 CONTROLLING LOADS WITH THE ODYSSEYCONTROL 19 VIEW CUSTOMISATION 20 UPDATING THE ODYSSEY APP ON THE ODYSSE...

Страница 7: ...7 SERVICING 24 FAQS AND TROUBLESHOOTING 25 ODYSSEYCONTROL 25 LOAD CONTROL 27 PAIRING 30 BATTERY 30 WALL SWITCHES 30 APPENDICES 32 SPECIFICATIONS 32 WARRANTY TERMS AND CONDITIONS 34 ...

Страница 8: ...urces 9 Monitoring of clean and dirty water tanks and caravan temperature 9 Control of caravan features including lights slide out and water pumps from the OdysseyControl or Wall Switches SMARTCONNECT Odyssey is SmartConnect ready With SmartConnect you can remotely control various aspects of your caravan such as tyre pressure gas bottle levels and caravan temperatures through the OdysseyControl or...

Страница 9: ...9 ODYSSEY SYSTEM DIAGRAM ...

Страница 10: ...d the OdysseyLink ICON PAIRING STATUS CONNECTED DISCONNECTED Table 1 Pairing status indicators 1 3 2 4 6 10 9 8 5 7 ODYSSEYCONTROL APP WARNING When Bluetooth is disconnected any information displayed on the OdysseyControl will be incorrect When Bluetooth connection is re established the OdysseyControl will update to reflect correct battery usage ...

Страница 11: ...d ECO Mode is a convenient way to save remaining power of your battery if you are on the road and have limited ability to charge the battery When charging ECO Mode ensures that all available charging current is dedicated to charging your battery 5 LIGHT ZONES Used to turn lights in three dedicated zones on and off Lights may be renamed via the Settings Menu 6 WATER PUMPS Used to turn water pumps o...

Страница 12: ...ining before the battery is completely discharged IDLE Indicates that no current is flowing into or out of the caravan battery Table 2 Battery status indicators 8 BATTERY STATUS Displays the battery s power capacity and usage 9 SMARTCONNECT Used to access the SmartConnect sensor screen 10 SWIPE UP Swipe up to access more information on caravan battery and power consumption ...

Страница 13: ...attery connected to the BatteryPlus35 13 INPUT SOURCE Indicates the power sources used for charging your battery and powering the caravan loads 14 LOADS Indicates the current supplied by the BatteryPlus35 to power all loads connected to the BatteryPlus35 15 TEMPERATURE Indicates the temperature of the caravan Note Connect the wired temperature sensor to the INT terminal of the OdysseyLink 11 12 13...

Страница 14: ...d the OdysseyControl 2 LED STATUS INDICATOR Indicates the operational pairing status of the OdysseyLink The LED will blink green if the OdysseyLink is ready to pair to the OdysseyControl 3 SERIAL NUMBER Required when pairing the OdysseyLink to the OdysseyControl 2 3 1 Figure 3 The OdysseyLink ...

Страница 15: ... scan at the prompt If the Odyssey App requests access to the device s location allow access 4 The Odyssey App will now search for nearby OdysseyLink devices Once this is complete a pop up window will appear with a list of OdysseyLink devices available for connection 5 Select the device with the number that corresponds to the last six digits of the serial number of the OdysseyLink you wish to pair...

Страница 16: ...If you have not registered your Odyssey when you launch the Odyssey App you will be greeted with the registration screen To register your Odyssey 1 Scroll down and press Register Figure 5 Registration screen Figure 6 Register Now ...

Страница 17: ...17 2 Enter your name and email address 3 Select your RV brand 4 Choose whether your RV is new or used 5 Press Save Your Odyssey is now registered with BMPRO Figure 7 Entering registration details ...

Страница 18: ... and time remaining To configure a new battery 1 Power down the BatteryPlus35 2 Replace the battery 3 From the OdysseyControl repower the BatteryPlus35 4 Press the Settings button 5 Scroll down to the Battery Capacity field 6 In the Battery Capacity field enter your battery s battery capacity in Ampere hours the default is 100 Ah 7 In the Battery Profile section select the battery profile that mat...

Страница 19: ... the caravan s battery voltage continues to drop the BatteryPlus35 will then enter Storage Mode and the OdysseyLink will no longer receive power through the communication bus The OdysseyLink will disconnect Bluetooth communication to the OdysseyControl Monitoring of battery capacity and consumption will no longer be available This is to conserve remaining available battery power until the battery ...

Страница 20: ...he Odyssey App based on your RV accessories by going into Customise View in the Settings menu By customising the view you can disable features not available in your RV such as slides or water tanks Figure 9 Customising the view to remove water tanks and slides ...

Страница 21: ...ong as the OdysseyControl is connected to the internet and logged in to a Google account UPDATING THE ODYSSEYLINK FIRMWARE When the OdysseyControl is connected to the OdysseyLink and detects the firmware version on the OdysseyLink is out of date the Odyssey App will automatically begin performing a firmware update Once the firmware update is complete a message will appear Press Done to return to t...

Страница 22: ...responding it may need to be re paired PAIRING A WALL SWITCH TO THE ODYSSEYLINK Up to two Wall Switches can be paired to the OdysseyLink To pair a Wall Switch to the OdysseyLink 1 From the App home screen press the Settings button 2 Press Wall Switches 3 Press Add 4 On the Wall Switch you want to pair press any two buttons at the same time 5 Once pairing is successful the newly paired Wall Switch ...

Страница 23: ...SEYLINK To unpair a Wall Switch from the OdysseyLink 1 From the App home screen press the Settings button 2 Press Wall Switches 3 Next to Remove wall switches press Unpair 4 Red Unpair buttons will appear next to the Wall Switch listings Next to the Wall Switch you want to unpair press Unpair 5 Press Done ...

Страница 24: ...ch button pad 2 Using a flathead screwdriver pry open the Wall Switch button pad and remove the battery from the holder 3 Insert the new battery in the holder with the positive side facing up Figure 15 Accessing the battery in a Wall Switch CHECKING THE BATTERY IN YOUR WALL SWITCH Wall Switches are powered by a standard CR2032 3V Lithium Cell coin battery To check if the battery needs replacing 1 ...

Страница 25: ... Odyssey App updates Just make sure that you are 1 Connected to the internet 2 Logged into your Google account The Odyssey App will automatically update whenever a new release is available How do I create a Google account If you don t have a Google account you can create one by pressing the Google Play icon on the OdysseyControl main screen and following the prompts If you need more help creating ...

Страница 26: ... on your OdysseyControl is frozen reset your OdysseyControl by inserting a small thin object such as a paper clip into the reset pin hole located on the top of the OdysseyControl Figure 14 Resetting the OdysseyControl ...

Страница 27: ...ryPlus35 None of my loads appear to be powered and I can t use the OdysseyControl to power the loads on again In this situation when you attempt to power loads from the OdysseyControl the pop up message that appears will help to diagnose why the loads are no longer powered 1 Eco Mode is Switched On This pop up message will display if the battery button on the OdysseyControl has been selected The b...

Страница 28: ...e which is the first stage of a low voltage disconnection All icons in the OdysseyControl will be dark grey The Pairing Status Icon will indicate that the OdysseyControl is paired to the OdysseyLink Connect the BatteryPlus35 to a power source and begin battery charging Figure 16 Low voltage mode is switched on ...

Страница 29: ...e OdysseyLink This message will display if 1 The switch connected to the BatteryPlus35 Remote Switch input is activated If this is the case deactivate the switch 2 The BatteryPlus35 has entered Storage Mode which is the second stage of a low voltage disconnection Connect the BatteryPlus35 to a power source and begin battery charging Figure 17 No Bluetooth connection ...

Страница 30: ...5 Remote Switch input is not activated 3 Ensure the BatteryPlus35 is not in Storage Mode as this will turn power to the OdysseyLink off meaning the OdysseyLink cannot talk to the OdysseyControl If the BatteryPlus35 is in Storage Mode the operational LED status indicator on the BatteryPlus35 will emit a single yellow flash Connect the BatteryPlus35 to a power source to begin battery charging When t...

Страница 31: ...31 ...

Страница 32: ...ent 3A Charger Input Voltage 12V Communication Charger Cable USB to microUSB Weight 0 5 kg OdysseyLink Input Voltage 8 15V DC Battery Drain 21mA Ambient Temperature 0 50C Cable Length 0 5m SPECIFICATIONS Wall Switch Input Voltage 2 2 3 0V DC Battery Type CR2032 ...

Страница 33: ...33 ...

Страница 34: ...ept no responsibility in addition to our consumer guarantee obligations where a product has been installed incorrectly 4 This warranty does not extend to product failures or defects caused by or associated with but not limited to failure to install or maintain correctly unsuitable physical or operating environment accident acts of God hazard misuse unauthorised repair modification or alteration na...

Страница 35: ...35 ...

Страница 36: ...POWERING YOUR ADVENTURES TEAM BMPRO COM BMPRO customerservice teambmpro com 19 Henderson Rd Knoxfield VIC 3180 Australia teambmpro com ...

Отзывы: