


NOTES ON POSITIONING YOUR FOUNTAIN
a.
Try to position your fountain near an electrical outlet. If being placed outdoors, please use a Ground Fault
Circuit Interrupter (GFCI) Outlet. Position the base with the pump cord exiting on the left. See step 3 for further
information regarding this.
b.
When considering the location of your fountain, please consider the making it easily accessible for maintenance
(e.g. adding water, performing regular maintenance etc.)
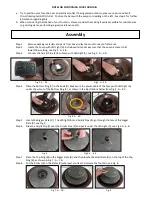
Step 1 Remove packing materials and parts from box and lay them out for ease of reference.
Step 2
Locate the Pump with LED Light (A) in the Bowl (G) and make sure that the pump is preset to its
lowest flow setting, see Fig. 2. A – 2.B.
Step 3
Connect the Acrylic Pipe (E) into Pump with LED Light (A), see Fig. 3. A – 3. B.
Step 4
Place the Bottom Ring (C) in the Bowl (G). Make sure the power cable of the Pump with LED Light (A)
under the cutout of the Bottom Ring (C), as shown in the illustrations below from Fig. 4. A – 4. C.
Step 5
Locate the bigger Slate (D). The LED light (A) and Acrylic Pipe (E) go through the hole of the bigger
Slate (D), see Fig. 5.
Step 6
Slide the Acrylic Clip (F) over the Acrylic Pipe (E) and put it under the LED Light (A), see Fig 6. A- 6. B.
Step 7
Place the Top Ring (B) on the bigger Slate (D), and then locate the small Slate (D) on the top of the Top
Ring (B), as shown in Fig. 7. A – 7.B.
Step 8 Put the Rocks (H) on the Slates (D) wherever you like to decorate the fountain, see Fig. 8.
Assembly
Fig 2. A - 2.B
Fig 3. A - 3.B
Fig 4. A - 4.C
Fig. 5
Fig 6. A - 6.B
Fig. 8
Fig 7. A - 7.B