

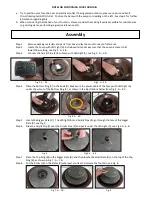

A. Pump with LED Light
(model may vary)
B. Top Ring
C. Bottom Ring
D. Slates
(one big & one small)
E. Acrylic Pipe
F. Acrylic Clip
G. Bowl
H. Rocks
Maintenance
The water level must remain 1” from the bottom of the bigger Slate (D) so it should be checked daily. Water
will evaporate from the fountain and adversely affect the performance of the water pump, which MUST be
completely submerged for proper operation and longevity. NEVER ALLOW
YOUR WATER PUMP TO OPERATE DRY!
Our water pumps are designed to provide exceptional pumping capacity
with minimal maintenance. Please see the instructions below for important
maintenance information:
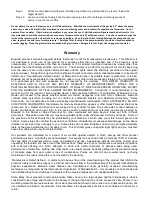
To clean your pump, remove the intake pre-chamber (Item 1 in photo) as
shown in the picture to the right. Clean all parts thoroughly then
reassemble and reinstall in your fountain.
•
Pump is noisy: Check that the pump’s output (Item 2 in photo) nozzle is securely inserted into the fountain’s
intake tube as forced water escaping the connection may cause unwanted air bubble noise. Make sure the
pump is completely submerged. You will need to remove the 2 Slates (D), LED light and Acrylic Clip (F) to
access the pump.
•
Fountain splashes: The pump is adjustable and the flow may be turned up too high. See figure 2-A to
adjust the flow rate by sliding the adjuster to a lower position. Reposition rocks which will change the water
stream to minimize splashing. Make sure the acrylic Pipe (E) is securely attached to the pump.
•
Water does not flow: Make sure pump output nozzle is inserted into the rubber intake tube, pump is
completely submerged in water and that the cord is plugged into a working receptacle. Also check to see
that flow adjustment control is positioned to a middle setting or above.
•
Water does not flow evenly over Slate tiers (D): The Slate stones (D) are natural and are not completely
flat or level. You may need to spin/rotate the slates (D) to find a position for each that provides a level base
for the best and most even water flow.
Identification of Components
Carefully identify and count all components as shown below. Photos may slightly vary from what you receive.
1
2