background image

8

9

EN

EN

FOLDING INSTRUCTIONS

OPERATING INSTRUCTIONS

Safety key

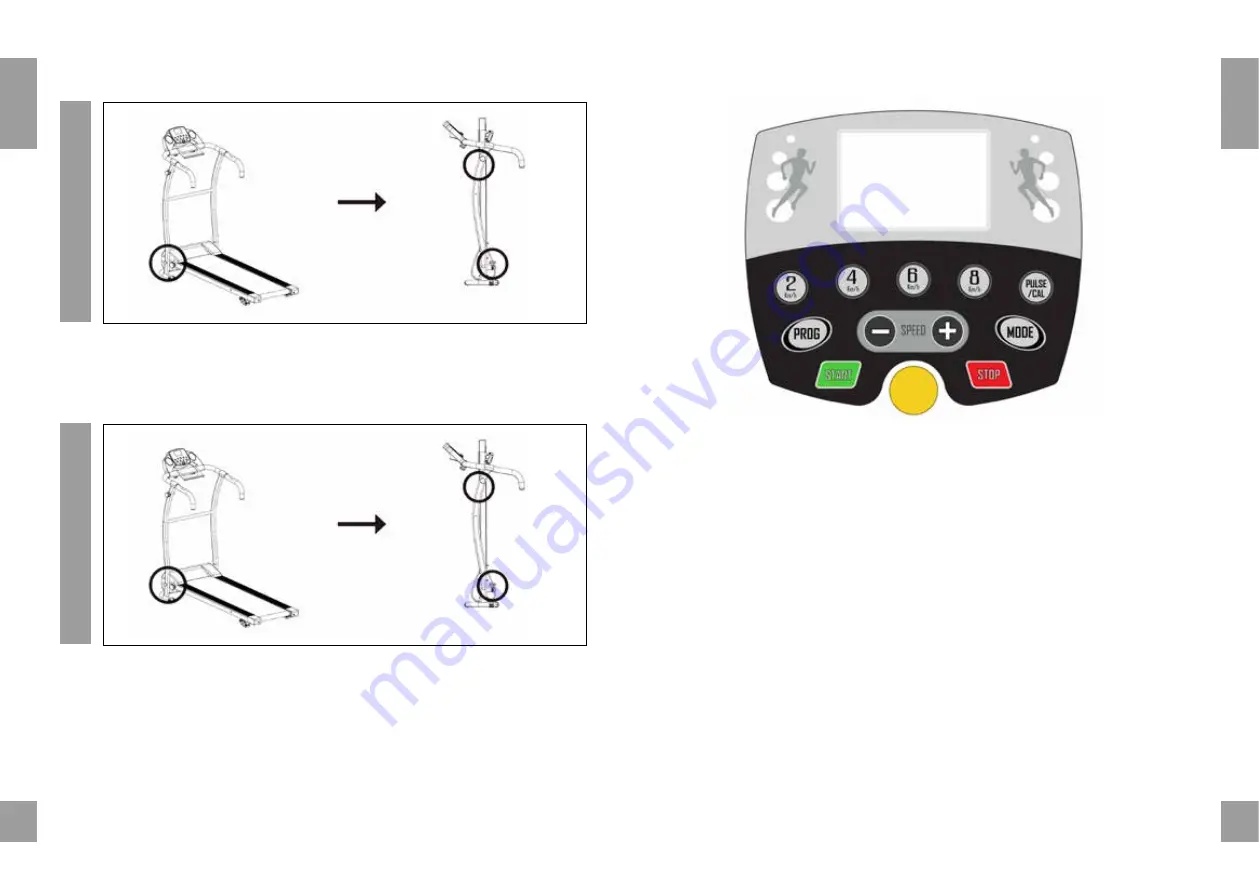
To start the treadmill, the Safety Key must be attached to the Control Pad (yellow circle) 

and your clothing. Note, the treadmill will not start unless you do this.

You can STOP the treadmill at any time by pulling the Safety Key off the Control Pad – the 

treadmill will STOP immediately.

Starting the treadmill

Turn the power on at the wall and turn the red power switch on at the back of the 

treadmill and place the Safety Key on the Control Pad.

Now press the START key - the Control Pad will beep and the LCD display will light up – 

the treadmill is now in Standby Mode.

Now select the Manual Mode or a Pre-set Program by referring to the instructions below.

Selecting the PRE-SET programs

There are 12 pre-set programs for you to choose - refer to table below and the Charts on 

the Control Pad to determine the degree of difficulty for each program.

1.  To select a pre-set program, keep pressing the PROG key to switch between 

programs.

1.  Now change the TIME by using the Speed + and Speed - keys then press the START 

key to start the treadmill and a 3 second countdown will begin(Time range 5-99 

minutes). 

TO FOL

D

TO UNFOL

D

After using, unscrew the safety lock on the bottom frame and place it in the safety lock 

holder, fold the treadmill and pull the spring cotter out from the upper frame and release 

to lock the treadmill in an upright position.

Release the spring cotter and lower the bottom frame to the ground. Screw the safety 

lock to the bottom frame to lock the upper frame in an upright position.

Содержание HSM-T09D5

Страница 1: ...MANUAL GEBRUIKSAANWIJZING MODE D EMPLOI ANLEITUNG ...

Страница 2: ...s sticky under foot and loose refer to the Belt Alignment section in page10 It s important you do this correctly to avoid injury To start the treadmill place the safety key on the yellow circle on the Control Pad and attach the clip to your clothing Note the treadmill will not start unless you place the safety key on the yellow circle START the treadmill at the lowest speed and hold onto the handr...

Страница 3: ...rstand that we are not able to offer you a complete opera tion guide of application inside this manual as the app will be updated from time This process can make changes to the operation or the design of the application Please refer to the instructions inside the specific app download store or contact us 1 2 4 5 6 7 8 9 10 11 12 13 14 45 3 1 Control Pad 2 iPad Holder 3 Control Pad Sensor Wires 4 H...

Страница 4: ...please contact the Customer Care team immediately for further instructions Note do not try to resolve any issues yourself as this could lead to further damage or injury TOOL KIT Allen Key x 1 Lubricant x 1 Safety Key emergency stop x 1 Decorative Handrest Cover x 2 Safety Locks to fold and unfold x 2 Control Pad Locks x 2 ASSEMBLY INSTRUCTIONS 5 easy steps to assemble your treadmill then you re re...

Страница 5: ... by referring to the instructions below Selecting the PRE SET programs There are 12 pre set programs for you to choose refer to table below and the Charts on the Control Pad to determine the degree of difficulty for each program 1 To select a pre set program keep pressing the PROG key to switch between programs 1 Now change the TIME by using the Speed and Speed keys then press the START key to sta...

Страница 6: ...lubricant How to apply lubricant Lift one side of running belt Pour some lubricant under the centre of the running belt on the top surface of the running deck Run on the treadmill at a slow speed for 3 to 5 minutes to evenly distribute lubricant NOTE DO NOT over lubricate running deck Any excess lubricant that comes out should be wiped off Manual Mode To select the Manual Mode press the MODE key U...

Страница 7: ...on a medium speed check the belt is centered if not keep turning the screw a turn clockwise at a time until the belt is centered A C B MAINTENANCE Regular maintenance will prolong the life of your treadmill and prevent injury We strongly recommend that you do the following on a regular basis 1 Remove the power cord from the wall after use especially if children are around 2 It s especially importa...

Страница 8: ...n u ten zeerste aan de uitlijning van de band te controleren wanneer u het apparaat uit de verpakking haalt omdat de band mogelijk is verschoven tijdens het transport Controleer de uitlijning ook voor of na elk gebruik Stel de band altijd zowel links als rechts af om deze goed strak en in het midden te houden REF PROBLEM SOLUTION 1 THERE IS NO DISPLAY ON THE CONTROL PAD Check the power outlet and ...

Страница 9: ...an de loopband om letsel te voorkomen Laat de loopband niet onbeheerd achter met de stekker in het stopcontact met name wanneer er jonge kinderen in de buurt zijn Zet de loopband altijd UIT met de aan uitschakelaar en haal de stekker uit het stopcontact wanneer u het apparaat niet gebruikt Doe dit ook wanneer u de loopband schoonmaakt of verplaatst De loopband is niet bedoeld om zonder toezicht te...

Страница 10: ...4 cm Snelheidsbereik 1 10 km u 12 programma s 1 handmatige modus 4 quickstart knoppen met verschillende snelheden Fitshow app iPad houder 2 fleshouders Noodstopkoord Verstelbare helling drie standen Wieltjes Gebruiksvriendelijk display met weergave van snelheid tijd afstand calorieën hartslag en voorgedefinieerde programma s Afmetingen uitgeklapt 126 x 60 x 120 cm Motorvermogen 735 W Afmetingen in...

Страница 11: ...ver de bouten Sluit de signaalkabel van het bedie ningspaneel A aan op de kabel op het frame B Draai het schroefje aan de achterzijde van het bedieningspaneel los Bevestig het bedie ningspaneel en de iPad houder met de twee zwarte schroeven WAARSCHUWING Draai het bedieningspaneel niet om schade aan de interne bedrading te voorkomen borgpen IN EN UITKLAPPEN INKLAPPEN UITKLAPPEN Draai na gebruik van...

Страница 12: ...omen dat u valt Trek het noodstopkoord van de loopband als u niet stevig staat of dreigt te vallen Let op U kunt de snelheden van de voorgedefinieerde programma s niet aanpassen De snelheidsveranderingen staan aangegeven in de onderstaande tabel De intervallen zijn afhankelijk van de door u ingestelde tijd Handmatige stand Druk op de knop MODE om de handmatige stand te selecteren Druk op de knoppe...

Страница 13: ... het smeermiddel gelijkmatig te verdelen LET OP Gebruik niet TE VEEL smeermiddel Veeg overtollig smeermiddel weg met een droge doek smeermiddel BAND AFSTELLEN We raden u ten zeerste aan de uitlijning van de band te controleren wanneer u het apparaat uit de verpakking haalt omdat de band mogelijk is verschoven tijdens het transport Controleer de uitlijning ook voor of na elk gebruik Stel de band al...

Страница 14: ...T DISPLAY Controleer of de stekker in het stopcontact zit en het apparaat is ingeschakeld met de aan uitschakelaar aan de achterzijde Controleer of de kabel van het bedie ningspaneel is aangesloten op de kabel van het frame raadpleeg de montage instructies Plaats de magneet van het noodstopkoord in de gele cirkel op het bedie ningspaneel en bevestig de clip aan uw kleren Druk op de knop START op h...

Страница 15: ...bande de course ci après Il est important d entretenir la bande de course correctement pour éviter les blessures Veuillez lire ce mode d emploi et les consignes de sécurité avant d utiliser ce tapis de course Pour mettre en route le tapis de course connectez la clé de sécurité magnétique au cercle jaune de la console et attachez le clip à votre vêtement Remarque Le tapis de course peut uniquement ...

Страница 16: ...tion favorite sur App Store Vérifiez si votre téléphone a les conditions requises pour l installation de l application Les conditions pour chaque application sont affichées sur Google Play ou App Store INSTRUCTIONS D UTILISATION 1 Activez la fonction Bluetooth de votre téléphone 2 Ouvrez l application sur votre téléphone 3 Dans le menu principal cherchez les appareils Bluetooth disponibles 4 Sélec...

Страница 17: ...gine Si une pièce manque a été endommagée pendant le transport ou ne fonctionne pas contactez immédiatement le Service clients pour recevoir les instructions adéquates Remarque N essayez pas de résoudre vous même un éventuel problème sous peine d aggraver le problème ou de vous blesser Châssis du tapis de course Appuie mains console et support pour iPad Kit d accessoires KIT D ACCESSOIRES 1 x clé ...

Страница 18: ...ors immédiatement Allumer le tapis de course Branchez l appareil et appuyez sur l interrupteur rouge situé à l arrière du tapis de course Connectez ensuite la clé de sécurité à la console Appuyez sur la touche START de la console Après un bip l écran LCD s allume Le tapis de course est en Mode Veille Sélectionnez le mode manuel ou un programme préenregistré Pour cela consultez les instructions ci ...

Страница 19: ...5 3 3 P8 2 3 3 6 7 7 4 6 7 4 4 4 6 7 4 4 4 2 3 2 P9 2 4 4 7 7 4 7 8 4 8 9 9 4 4 4 5 6 3 3 2 P10 2 4 5 6 7 5 4 6 8 8 6 6 5 4 4 2 4 4 3 3 P11 3 4 5 9 5 9 5 5 5 9 9 5 5 5 9 9 8 7 6 3 P12 2 5 8 10 7 7 10 10 7 7 10 10 6 6 9 9 5 5 4 3 Éteindre le tapis de course La bande de course a été lubrifiée avant sa sortie d usine Au fil de son utilisation la bande de course se détendra et se déplacera vers la gau...

Страница 20: ...ération si nécessaire A C B ENTRETIEN GÉNÉRAL Un entretien régulier augmente la durée de vie de votre tapis de course et réduit les risques de blessures Nous recommandons vivement d effectuer les opérations suivantes de façon régulière 1 Débranchez l appareil après utilisation surtout si des enfants sont présents 2 Pour réduire l usure et les risques d endommager votre appareil il est extrêmement ...

Страница 21: ...tzung zu einer Seite bewegen wird Stellen Sie bitte sicher dass Sie das Benutzerhandbuch und die Sicherheitshinweise vor Benutzung des Laufbands sorgfältig durchlesen DYSFONCTIONNEMENTS RÉF PROBLÈME SOLUTION 1 L ÉCRAN DE LA CON SOLE NE S ALLUME PAS Vérifiez que l appareil est branché correctement L inter rupteur à l arrière de l appareil doit être en position On Vérifiez que le fil de la console A...

Страница 22: ...te 12 Verwenden Sie stets die richtige Hebetechnik und oder Hilfe beim Heben oder Bewegen des Laufbands um Verletzungen zu vermeiden Lassen Sie das Laufband nie unbeaufsichtigt oder den Stecker in der Steckdose insbesondere wenn kleine Kinder im Haus sind Schalten Sie das Laufband an der Wand immer AUS und ziehen Sie den Stecker wenn das Gerät nicht verwendet wird dies gilt wenn Sie das Laufband r...

Страница 23: ...toff Handpulssensor Lauffläche 100 34 cm Geschwindigkeitsbereich 1 10 km h 12 voreingestellte Programme 1 manueller Modus Schnellstarttasten für 4 Geschwindigkeiten Fitshow APP iPad Halter 2 Wasserflaschenhalter Safety Key Not Halt Manuelle Neigung 3 Stufen Transporträder Einfach zu bedienendes Bedienfeld mit Anzeige von Geschwindigkeit Zeit Entfernung Kalorien Puls und der voreingestellten Progra...

Страница 24: ...Abdeckungen auf die Schrauben Verbinden Sie das Signalkabel A des Bedien felds mit dem Signalkabel auf dem Rahmen B Schrauben Sie die kleine silberne Schraube auf der Rückseite des Bedienfelds ab Montieren Sie das Bedienfeld richten Sie das Bedienfeld und den iPad Halter mit den beiden schwarzen Schrauben aus und schrauben Sie diese mit der Hand in Position fest WARNUNG Kabel im Innern nicht das B...

Страница 25: ...digkeit zu ändern Halten Sie sich während Geschwindigkeitsänderungen an den Handgriffen fest um sicherzustellen dass Sie nicht vom Laufband fallen und ziehen Sie den Safety Key ab um das Laufband zu stoppen wenn Sie sich instabil fühlen oder fallen Hinweis Die Geschwindigkeiten für die voreingestellten Programme sind festgelegt und können nicht geändert werden Die Geschwindigkeit ändert sich in je...

Страница 26: ...erteilen HINWEIS Tragen Sie NICHT zu viel Schmiermittel auf Überschüssiges austretendes Schmiermittel sollte weggewischt werden Schmiermittel 1 Stück JUSTIERUNG DES LAUFBANDS Wir empfehlen Ihnen dringend die Justierung des Laufbands zu überprüfen wenn Sie es aus der Box nehmen um sicherzustellen dass diese sich während des Transports und davor nicht verschoben hat Kontrollieren Sie die Justierung ...

Страница 27: ... DAS ANTISTATIKUM IST ABGENUTZT Schmieren Sie das Laufband nach ca 80 Betriebsstun den oder machen Sie den Test und versuchen Sie Ihre Hand zwischen dem Brett und dem Band zu reiben um zu sehen ob es trocken ist Siehe den Abschnitt Wartung des Laufbands oben WARTUNG Die regelmäßige Wartung wird die Lebensdauer Ihres Laufbands verlängern und Verletzungen vorbeugen Wir empfehlen dringend dass Sie fo...

Страница 28: ...54 Distributed by OCG Retail Eemnesserweg 11 10 1251 NA Laren the Netherlands ...

Отзывы: