


ENG
LI
SH
5
100V
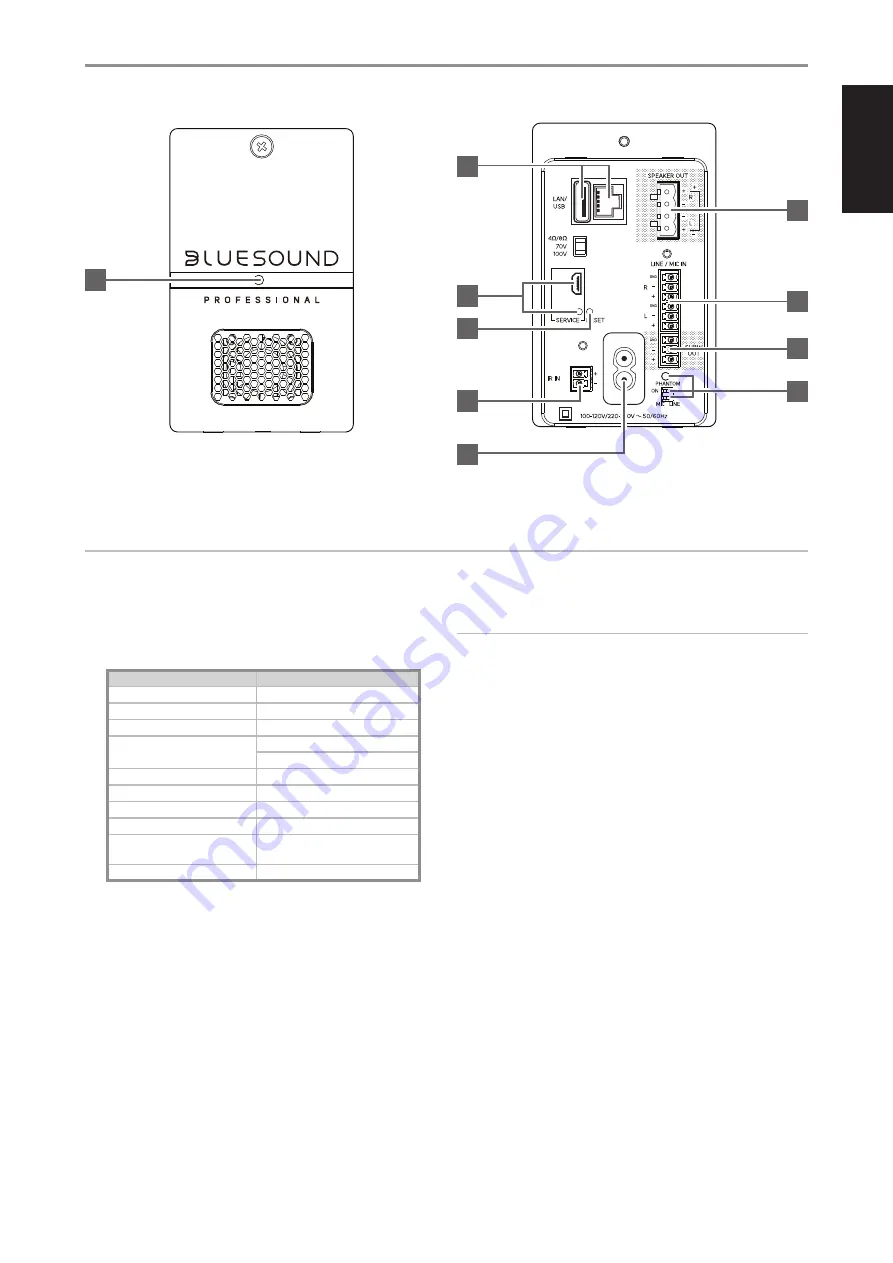
IDENTIFICATION OF CONTROLS
1 STATUS INDICATOR
Below is a table of the LED blink codes and their corresponding
descriptions.
LED BLINK
CODE DESCRIPTION
Short blue flash, then red
Powering up, rebooting the unit
Alternate flashing red and green
Upgrading…
Flashing green
Connecting to network shares
Solid red
Cannot boot; drive error
Upgrade mode
Red pulse
No internet gateway
Flashing red
Factory reset in progress
Solid white
Indexing
White pulse
Software update available
Solid blue
Connected to Network – ready to use
with Bluesound App
Flashing blue
Mute mode
2 LAN/USB
LAN
•
LAN connection must be setup for wired connection to be
established. Set up a Wired Ethernet broadband router with
broadband internet connection. Your router or home network
should have a built-in DHCP server to consummate the
connection.
•
Using a standard straight-through Ethernet cable (not supplied),
connect one end of the Ethernet cable to the LAN port of your
wired Ethernet broadband router and the other end to B170S'
LAN port.
NOTES
• Bluesound Professional is not responsible for any malfunction of the
B170S and/or the internet connection due to communication errors
or malfunctions associated with your broadband internet connection
or other connected equipment. Contact your Internet Service Provider
(ISP) for assistance or the service bureau of your other equipment.
• Contact your ISP for policies, charges, content restrictions, service
limitations, bandwidth, repair and other related issues pertinent to
internet connectivity.
USB
•
Connect to this USB port USB mass storage devices formatted as
FAT32, NTFS or Linux ext4. The connected USB device appears
as a Local Source (USB) in the BluOS App.
•
Access and playback music stored in the connected USB device
by selecting “USB” from the BluOS App
3 SPEAKER OUT
•
Connect external speaker cables to supplied SPEAKER terminal
block ensuring that the connections match B170S' SPEAKER
OUT terminal markings.
•
Ensure that SPEAKER OUT “R+” is connected to the “+” terminal
of your external right speaker and SPEAKER OUT “R-” connected
to the speaker’s “-” terminal. Connect SPEAKER OUT terminals
marked “L+” and “L-” to the external left speaker in the same
way.
•
Install the wired up SPEAKER terminal block to B170S'
SPEAKER OUT terminal.
B170S
1
2
3
4
5
8
6
9
7
10
ATTENTION!
Please ensure that the B170S is powered off or unplugged from the mains power outlet before making any connections. It is also advisable to power
down or unplug all associated components while breaking any signal or AC power connections.