background image

11 

Operation


Lighting the Oven Pilot Burner 

This oven is fitted with a pilot as a standard option and flame 

failure protection, which is incorporated by way of a  
thermo-electric system for the main burner.  Flame failure 

protection will shut off the gas supply to the burner in the 

event that the pilot burner goes out, so that un-burnt gas is not 

expelled.  

This is an important safety feature which is 

slowly becoming law throughout the world

 
1. 

Open the oven door.  Partially depress the thermostat 

control knob whilst turning anti-clockwise to the ‘Pilot’        

position.  

DO NOT fully depress the Control Knob 

whilst trying to rotate anti-clockwise as the Knob 

and Gas Valve will be damaged.


2. 

With the thermostat control knob in the ‘Pilot’ position, 

keep the knob depressed whilst pressing the piezo igniter 

button.  (Each press of the piezo igniter button will 

generate a single spark). 

3. 

Hold in the thermostat control knob depressed for 

approx. 10-20 seconds, then release.  The pilot burner 

should remain alight.  (If the pilot does not light, repeat 

Items 1 to 3 above). 

4. 

View the oven pilot burner through the holes in the front 

of the sole plate with the oven door open. 


Lighting the Oven Main Burner 

1. 

Ensure that the pilot burner is alight. 

2. 

Rotate the thermostat control knob anti-clockwise to the 
desired temperature marked on the knob. 

3. 

The main burner will now ignite automatically, from the 

pilot burner. 


Turning the Oven to ‘Stand-by’ (Pilot ‘ON’ Only) 


NOTE:  DO NOT attempt to rotate the T

hermostat 

Control 

Knob anti-clockwise back to the ‘Pilot’ position as 
the Knob and Gas Valve will be damaged. 


1. 

Rotate the thermostat control knob clockwise to the 

‘Pilot’       position.  The main burner will extinguish and 

the pilot burner will remain alight. 

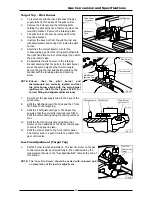
Pilot Burner 

viewing holes 

Fig 4 

DO NOT USE aluminium foil or trays directly on the cast 
iron sole plate(s). NEVER block or cover the openings on 
each side of the sole plate(s). 

! IMPORTANT 

Control Knob in 

Pilot Position 

Depress and Rotate Knob 

Anti-Clockwise to Pilot Position 

Piezo Igniter 

Button 

Control Knob in Main 

Burner Operating Position 

Rotate Knob Anti-Clockwise  

to Operating Temperature 

Control Knob in 

Pilot Position 

Rotate Knob Clockwise to Pilot Position 

Piezo Igniter 

Button 

Содержание Evolution G570

Страница 1: ...For use in GB IE 230096 8 GAS TARGET TOP STATIC OVEN RANGE G570 I N S T A L L A T I O N A N D O P E R A T I O N M A N U A L ...

Страница 2: ...00 337 963 Customer Service tel 1800 335 315 fax 1800 350 281 CANADA Serve Canada Web www servecanada com E Mail info servecanada com Sales tel 800 551 8795 Toll Free Service tel 800 263 1455 Toll Free NEW ZEALAND Moffat Limited Web www moffat co nz E Mail sales moffat co nz Main Office tel 0800 663328 UNITED KINGDOM Blue Seal Web www blue seal co uk E Mail sales blue seal co uk Sales tel 44 121 3...

Страница 3: ...mbly Gas Connection Commissioning Operation 9 Operation Guide Description of the Controls Lighting the Pilot Burner Target Top Lighting the Main Burner Target Top Lighting the Oven Pilot Burner Lighting the Oven Main Burner Turning the Oven to Stand By Pilot ON Only Oven Shut Down Cleaning and Maintenance 13 General After Each Use Daily Cleaning Weekly Cleaning Periodic Maintenance Fault Finding 1...

Страница 4: ...AGE INJURY OR DEATH READ THE INSTALLATION OPERATING AND MAINTENANCE INSTRUCTIONS THOROUGHLY BEFORE INSTALLING OR SERVICING THIS APPLIANCE WARNING INSTRUCTIONS TO BE FOLLOWED IN THE EVENT THE USER SMELLS GAS ARE TO BE POSTED IN A PROMINENT LOCATION THIS INFORMATION SHALL BE OBTAINED BY CONSULTING THE LOCAL GAS SUPPLIER WARNING GREAT CARE MUST BE TAKEN BY THE OPERATOR TO USE THE EQUIPMENT SAFELY TO ...

Страница 5: ...nce is installed Gas Supply Requirements Non CE Only Australia New Zealand CE Only Appliance Classification Category II2H3P Flue Type A1 The burner operating pressure is to be measured at the target top hob manifold test point with the target top burner Inner and outer ring operating at full setting The operating pressure is ex factory set through the appliance regulator and not to be adjusted apa...

Страница 6: ...ection Gas supply connection point is located 130 mm from the right hand side 32 mm from the rear and 655 mm from the floor and is reached from beneath the appliance Refer to the Dimensions section Connection is BSP male thread ...

Страница 7: ...5 Dimensions G570 ...

Страница 8: ...only allowed to be adjusted by an authorised service agent They are not to be adjusted by the installation person Unpacking Remove all packaging and transit protection from the appliance including all protective plastic coating from the exterior stainless steel panels Check equipment and parts for damage Report any damage immediately to the carrier and distributor Report any deficiencies to the di...

Страница 9: ...rect for the gas supply the appliance is being installed for The gas conversion procedure is detailed in this manual b Supply Pressure required for this appliance is shown in the Specifications section of this manual Check the gas supply to ensure that adequate supply pressure exists c Input Rate of this appliance is stated on the Rating Plate and in the Specifications section of this manual The i...

Страница 10: ...e leaving the new installation Check the following functions in accordance with the operating instructions specified in the Operation section of this manual Light the Target Top Pilot Burners Light the Target Top Main Burners Light the Oven Pilot and Main Burners Check the Oven Main Burner Thermostat operation Check the Low Fire Burner operation for Target Top and Oven Check the High Fire Burner o...

Страница 11: ... Burner Thermostat Turning Oven to Stand By Mode Oven Shut Down Description of the Controls CAUTION This appliance is for professional use and is only to be used by qualified people Only authorised service persons should be used to carry out installation servicing or gas conversion operations Components having adjustments protected e g paint sealed by the manufacturer should not be adjusted by the...

Страница 12: ...ool 2 Rotate the gas control knob anti clockwise to the position marked HIGH 3 The main burner will now ignite automatically off the pilot burner 4 Once lit the main burner will be burning at full rate For a lower heat turn the gas control knob fully anti clockwise to the LOW position 5 Also for intermediate heat position the gas control knob between the HIGH and LOW positions NOTE Always set the ...

Страница 13: ... pilot does not light repeat Items 1 to 3 above 4 View the oven pilot burner through the holes in the front of the sole plate with the oven door open Lighting the Oven Main Burner 1 Ensure that the pilot burner is alight 2 Rotate the thermostat control knob anti clockwise to the desired temperature marked on the knob 3 The main burner will now ignite automatically from the pilot burner Turning the...

Страница 14: ... NOT fully depress the Thermostat Control Knob whilst trying to rotate clockwise to the O Off position as the Knob and Gas Valve will be damaged Control Knob in Off Position Partially Depress and Rotate Knob to the O Off Position Should any abnormal operation like ignition problems abnormal burner flame burner control problems partial or full loss of burner flame in normal operation be noticed the...

Страница 15: ...d a soft scrubbing brush 2 Brush the Target Top cast iron with a soft bristled brush followed by wiping with a cloth to prevent accumulation of carbon 3 Remove the drip tray and clean with a mild anti bacterial detergent and hot water solution using a soft bristled brush Dry the drip tray thoroughly with a dry cloth 4 Dry the Target Top Range thoroughly with a dry cloth and polish with a soft dry ...

Страница 16: ...ean with a mild anti bacterial detergent and hot water solution using a soft bristled brush Dry the drip trays thoroughly with a dry cloth before re fitting e Dry all components thoroughly with a dry cloth and polish with a soft dry cloth Periodic Maintenance NOTE All maintenance operations should only be carried out by a qualified service person To achieve the best results cleaning must be regula...

Страница 17: ...hermocouple has heated Pilot flame too small Gas pressure too low Partially blocked pilot injector Thermocouple connection to the gas control is loose or faulty Thermocouple faulty Electromagnet in the rear of the gas control unit is faulty Hold knob in for at least 20 seconds following ignition of the pilot Clean or replace the pilot injector Tighten the thermocouple connection Check that the the...

Страница 18: ...washers securing the main burner to the target top 7 Carefully remove the main burner from the target top to reveal the inner and outer ring injectors Target Top Main Burner Injector 1 Unscrew the main burner injectors A F from the Target Top 2 Determine the correct injector sizes for the corresponding gas from the rating plate affixed to the right hand front corner of the bottom sill 3 Replace wi...

Страница 19: ... ignition port Refer to the Figures 12 13 for correct fitting and alignment dimensions 7 Re connect the gas supply tube to the base of the pilot burner 8 Refit the right hand main fire brick and the 2 front fire bricks to the target top 9 Refit the 2 half plate castings to the target top ensuring that they correctly interlock once fitted Refit the centre casting using the casting removal tool 10 R...

Страница 20: ...raw the pilot injector from the pilot assembly 4 Replace the pilot injector with the correct sized injector for the gas type being used and re connect the pilot supply tube to the pilot assembly 5 Refit the vitreous enamelled tray to the oven Low Fire 1 To change the thermostat Low Fire screw for the gas type required remove the gas control knob from the oven control panel The control knob is a pu...

Страница 21: ...nnection Beside the Rating Plate Commissioning Before leaving the converted installation 1 Check all gas connections for leakages using soapy water or other gas detecting equipment 2 Check the following functions in accordance with the operating instructions specified in the Operation section of this manual Light the Target Top Pilot Burner Light the Target Top Main Burner Check the Low Fire burne...

Страница 22: ...njector 0 35 0 25 Burner Aeration Screw X Inner 25 mm 25 mm Burner Aeration Screw Y Outer 28 mm 28 mm Low Fire Adjustment 2 turns out ccw 1 turn out ccw Oven Main Burner Ø 2 60 mm Ø 1 60 mm Pilot Burner 0 35 0 23 Low Fire Screw Ø 1 5 mm Ø 0 95 mm Burner Operating Pressure 1 00 kPa 2 60 kPa Gas Regulator Cap Screw Burner Aeration Setting Fully open Fully open Natural Gas G20 Propane G31 Target Top ...

Страница 23: ...ator 228531 Regulator RV48CLM Nat Gas LPG convertible BSP F F Oven 228767 Oven Burner 018691K Oven Pilot 020253 Oven Thermocouple 018743 Thermocouple Spacer 032260 Oven Burner Injector Nat Gas Ø 2 60 mm 032160 Oven Burner Injector LPG Ø 1 60 mm 026488 Pilot Injector Nat Gas 0 35 019217 Pilot Injector LPG 0 23 228703 Thermostat Gas Control Kit 227381 Knob Thermostat 100 290 C 022408 Low Fire Screw ...

Страница 24: ...4997 Casting Removal Tool 227892 Oven Side Rack LH 227893 Oven Side Rack RH 227896 Oven Rack 227850 Adjustable Leg 150 mm 229674 Rear Roller Assy Gas Conversion Kits Accessories 228800 Ranges 900 mm Plinth Kit Model Gas Type to Convert to Nat Gas G20 LPG Propane G31 G570 231976 231975 ...

Страница 25: ......

Отзывы: