Blue Rhino 184639 Скачать руководство пользователя страница 4

Outdoor LP Gas Barbecue Grill  Model No. NSP2304L / 0184639

Contact 1.800.762.1142 for assistance. Do not return to place of purchase.

For great recipes and tips, visit recipes.uniflame.com

3

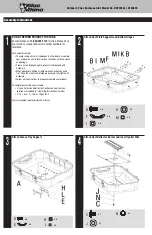
Attach Grease Tray Support

A

x 4

E

x 4

H

x 4

L

x 4

1

DO NOT RETURN PRODUCT TO STORE. 

For assistance call 

1.800.762.1142

 toll free. Please have 

your owner’s manual and serial number available for 
reference.

For Easiest Assembly:

•  To avoid losing any small components or hardware, assemble 

your product on a hard level surface that does not have cracks 
or openings.

•  Clear an area large enough to layout all components and 

hardware.

•  When applicable, tighten all hardware connections by hand 

first. Once the step is completed go back and fully tighten all 
hardware.

•  Follow all steps in order to properly assemble your product.

To complete assembly you will need:

•  (1) Leak Detection Solution (Instructions on how to make 

solution are included in “Operating Instructions” section)

•  (1) 14.1 oz or (1) 16.4 oz LP gas tank.

Typical assembly: approximately 30 minutes.

Assembly Instructions

2

Attach Heat Plate Supports and Bottom Hinges

B

x 8

F

x 8

I

x 8

K

x 4

M

x 8

4

Attach Heat Reflector, Burner and Insert Igniter Wire

C

x 1

J

x 1

N

x 1

Содержание 184639

Страница 1: ...reference WARNING FOR YOUR SAFETY For Outdoor Use Only outside any enclosure Table of Contents Important Safeguards Page 2 Exploded View Hardware 3 Assembly Instructions 4 Operating Instructions 7 Ch...

Страница 2: ...upply Call our customer care at 1 800 762 1142 a gas appliance serviceman or your local LP gas supplier Do not use in an explosive atmosphere Keep grill area clear and free from combustible materials...

Страница 3: ...Zinc Plated 11 pcs O Pin 5 x 30 2 pcs P Cotter Pin 1 4 x 30 2 pcs Tools Required for Assembly Not Included 2 Phillips Head Screwdriver 1 pc 6 19 Parts List 1 Lid Handle 55 10 366 2 Temperature Guage 5...

Страница 4: ...rge enough to layout all components and hardware When applicable tighten all hardware connections by hand first Once the step is completed go back and fully tighten all hardware Follow all steps in or...

Страница 5: ...recipes and tips visit recipes uniflame com page no 5 5 Attach Left and Right Side Handle and Igniter Wire G x 4 J x 4 N x 4 6 Attach Legs D x 4 J x 4 N x 4 7 Attach Temperature Gauge Lid Handle and T...

Страница 6: ...embly Instructions continued 10 Insert Heat Plate and Cooking Grid 11 Attach Wind Guard and Regulator Control Valve Note Once attached the regulator control knob will freely rotate to accomodate for t...

Страница 7: ...tened If your unit was assembled for you visually check the connection between the burner and control valve If you have questions contact 1 800 762 1142 for assistance WARNING Failure to inspect this...

Страница 8: ...of burner with small bottle brush or compressed air 8 Clean any clogged ports with a stiff wire such as an opened paper clip 9 Inspect burner for any damage cracks or holes If damage is found replace...

Страница 9: ...defective parts transportation charges must be prepaid by you Vendor will return replacement parts to the original retail purchaser freight or postage prepaid This Limited Warranty does not cover any...

Страница 10: ...ait 1 minute d Attach LP gas tank e Perform a leak check per Checking for Leaks instructions in the owner s manual f Light grill per Lighting Instructions instructions in the owner s manual Irregular...

Страница 11: ...os da os en el aparato reproductivo Propuesta 65 de California L vese las manos despu s de manipular el producto ADVERTENCIA PARA SU SEGURIDAD 1 La instalaci n el ajuste la alteraci n la reparaci n o...

Страница 12: ...vapores o l quidos inflamables cerca de la parrilla Mantenga todos los art culos y superficies combustibles a una distancia m nima de 91 44 cm 36 de la parrilla en todo momento NO use esta parrilla ni...

Страница 13: ...bierto en zinc 10 pzas N Arandela de seguridad 6 Recubierto en zinc 11 pzas O Pasador 5 x 30 2 pzas P Pasador de chaveta 1 4 x 30 2 pzas Herramientas necesarias para el ensamblaje no incluidas Destorn...

Страница 14: ...s de los aditamentos Cuando haya completado este paso vuelva al principio y apriete todos los aditamentos firme y completamente Siga todos los pasos para ensamblar adecuadamente su producto Para compl...

Страница 15: ...y consejos visite recipes uniflame com p gina no 5 5 Instale la manija lateral izquierda y derecha y el cable del encendedor G x 4 J x 4 N x 4 6 Coloque las patas D x 4 J x 4 N x 4 7 Instale el indica...

Страница 16: ...el plato calentador y la rejilla de cocci n 11 Instale la protecci n contra viento y el regulador v lvula de control Nota Una vez instalado el regulador perilla de control girar con facilidad para ac...

Страница 17: ...vuelta m s El regulador se debe girar 360 incluso si la tuerca de lat n est apretada Si otra persona ensambl la unidad revise visualmente las conexiones entre el quemador y la v lvula de control Si ti...

Страница 18: ...qu mico seco tipo BC o ap guelo con tierra arena o bicarbonato Control de las llamaradas Las llamaradas son parte de la cocci n de carnes en una parrilla y aderezos del sabor nico que da asar un alim...

Страница 19: ...as ninguna de las piezas del producto presentar defectos de fabricaci n en el material ni en la mano de obra durante un 1 a o desde la fecha de compra El proveedor podr a exigir un comprobante razonab...

Страница 20: ...ueda de fugas de acuerdo con las instrucciones del manual del propietario sobre B squeda de fugas f Encienda la parrilla de acuerdo con las Instrucciones de encendido del manual del propietario Patr n...

Отзывы: