16
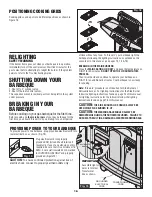
POSITIONING COOKING GRIDS
Cooking grids can be put into 3 different positions as shown in
Figure 18.
1
2
3
Fig. 18
RELIGHTING
SAFETY WARNING
If the burner flame goes out when your barbeque is in operation,
immediately turn off the control valves. Wait five minutes for the
gas to clear before attempting to relight the burner. If the problem
persists, refer to the Troubleshooting Guide.
SHUTTING DOWN YOUR
BARBEQUE
1. Shut off L.P. cylinder valve.
2. Shut off burner control valves.
This sequence prevents residual gas from being left in the system
under pressure.
BREAKING IN YOUR
BARBEQUE
Before cooking on your gas barbeque for the first time...
Before cooking on
the main burners
of your gas barbeque for the
first time, you should "break it in" by operating for a short period
of time without any food. To "break in" your barbeque light the
barbeque following the lighting instructions as outlined on the
console or in this manual. (see pages 13, 14 & 15)
BREAKING IN THE MAIN BURNERS:
Close the
MAIN CASTING LID ONLY
and keep the temperature on
"HIGH" for 20 minutes.
DO NOT OPEN THE LID DURING THIS
PROCESS.
Then raise the lid and continue to operate your barbeque on
"HIGH" for an additional 5 minutes. Your barbeque is now ready
for cooking.
Note:
"Break-in" procedure is not required for Side Burner or
Rotisserie burner. For lighting instructions for the Side Burner
follow the lighting instructions found on page 14 of this manual.
For lighting instructions for the rotisserie follow the lighting
instructions found on page 15 of this manual.
CAUTION:
THE SIDE BURNER LID SHOULD ALWAYS BE
OPEN WHILE SIDE BURNER IS LIT.
CAUTION:
THE WARMING RACK SHOULD ALWAYS BE
REMOVED WHEN USING THE ROTISSERIE BURNER. FAILURE TO
DO SO MAY RESULT IN A DAMAGED & WARPED WARMING RACK.
PROVIDING POWER TO YOUR BARBEQUE
To provide power to the barbecue, plug grounded electrical cord into
rear electrical box as shown. (Fig.15)
Plug electrical cord into properly
grounded GFI (Ground Fault Interrupt)
receptacle. If use of an extension cord is
required, be sure that it is a minimum 16
AWG, 3 wire well insulated cord, marked
for OUTDOOR USE ONLY and properly
grounded. (Figure14)
CAUTION
: To ensure continued protection against risk of
electric shock, connect to properly earthed outlets only.
TRANSFORMER
CORD
TRANSFORMER
BOX
IMPORTANT
Assemble light switch
wires to Internal
Transformer
box as shown.
GROUNDED
ELECTRICAL
CORD
Fig. 15
Fig. 14

