2
201
6
-0
2
blubathworks.com
®
1
2
3
5
6
EN - INSTALLATION GUIDE
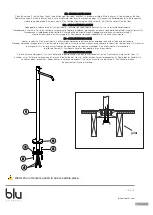
Place the column (1) on the floor. Check the positioning of the spout and that it is properly installed. Mark the holes (2) to be made on the floor.
Remove the colum
n
, make the holes
,
and
in case of concrete floor
insert the respective plugs
(3).
C
onnect the flexible pipes (4) to the respective
water piping. Reposition the mixer column (1) on the floor, tightening the fixing screw (5). Position the cover (6) on the floor.
ITA - GUIDA D’INSTALLAZIONE
Appoggiare la colonna lavabo (1) sul pavimento. Verificare il posizionamento della canna che sia installata correttamente.
Procedere con il marcare i fori (2) da realizzare sul pavimento. Togliere la colonna, proseguire con l’esecuzione dei fori ed infilare i rispettivi tasselli (3).
Procedere con il collegamento dei flessibili (4) alle rispettive tubazioni d’acqua. Appoggiare la colonna miscelatore lavabo (1)
al pavimento avvitando le viti di fissaggio (5). Posizionare il rosone di copertura (6) in battuta al pavimento.
ES - GUIA DE INSTALLACION
Apoyar la columna (1) en el pavimento. Verificar el posicionamiento del cano para comprobar que esté instalado correctamente.
Proceder marcando los aguejeros (2) a realizar sobre el pavimento. Quitar la columna, hacer los aguejeros e introducir los relativos tacos (3). Conectar
la mangueras (4) a las respectivas tuberias de agua. Apoyar la columna mezclador (1) en el pavimento, atornillando los
tornillos de fijacion (5). Posicionar el roseton de cobertura (6) en el pavimento.
FR- GUIDE D’INSTALLATION
Poser la colonne mélangeur (1) au sol. Vérifier que le positionnement du bec soit correctament réalisé. Continuer en marquant les trous (2)
à réaliser au sol. Enlever la colonne, continuer avec la réalisation des trous et enfiler les chevilles correspondantes (3). Raccordez les flexible (4) à
conduites d’eau respectives. Repositionner la colonne mélangeur (1) au sol en vissant les vis de fixage (5). Positionner la plaque
de couvrement (6) en el pavimento.
joist
H
C
4
Water shut offs are required in an accessible place.
Содержание INOX TOX105-S
Страница 6: ...TOX105 S 5 2016 02 blubathworks com ...


