


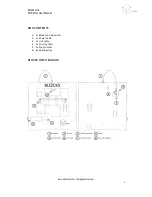


Blocks One
3D Printer User Manual
www.blockstec.com | [email protected]
7
FIRST PRINT
1.
Install slicer software. We reccomend cura software but any slicer will do (go to
www.ultimaker.com/en/products/cura-‐software
and download the latest version of
cura).
2.
Import
our
profiles
into
cura
software
(
go
to
www.blockstechnology.com/downloads/print_profiles.zip
and download our
optimized settings).
3.
Import a 3D model (go to
www.thingiverse.com
and download anything you wish).
4.
Choose the profile suitable for the desired quality.
5.
Save to SD card. Once saved remove it safely and then insert it into the Blocks one
card slot.
6.
Press the Knob a go to Print from SD and select your file.
7.
The Blocks one will home its axis and then heat up. When the nozzle is at the
desired temperature, the print will start.
8.
After the print finishes remove the bulldog clips and the glass with the printed part.
9.
Let the glass cooldown naturally and then detach the part (If the part gets stuck to
the glass, use a spatula to detach it).
RECOMMENDED SOFTWARE
CAD SOFTWARE
•
Onshape -‐ opensource complete modelling software (
https://www.onshape.com/
)
•
Solidworks -‐ paid complete modelling software (
http://www.solidworks.com/
)
•
Others – capable of exporting as .stl/.obj files.
3D MODEL DATABASE
•
Thingiverse (
http://www.thingiverse.com/
)
•
Grabcad (
https://grabcad.com/
)
•
3D warehouse (
https://3dwarehouse.sketchup.com/
)
•
Yeggi (
http://www.yeggi.com/
)
SLICER SOFTWARE
•
Cura – opensource (
https://ultimaker.com/en/products/cura-‐software
)
•
Slic3r – opensource (
http://slic3r.org/
)
•
Repetier – opensource (
http://www.repetier.com/
)
•
Simplify3D – paid software (
https://www.simplify3d.com/
)