background image


Wireless Remote Keypad (KP-R1) 


P

P

a

a

r

r

t

t

s

s


D

D

e

e

s

s

c

c

r

r

i

i

p

p

t

t

i

i

o

o

n

n


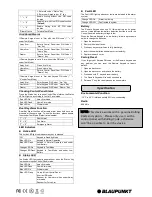
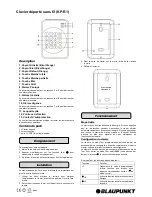
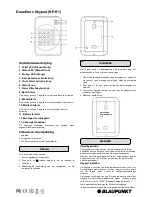
1. Active LED (Blue/Orange) 

2. Status LED (Blue/Red) 

3. Fault LED (Orange) 

4. Away Arm Key   

5. Home Arm Switch 

6. Status Key 

7. Disarm Key 

8. Panic Alarm 

Press both 1 and 3 key to trigger Panic alarm 

9. Fire Alarm 

Press both 4 and 6 key to trigger Fire alarm 

10. Emergency Alarm 

Press both 7 and 9 key to trigger Emergency alarm 

11. Battery Insulator 

12. Mounting Knockouts 

13. Tamper Switch 

The  Tamper  switch  protects  the  PIR  from  unauthorized  cover 
opening. 

P

P

a

a

c

c

k

k

a

a

g

g

e

e


C

C

o

o

n

n

t

t

e

e

n

n

t

t


1 x Remote Keypad 

2 x wall plugs and screws 

1 x 3V lithium batteries (pre-installed) 


For learning the Remote Keypad: 

1.  Put the Control Panel into learning mode.   

2.  Press both

 #

 and 

 keys to transmit learn code 

3.  Refer to Control Manual to complete the learning process. 


The  Remote Keypad  has  2 knockouts  on the  back  where  plastic 

is thinner for wall mounting.   

1.  Use  the  two  knockouts  on  the  back  to  mark  position  on  the 

wall at chest height. Open the back cover. 

2.  Drill holes into the wall using the knockouts as template. 

3.  Fix  the  keypad  base  onto  the  wall  with  the  screw  and  plugs 

provided. 

4.  Replace the keypad cover onto the base. 


S

S

t

t

a

a

n

n

d

d

b

b

y

y


M

M

o

o

d

d

e

e


The  Remote  Keypad  features  a  power  saving  feature.  When  no 
key  is  pressed  for  5  seconds,  the  Remote  Keypad  will  turn  off 
automatically  to  conserve  power.  When  any  key  is  pressed,  the 
Remote Keypad will wake up and turn on Active LED to indicate it 
is now under normal operation 

K

K

e

e

y

y

p

p

a

a

d

d


S

S

e

e

t

t

t

t

i

i

n

n

g

g


The Remote Keypad features a Test (programming) mode for you 
to  customize  its  setting.  Before  you  start  using  the  Remote 
Keypad, you should first finish configuration setting. 

The  Remote  Keypad  also  feature  a  Keypad  PIN  code  which  is 
used  to  access  the  Test  mode,  To  enter  Test  Mode,  Enter 
“0000”(Default  Keypad  PIN  code)  +  “


key,  the  Active  Orange 

LED will light up 

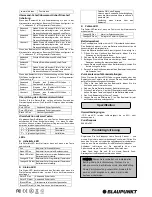
Under Test Mode, the following functions include: 

Key 

Function 

” + “7”   

Transmit  learn  code  (same  as  pressing 
both 

#

 and 


keys under normal mode) 

” + “2”   

Enable dual key Panic Alarm function 

” + “3”   

Enable dual key Fire Alarm function 

” + “4”   

Enable dual key Medical Alarm function 

” + “5” 

Disable all dual key functions 

” + “6” 

Change Keypad PIN Code: 

L

L

e

e

a

a

r

r

n

n

i

i

n

n

g

g


O

O

p

p

e

e

r

r

a

a

t

t

i

i

o

o

n

n


I

I

n

n

s

s

t

t

a

a

l

l

l

l

a

a

t

t

i

i

o

o

n

n


Surface Fixing 
Knockouts x 2 

Содержание KP-R1

Страница 1: ...outs as template 3 Fix the keypad base onto the wall with the screw and plugs provided 4 Replace the keypad cover onto the base S St ta an nd db by y M Mo od de e The Remote Keypad features a power sa...

Страница 2: ...in Normal Operation and under Low Battery Orange LED On Keypad in Test Mode Orange LED Flash Keypad in Test Mode and under Low Battery S St ta at tu us s L LE ED D The Status LED light up during oper...

Страница 3: ...hat eine Stromsparfunktion Wenn 5 Sekunden lang keine Taste gedr ckt wird schaltet sich das Bedienteil automatisch ab um Strom zu sparen Wenn man eine Taste dr ckt wird das Bedienteil wieder aktiviert...

Страница 4: ...die Status Taste gedr ckt wurde um den Status der Alarmzentrale abzufragen Rote LED an Abwesend Scharf aktiv Rote LED blinkt Anwesend Scharf aktiv Blaue LED an Alarmzentrale ist unscharf geschaltet Bl...

Страница 5: ...manual del Panel de Control para completar elaprendizaje y proceso del montaje 5 Presione dos veces la tecla de desactivaci n Disarm para salir del modo de prueba El Teclado Remoto est ahora funcionan...

Страница 6: ...n presionadas al mismo tiempo Para usar las funciones por favor habil telas en el modo Probar Test La funci n viene deshabilitada por defecto de f brica 1 y 3 Alarma de P nico Panic Alarm 4 y 6 Alarma...

Страница 7: ...l arri re pour marquer l emplacement sur le mur hauteur de poitrine Ouvrir la face arri re 2 Percer des trous dans le mur en utilisant les pr trous comme rep re 3 Fixer la base du clavier sur le mur l...

Страница 8: ...Activit Le voyant Activit s allume chaque fois que vous appuyez sur une touche Eteint Clavier en mode Veille Voyant bleu permanent Clavier en fonctionnement normal Voyant bleu Clavier en fonctionnemen...

Страница 9: ...ore per marcare la posizione di montaggio a circa 1 5mt di altezza Aprire il coperchio posteriore 2 Praticare i fori nel muro usando i fori passacavi come dima 3 Fissare la base della tastiera sul mur...

Страница 10: ...ED Attivo lampggia al premere su qualsiasi tasto Off La Tastiera in modalit Standby Spia LED Blu On La Tastiera nelle condizioni di funzionamento normali Spia LED Blu La Tastiera nelle condizioni di L...

Страница 11: ...dmontage 1 Gebruik de twee doordrukgaten op de achterkant om de positie op de muur op borsthoogte te markeren Maak de achterklep open 2 Boor gaten in de muur gebruik hierbij de doordrukgaten als sjabl...

Страница 12: ...ED D De Status LED zal oplichten tijdens het gebruik of wanneer de toets Status wordt ingedrukt om naar de status van het regelpaneel te informeren Rode LED aan Inbraak Alarm modus Rode LED Flash Thu...

Отзывы: