background image

11

CONTROLS AND CONNECTIONS

USB connection

Insert a USB storage device into the USB port to record, playback of video/music/photo.

1. 

LAN / ETHERNET PORT

2.  DIGITAL AUDIO OUT/ OPTICAL PORT
3.  HDMI 3
4.  HDMI 2
5.  HDMI 1 (ARC - AUDIO RETURN CHANNEL)
6.  USB 1 & 2 INPUT
7.  ANTENNA (RF) IN
8.  AV IN

1

2

3

4

5

6

7

8

Содержание BP750USG9200

Страница 1: ...Instruction Manual 75 4K Ultra HD Android TV BP750USG9200...

Страница 2: ......

Страница 3: ...l 15 Android TV 10 0 Home Screen 20 Google Play Store 21 Google Assistant 22 Inputs 23 Quick Menu 24 TV Settings 25 Picture Menu 26 Sound Menu 27 TV Channel Tuning Menu 28 Setup Menu 29 Parental Menu...

Страница 4: ...t The lightning flash symbol within the triangle is intended to warn you of non insulated dangerous voltage the product s enclosure that could be of sufficient magnitude to generate a risk of electric...

Страница 5: ...or electric shock Unplug this TV during lightning storms or when unused for long periods of time Not doing so may result in fire or electric shock Do not cover the ventilation openings of the product...

Страница 6: ...E MATERIALS REQUIRE DIFFERENT ATTACHMENTS PLEASE SEEK PROFESSIONAL ADVICE IF YOU ARE IN DOUBT WHAT FIXING DEVICE TO USE WARNING GENERAL SAFETY CONT Please beware that Dust could accumulate over time o...

Страница 7: ...in short circuit fire or electric shock Do not use or store flammable or combustible materials near the unit Doing so may result in fire or explosion Do not place any naked flame sources such as lit...

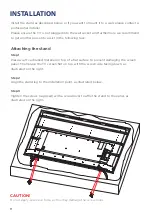
Страница 8: ...d Step 1 Place a soft cushioned material on top of a flat surface to prevent damaging the screen panel Then place the TV screen flat on top with the screen side facing down as illustrated on the right...

Страница 9: ...to assist in the following task We recommend you use a professional installer as we assume no liability for any eventual damage to the product or injury to yourself if you mount the TV on your own INS...

Страница 10: ...10 CONTROLS AND CONNECTIONS...

Страница 11: ...sert a USB storage device into the USB port to record playback of video music photo 1 LAN ETHERNET PORT 2 DIGITAL AUDIO OUT OPTICAL PORT 3 HDMI 3 4 HDMI 2 5 HDMI 1 ARC AUDIO RETURN CHANNEL 6 USB 1 2 I...

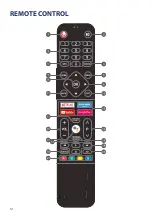
Страница 12: ...12 REMOTE CONTROL...

Страница 13: ...13 REMOTE CONTROL CONT...

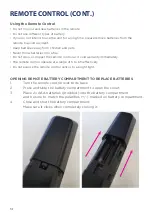
Страница 14: ...he remote control as it void warranty immediately The remote control operate at a range of 5 to 6M effectively Do not expose the remote control sensor to a bright light OPENING REMOTE BATTERY COMPARTM...

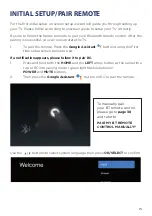
Страница 15: ...te Press the Google Assistant button during the First time setup screen below to pair If a notification appears please follow it to pair RC 1 Press and hold both the HOME and the LEFT arrow button at...

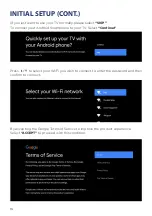
Страница 16: ...P To connect your Android Smartphone to your TV Select Continue Press to select your Wi Fi you wish to connect to enter the password and then confirm to connect By accepting the Google Terms of Servic...

Страница 17: ...identified on your ANDROID TV Note Select YES if you want google to inform you on weather more accurately based on location By Agreeing and selecting YES you agree to automatically send diagnostic in...

Страница 18: ...ontinue Select the country you are using the device in with the directional buttons TV MODES Please be sure in this step select HOME if you are using this TV for use at home Make sure to confirm once...

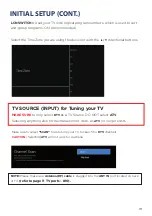
Страница 19: ...Selecting ATV will not work for Australia NOTE Please make sure Antenna RF cable is plugged into the ANT IN port located on back of TV refer to page 11 TV ports 10 TV SOURCE INPUT for Tuning your TV M...

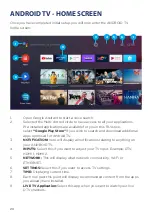
Страница 20: ...al apps optmised for Android TV 3 NOTIFICATION here will display all notifications relating to anything on your ANDROID TV 4 INPUTS Select this if you want to adjust your TV Input Example DTV HDMI 1 H...

Страница 21: ...nt Once you open Google Play Store you will be prompted to sign in or create a new account Once you have signed in you will be brought to the below page scroll through the list of applications availab...

Страница 22: ...utton on your remote control to commence Whats the weather today Allow for the voice box to appear at the bottom of your TV screen stating Listening then speak clearly towards the top of your remote c...

Страница 23: ...r select INPUT 4 on page 20 via the HOME screen or press the SOURCE button on your remote control to have quick access to INPUT menu The options that are AVAILABLE will be highlighted PORTS that are n...

Страница 24: ...ow keys to adjust sound mode Sleep Timer Press LEFT or RIGHT to adjust time settings to turn TV off after a period of time Source input Select this to select another INPUT source for your TV More Will...

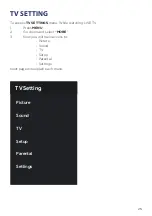
Страница 25: ...TTINGS menu While watching LIVE TV 1 Press MENU 2 Go down and select MORE 3 Now you will have access to Picture Sound TV Setup Parental Settings Next page will explain each menu TV Setting Sound Setup...

Страница 26: ...NNEL menu while watching LIVE TV 1 Press the MENU button on the remote control and select MORE refer to page 20 Menu Settings 2 Select PICTURE Picture Mode Options to choose from Standard Vivid Sport...

Страница 27: ...hin Settings icon on home menu refer to page 20 Sound Style Options to choose from Standard Vivid Sports Movie Music News User Speakers TV Speakers or External Speaker This will force the TV to output...

Страница 28: ...B C scanning for channel will NOT WORK To access CHANNEL menu while watching LIVE TV 1 Press the MENU button on the remote control and select MORE refer to page 20 Menu Settings 2 Select TV 3 Select C...

Страница 29: ...when turning TV off on via the Remote Control Note Full boot up turn on process occurs every time you turn off TV from the Power Outlet Power Point Subtitle Turn on the subtitles Can also select the l...

Страница 30: ...you want to lock Note please make sure to store save password somewhere you can access at a later date Forgetting password you may need to factory reset TV to use again Channel Block Block specific ch...

Страница 31: ...TV 1 Press the MENU button on the remote control and select MORE refer to page 20 Menu Settings 2 Select SETTINGS OR 1 Press HOME on remote control and the Smart home page will appear 2 Select the Se...

Страница 32: ...32 NETWORK INTERNET WLAN To access NETWORK menu 1 Select SETTING icon 6 on page 20 via the HOME screen 2 Then go down and select NETWORK INTERNET...

Страница 33: ...icon 6 on page 20 via the HOME screen 2 Then go down and select DEVICE PREFERENCES 3 Then go down and select ABOUT To access TIME menu 1 select SETTING icon 6 on page 20 via the HOME screen 2 Then go...

Страница 34: ...34 To access INPUT menu 1 select SETTING icon 6 on page 20 via the HOME screen 2 Then go down and select DEVICE PREFERENCES 3 Then go down and select INPUTS INPUT SETTINGS MENU...

Страница 35: ...on page 20 via the HOME screen 2 Then go down and select DEVICE PREFERENCES 3 Then go down and select HOME SCREEN To access HOME SCREEN menu 1 select SETTING icon 6 on page 20 via the HOME screen 2 Th...

Страница 36: ...via the HOME screen 2 Select Device Preferences 3 Then go down and select GOOGLE ASSISTANT Accounts will only be accessible if you have connected a Gmail account via the Google Play Store A Gmail acc...

Страница 37: ...37 GENERAL PROBLEMS WITH TV SET FAQS...

Страница 38: ...e GOOGLE ASSISTANT Feature until paired ANDROID TV REMOTE CONTROL APP If you want to control your TV via your Smart device Search for ANDROID TV REMOTE CONTROL app and download Once following prompts...

Страница 39: ...VP9 AV1 MPEG2 MPEG4 Music AAC PCM MP3 Photo JPEG JPG PNG BMP GIF Power Source 100 240V 50 60Hz Power Consumption 290W USB 5V max 500mA Dimensions With stand 1675 w 335 d 1015 h mm Without stand 1675 w...

Страница 40: ...CUSTOMER SUPPORT info ayonz com DISTRIBUTED BY Ayonz Pty Ltd...

Отзывы: