9
FRANÇAIS
ENGLISH
ESP
AÑOL
PORTUGUÊS
Switching on by inserting a CD
If the unit is switched off and there is no
CD inserted in the drive,
➮
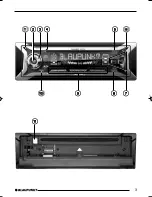
press the
button
1
.
The release panel opens.
➮
Gently insert the CD with the
printed side uppermost into the
drive until you feel some
resistance.
The CD will be drawn automatically into
the drive.
You must not hinder or assist the drive
as it draws in the CD.
➮
Gently close the control panel
whilst exerting a little pressure until
you feel it clicks into place.
The unit switches on. CD playback
begins.
Note:
●
The unit will remain off if the
ignition is off. To turn it on, press
button
2
once.
Adjusting the volume
The volume can be adjusted in steps
from 0 (mute) to 66 (maximum).
➮
To increase the volume, turn the
volume control
3
to the right.
➮
To decrease the volume, turn the
volume control
3
to the left.
Setting the power-on volume
You can set the unit’s default power-on
volume.
➮
Press the
MENU
button
8
.
➮
Keep pressing the
fi
or
%
button
7
until “ON VOLUME” appears in
the display.
➮
Set the power-on volume using the
@
and
#
buttons
7
.
To help you adjusting the volume more
easily, the audible volume level will
increase or decrease accordingly as you
make your changes.
If you select “LAST VOL”, the volume
played before the unit was last switched
off will be reactivated.
Note:
●
To protect your hearing, the
maximum switch-on volume under
the “LAST VOL” setting is “38”. If
the volume was higher before the
unit was switched off and “LAST
VOL” has been selected, the
volume will be set at “38” the next
time the radio is switched on.
When you have finished making your
changes,
➮
press the
MENU
button
8
twice.
ADJUSTING THE VOLUME
SWITCHING ON/OFF
BA Bahamas/Monte Carlo MP34_EN
13/11/03, 8:59
9
Содержание Bahamas MP34
Страница 2: ...2 Open here ...
Страница 26: ...26 1 2 3 4 BND FM AM TS 5 AUDIO X Bass E F EQ 6 7 8 MENU SCAN 9 1 6 SRC CD MP3 CD AUX Eject 0 E F ...
Страница 29: ...29 ENGLISH ESPAÑOL PORTUGUÊS 1 OFF TIMER MENU CD CD MP3 CD AUX 1 2 ...
Страница 30: ...30 ON OFF 2 L L OFF TIMER 0 C D M P 3 C D AUX 2 L 2 2 0 30 MENU 8 fi 7 OFF TIMER 7 MENU 8 OFF TIMER 0 ...
Страница 32: ...32 2 MUTE 2 MENU 8 fi 7 MUTE LVL 7 MENU 8 PHONE L MENU 8 fi 7 BEEP 7 OFF ON MENU 8 ...
Страница 71: ...EA ENGLISH W W W W W I K K 1 5 mm2 K BLAUPUNKT K I K K I Blaupunkt K I I I I I J J J J J J J J J J K K K K K ...
Страница 72: ...EA D C A H G E F 1 2 12V B I C D A 53 182 165 1 20 RC 12H Supplied Mounting Hardware ...


