www.blaubergventilatoren.de
vento expert (Duo) a W v.2
11
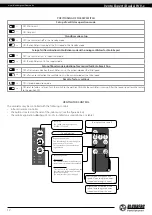
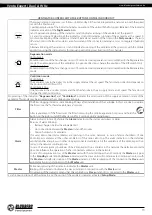
CONNECTION TO POWER MAINS AND CONTROL
N
L
N
L (~)
N (~)
L
In
Gnd
NO1
NO2
+12V
Power supply to
the next ventilator
Input for 0-10 V
analogue sensor
NO contact of an external unit
(relay sensor)
Power supply
100-230 V/50 (60) Hz
ON DIP
1 2 3 4
DIP switch and USB
socket under the
cover
EXTERNAL WIRING DIAGRAM
VENTILATOR SET-UP
POWER OFF THE POWER SUPPLY PRIOR TO ANY OPERATIONS WITH THE UNIT.
THE UNIT MUST BE CONNECTED TO POWER SUPPLY BY A QUALIFIED ELECTRICIAN.
THE RATED ELECTRICAL PARAMETERS OF THE UNIT ARE GIVEN ON THE
MANUFACTURER’S LABEL.
ANY TAMPERING WITH THE INTERNAL CONNECTIONS IS PROHIBITED
AND WILL VOID THE WARRANTY.
The unit is rated for connection to single-phase AC 100-240 V/ 50 (60) Hz power mains.
The installation of power and signal cables is described in the Installation and set-up section.
Connect the unit to power mains using durable, insulated and heat-resistant conductors (cables and wires). The total minimum cross
section for the power cable must be not less than 0.5 up to 0.75 mm
2
and 0.25 mm
2
for the signal cables. The above wire cross section
value is tentative. The signal cable must be shielded. The actual conductor cross section selection must be based on the wire type,
maximum wire temperature, insulation, length and installation method.
Use copper wires only for all the electric connections!
Connect the unit to power mains via the terminal block in compliance with the wiring diagram and terminal designation.
Connect the ventilator to power supply through an automatic circuit breaker with electromagnetic trip integrated into the home wiring
system. The rated trip current of the automatic circuit breaker must exceed the maximum current consumption of the unit, refer to the
rating plate on the unit casing.
The ventilator design enables connection of the external units with NO contact, such as external CO
2
sensor, humidity sensor, switch, etc.
When the NO contact of the external device is closed, the ventilator switches
to the maximum speed.
It is possible to connect an analogue sensor with output voltage 0-10 V to the
ventilator.
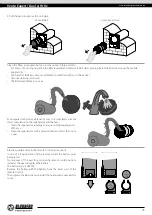
Prior to operating the ventilator set it up using the DIP switch. It is
located on the controller circuit board.
To access the DIP switch take off the front part of the indoor unit,
then uplift the rubber cover that closes the switch.


