background image

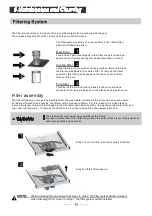
The filter prevents larger remnants of food or other objects from getting inside the pum.
The residues may block the filter, in this case they must be removed.

The filter system consists of a coarse filter, a flat (Main filter)

and a microfilter(Fine filter).

Food and soil particles trapped in this filter are pulverized by a
special jet on the lower spray arm and washed down to drain.

Larger items, such as pieces of bones or glass, that could block
the drain are trapped in the coarse filter. To remove the items
caught by this filter, gently squeeze the tap on the top of this
filter and lift it out.

This filter holds soil and food residues in the sump area and

prevents it from being redeposit on the dishes during wash cycle.

Main filter

1

Coarse filter

2

Fine filter

3

2

3

1

Filter assembly

The filter efficiently removes food particles from the wash water, allowing it to be recycled during the cycle.
For best performance and results, the filter must be cleaned regularly. For this reason, it is a good idea to
remove the larger food particles trapped in the filter after each wash cycle by rinsing the semicircular filter and
cup under running water. To remove the filter device, pull the cup handle in the upward direction.

The dishwasher must never be used without the filters.
Improper replacement of the filter may reduce the performance level of the appliance
and damage dishes and utensils.

Step 1 Turn the filter in anti-clockwise direction.

L

Step 2 Lift the filter assy up.

L

When following this procedure from step1 to step 2, the filter system will be removed;
when following it from Step 2 to Step 1, the filter system will be installed.

1

2

Содержание BDW126X

Страница 1: ...BDW126X 12 place settings...

Страница 2: ...ls and catalogues please visit our website blanco australia com support instruction_manuals or blanco australia com support catalogues Please make sure you activate your product warranty by registerin...

Страница 3: ...ened If the appliance is switched off during a wash cycle when switched on again please re select the washing cycle and operate the dishwasher according to the original Power on state Switch on the ap...

Страница 4: ......

Страница 5: ...h a visual heating element If the supply cord is damaged it must be replaced by the manufacturer or its service agent or a similarly qualified person in order to avoid a hazard Please dispose of packi...

Страница 6: ...he two buttons simultaneously to lock the program 4 Delay Button To Press the button to delay 3 Program Button To Press the button to select appropriate Program 1 Program indicators To show which prog...

Страница 7: ...he rinse aid diminishes the size of the black dot on the rinse aid level indicator changes as illustrated below Full 3 4 full 1 2 full 1 4 full Should refill to eliminate spotting Empty If there is no...

Страница 8: ...e dirt dissolving properties of the enzymes of the concentrated detergent For this reason normal wash programs in which concentrated detergents are used can achieve the same results that can otherwise...

Страница 9: ...with detergent The marking indicates the dosing levels as illustrated on the right For main wash detergent For pre wash detergent Please observe the manufacturers dosing and storage Recommendations as...

Страница 10: ...as cups glasses pans etc With the opening facing downwards so that water cannot collect in the container or a deep base Consider buying utensils which are identified as dishwasher proof Use a mild de...

Страница 11: ...ways be placed top down Deep pots should be slanted to allow water to flow out Please be reminded that The Bottom Basket features folding spikes so that larger or more pots and pans can be loaded For...

Страница 12: ...ollowing direction If a program is selected the responding light will be on Then press the Start Pause button the dishwasher begins to start Normal 90min Rapid Intensive Heavy Pre wash Intensive Heavy...

Страница 13: ...n be added any time before the detergent cup opens Add forgotten dishes Close the door After the spray arms stop working you can open the door completely 2 3 Open the door a little 1 4 5 6 Press the S...

Страница 14: ...e Main filter 1 Coarse filter 2 Fine filter 3 2 3 1 Filter assembly The filter efficiently removes food particles from the wash water allowing it to be recycled during the cycle For best performance a...

Страница 15: ...he filters could be contorted and the performance of the dishwasher could be decreased To clean the edge around the door you should use only a soft warm damp cloth To avoid penetration of water into t...

Страница 16: ...ishwasher is equipped with water supply and drain hoses that can be positioned either to the right or the left sides to facilitate proper installation Once the appliance is positioned for levelling th...

Страница 17: ...and protects you and the room from severe splashing Unscrew the safety supply hose from the faucet 3 2 1 2 3 The appliance must be connected to the water mains using new hose sets The old hose sets s...

Страница 18: ...sure to use a similar drain hose It must be no longer than 4 metres otherwise the cleaning effect of the dishwasher could be reduced Water Outlet Connect the water drain hose The drain hose must be c...

Страница 19: ...without colourant Improper detergent Make sure the dishwasher is turned on and the door is closed securely Check that the water supply is connected properly and the water is turned on Make sure to clo...

Страница 20: ...a program with a long high rinse temperature Water drainage is more difficult with these items Cutlery or dishes of this type are not suitable for washing in the dishwasher The program was not powerf...

Страница 21: ...04 1 0MPa Power supply see rating label Capacity 12 place settings If overflow occurs turn off the main water supply before calling a service If there is water in the base pan because of an overfill...

Страница 22: ......

Отзывы: