background image

TABLE OF CONTENTS

UNIVERSAL REMOTE CONTROL

• GETTING STARTED (BATTERIES)

• IN THE BOX

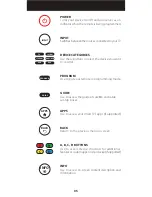
• GETTING STARTED (BUTTONS)

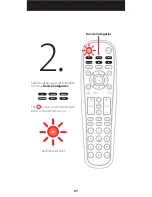
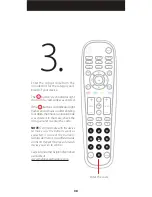
• PROGRAMMING YOUR REMOTE (DIRECT CODE ENTRY)

• PROGRAMMING YOUR REMOTE (AUTO CODE SEARCH)

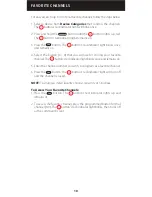
• FAVORITE CHANNELS

• VOLUME LOCK

• CHANNEL LOCK

• CODE IDENTIFICATION & FACTORY RESET

WIRELESS AUDIO TRANSMITTER

• ABOUT PRIVATE LISTENING

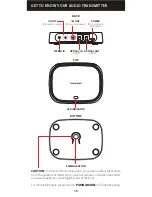
• GET TO KNOW YOUR AUDIO TRANSMITTER

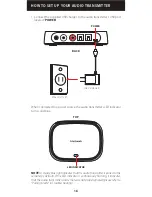
• HOW TO SETUP YOUR AUDIO TRANSMITTER

• OTHER CONNECTION OPTIONS

• PRIVATE LISTENING THROUGH YOUR REMOTE

• TROUBLESHOOTING

• FCC INFORMATION

• LIMITED 90-DAY WARRANTY

02

03

04

06

09

10

11

12

13

14

15

16

18

20

23

25

26

01

Содержание BWA18AV007

Страница 1: ...r Guide v1 0 2018 BWA18AV007 with wireless audio transmitter and stereo headphones AMP PROGRAM AUX INPUT FAV ENTER 1 2 3 4 5 6 7 8 0 9 CH SAT CBL STREAM TV B RAY DVD GUIDE VOL CH MENU BACK APPS EXIT OK A B C D INFO ...

Страница 2: ...E SEARCH FAVORITE CHANNELS VOLUME LOCK CHANNEL LOCK CODE IDENTIFICATION FACTORY RESET WIRELESS AUDIO TRANSMITTER ABOUT PRIVATE LISTENING GET TO KNOW YOUR AUDIO TRANSMITTER HOW TO SETUP YOUR AUDIO TRANSMITTER OTHER CONNECTION OPTIONS PRIVATE LISTENING THROUGH YOUR REMOTE TROUBLESHOOTING FCC INFORMATION LIMITED 90 DAY WARRANTY 02 03 04 06 09 10 11 12 13 14 15 16 18 20 23 25 26 01 ...

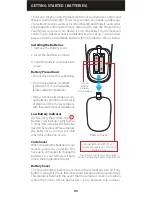
Страница 3: ... out batteries promptly and recycle or dispose of them in accordance with local and national regulations Low Battery Indicator If while using the remote the button s red indicator light flashes 3 times this indicates the batteries need to be replaced Please replace the batteries as soon as possible when this indication occurs Code Saver When changing the batteries of your remote please do so quick...

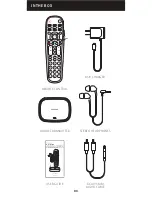
Страница 4: ...OK REMOTE CONTROL AUDIO TRANSMITTER USER GUIDE RCA 3 5MM AUDIO CABLE STEREO HEADPHONES USB CHARGER 6 Device User Guide v1 0 2018 BWA18AV007 with wireless audio transmitter and stereo headphones AMP PROGRAM AUX INPUT FAV ENTER 1 2 3 4 5 6 7 8 0 9 CH SAT CBL STREAM TV B RAY DVD GUIDE VOL CH MENU BACK APPS EXIT OK A B C D INFO 03 ...

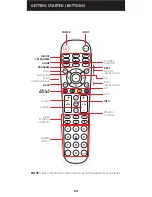
Страница 5: ... 0 9 CH SAT CBL STREAM TV B RAY DVD GUIDE VOL CH MENU BACK APPS EXIT OK POWER INPUT DEVICE CATEGORIES GUIDE PROGRAM MENU APPS 3 5MM HEADPHONE JACK NAVIGATION OK BACK MUTE HEADPHONES VOLUME HEADPHONES EXIT A B C D BUTTONS A B C D VOLUME CHANNEL MUTE INFO PREVIOUS CHANNEL VIDEO PLAYBACK CONTROLS NUMBER KEYPAD FAVORITE CHANNELS INFO 04 ...

Страница 6: ...our remote in programming mode GUIDE Use to access the guide of satellite and cable set top boxes APPS Use to access your smart TV s apps if supported BACK Return to the previous menu or screen A B C D BUTTONS Use to access device shortcuts for additional featuresorcustomappsonyourdevice ifsupported INFO Use to access on screen content description and information TV B RAY DVD SAT CBL AMP STREAM AU...

Страница 7: ...beginning please make sure that the device you want to control is powered on and follow these three simple steps NOTE Press to exit at any time NOTE The Blackweb universal remote comes pre programmed to operate many Samsung TVs 1 PROGRAM PROGRAM AMP AUX SAT CBL STREAM TV B RAY DVD INPUT FAV ENTER 1 2 3 4 5 6 7 8 0 9 CH GUIDE VOL CH MENU BACK APPS EXIT OK PROGRAM Red indicator light INFO 06 ...

Страница 8: ...he button s red indicator light blinks once and remains on 2 TV SAT CBL STREAM B RAY DVD AMP AUX AMP AUX SAT CBL STREAM TV B RAY DVD INPUT FAV ENTER 1 2 3 4 5 6 7 8 0 9 CH GUIDE VOL CH MENU BACK APPS EXIT OK PROGRAM Device Categories Red indicator light INFO 07 ...

Страница 9: ...ntered In that case check the list again and re enter the code NOTE Testtheremotewiththedevice to make sure the buttons work as expected If some of the buttons featuresdon twork tryadifferentcode onthelist Repeatthisprocessforeach device you wish to control Codelistandotherhelpfulinformation available at www myblackwebremote com 3 AMP AUX SAT CBL STREAM TV B RAY DVD INPUT FAV ENTER 1 2 3 4 5 6 7 8...

Страница 10: ...ces not compatible with Roku Streaming Stick Amazon Fire TV and any voice search features 4 Point the remote at the device you wish to control and then press and hold the OK button until the device turns off The button s red indicator light will blink as the codes are being tested 5 When the device turns off immediately release the OK button to lock in the code The button s red indicator light wil...

Страница 11: ...at you will use for storing your favorite channel The button s red indicator light blinks once and remains on 5 Enter the channel number you wish to program as a favorite channel 6 Press the button the button s red indicator light will turn off and the channel is saved NOTE To change a stored favorite channel repeat steps 1 6 above To Access Your Favorite Channels 1 Press the button The button s r...

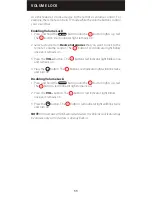
Страница 12: ...blinks once and remains on 3 Press the VOL button The button s red indicator light blinks once and remains on 4 Press the OK button The button s red indicator light will blink twice and turn off Disabling Volume Lock 1 Press and hold the button until the button lights up red The button s red indicator light remains on 2 Press the VOL button The button s red indicator light blinks once and remains ...

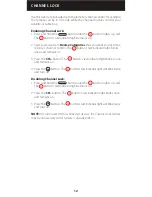
Страница 13: ...ight blinks once and remains on 3 Press the CH button The button s red indicator light blinks once and remains on 4 Press the OK button The button s red indicator light will blink twice and turn off Disabling Channel Lock 1 Press and hold the button until the button lights up red The button s red indicator light remains on 2 Press the CH button The button s red indicator light blinks once and rema...

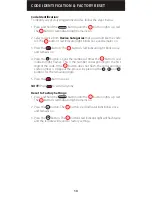
Страница 14: ...r of times the button s red indicator light flashes This is the number corresponding to the first digit of the code If the button does not flash the corresponding code number is 0 Repeat the process by pressing the and buttons for the remaining digits 5 Press the button to exit NOTE Press to exit at any time Reset to Factory Settings 1 Press and hold the button until the button lights up red The b...

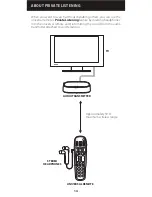
Страница 15: ...ting headphones into the universal remote and transmitting the sound from the audio transmitter attached to your television AMP PROGRAM AUX INPUT FAV ENTER 1 2 3 4 5 6 7 8 0 9 CH SAT CBL STREAM TV B RAY DVD GUIDE VOL CH MENU BACK APPS EXIT OK TV AUDIO TRANSMITTER UNIVERSAL REMOTE STEREO HEADPHONES Approximately 30 ft maximum wireless range 14 ...

Страница 16: ...r universal remote and audio transmitter are already paired to work together out of the box For more information please refer to PARING MODE in Troubleshooting BACK STEREO IN R OUT RCA audio output POWER Micro USB port 5V 300mA L OUT RCA audio output OPTICAL IN S PDIF OPTICAL OUT S PDIF LED INDICATOR PAIRING BUTTON TOP BACK BOTTOM 15 ...

Страница 17: ...transmitter s LED indicator turns solid blue NOTE A steady blue light indicates that the audio transmitter is paired to the remote by default If the LED indicator is continuously flashing it indicates that the audio transmitter and remote are not properly paired please refer to Pairing Mode in Troubleshooting LED INDICATOR TOP WALL OUTLET USB CHARGER POWER BACK 16 ...

Страница 18: ...audio that may be playing through your television s built in speakers sound bar or other connected A V equipment You can use the equipment manufacturer s remote or the universal remote s volume mute or power controls to silence the audio On some televisions you may need to manually switch the audio output from the built in speakers to the connected audio transmitter equipment Please consult your e...

Страница 19: ...ready connected to your television s audio jacks you can use the audio transmitter s audio passthrough connection labeled L OUT and R OUT to connect to your other audio equipment RCA STEREO AUDIO CABLE not included SOUND BAR OR OTHER AUDIO EQUIPMENT L R AUDIO IN L OUT R OUT 18 ...

Страница 20: ...Hz 24bit If you have a sound bar or other audio equipment already connected to your television you can use the audio transmitter s audio passthrough connection labeled OPTICAL OUT to connect to your other audio equipment NOTE When an audio source is connected to the audio transmitter s STEREO IN the optical ports will not function OPTICAL IN OPTICAL OUT OPTICAL AUDIO CABLE not included STEREO IN 3...

Страница 21: ...dio press the HEADPHONE MUTE button located on the right side of the remote The buttons below ARE NOT used for controlling the headphone s audio volume RIGHT SIDE LEFT SIDE HEADPHONE VOLUME HEADPHONE MUTE 3 5MM HEADPHONE JACK enables disables Private Listening FRONT AMP PROGRAM AUX INPUT FAV 1 2 3 4 5 6 7 8 9 CH SAT CBL STREAM TV B RAY DVD GUIDE VOL A B C D CH MENU BACK APPS EXIT OK INFO 20 ...

Страница 22: ...5MM HEADPHONE JACK located on the left side of the remote After inserting the headphones the audio transmitter s LED indicator will flash three times and play a beep in the headphones indicating when the Private Listening feature has been activated STEREO HEADPHONES Plug in LEFT SIDE 3 5MM HEADPHONE JACK LED INDICATOR Flashes 3 times 21 ...

Страница 23: ...ransmitter s LED indicator will flash once to indicate that the Private Listening feature has been deactivated CAUTION DON T FORGET TO UNPLUG THE HEADPHONES OR IT WILL DRAIN THE REMOTE S BATTERIES LED INDICATOR Flashes once Unplug AMP PROGRAM AUX INPUT FAV ENTER 1 2 3 4 5 6 7 8 0 9 CH SAT CBL STREAM TV B RAY DVD GUIDE VOL CH MENU BACK APPS EXIT OK STEREO HEADPHONES 22 ...

Страница 24: ...ossible the code that you programmed is not fully compatible with your device Try selecting the next code from the options available for the category and brand of your device There may be some buttons from your device s original remote that are not supported You may have pressed an invalid button for the device category mode the remote is in The remote will not change the channels on my device Mak...

Страница 25: ...s activated or deactivated If you notice the LED indicator is continuously flashing it means that the audio transmitter and universal remote are not paired In that case please follow the instructions below FollowtheseinstructionsonlyiftheLEDindicatoriscontinuously flashing on the audio transmitter PAIRING MODE To enter pairing mode 1 Connect the audio transmitter to a power source 2 Plug the headp...

Страница 26: ...ance with the instructions may cause harmful interference to radio communications However there is no guarantee that interference will not occur in a particular installation If this equipment does cause harmful interference to radio or television reception which can be determined by turning the equipment off and on the user is encouraged to try to correct the interference by one or more of the fol...

Отзывы: