background image

Attaching Accessories

38

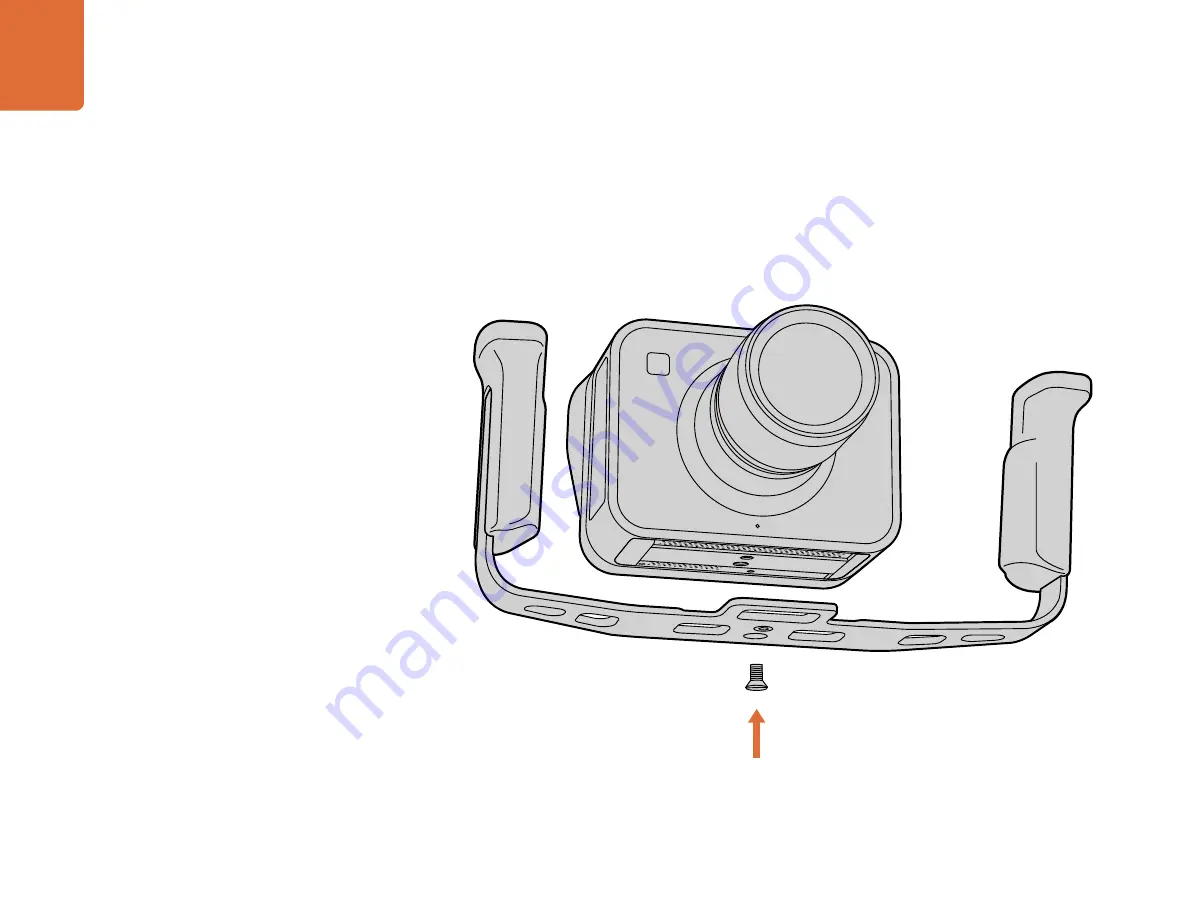
Camera Handles

Optional handles for Cinema Camera and Production Camera 4K allow shooting in locations where you 
need to move around quickly with your camera. The handles let you steady your shot and keep up with the 
action!

On the underside of the camera, locate the 

¼

” screw thread and insert the guide pin, locking the handles 

to the camera.

Содержание Cinema Camera

Страница 1: ...Installation and Operation Manual Blackmagic Cameras Windows July 2013 Mac OS X ...

Страница 2: ...Our cameras are designed to produce files that are flat which means they preserve the wide dynamic range from the sensor as well as standard file formats that work with all video software This allows you to make creative decisions by using the included DaVinci color correction software We think this means you get a cinema style shooting experience where you capture and preserve more of the image s...

Страница 3: ...ic Cinema Camera and Production Camera 4K 16 Settings Camera Settings 17 Audio Settings 19 Recorder Settings 20 File Naming Convention 22 Display settings 23 Adjusting Settings 24 Status Strip 25 Entering Metadata What is the Slate 26 Camera Video Output Waveform Monitoring using Thunderbolt 27 Using Blackmagic UltraScope 28 Monitoring using SDI 30 Post Production Workflow Working with Files from ...

Страница 4: ...nd updates See page 39 5 LANC REMOTE The 2 5mm stereo jack for LANC remote control supports record start and stop iris control and manual focus See page 15 6 HEADPHONES 3 5 mm stereo headphone jack connection See page 15 7 AUDIO IN 3 5mm stereo jack for mic or line level audio See pages 15 and 19 8 HDMI OUT Micro HDMI port for monitoring or outputting video to a switcher See page 15 9 POWER 0 7mm ...

Страница 5: ...u on the LCD See page 17 7 POWER BUTTON Press the power button to turn on the Blackmagic Cinema camera Press and hold the button to turn the camera off See page 7 8 LANC REMOTE The 2 5mm stereo jack for LANC remote control supports record start and stop iris control and manual focus See page 16 9 HEADPHONES 3 5 mm stereo headphone jack connection See page 16 10 AUDIO IN 2 x 1 4 inch balanced TRS p...

Страница 6: ...keep the dustcap on whenever possible Turning Your Camera On Pocket Cinema Camera Before you can operate Pocket Cinema Camera you need to insert the battery Step 1 On the under side of the camera push the door release towards the lens to access the battery terminal Step 2 With the gold contacts facing into the terminal and the white arrow facing the lens hook the lip of the battery under the orang...

Страница 7: ...arge the camera via a powered USB connection however it takes longer to charge so we recommend using the DC adapter when possible Step 1 Press the power button below the touchscreen The status strip will appear along the bottom of the LCD Step 2 Press and hold the power button to switch off the camera Congratulations You are now ready to insert an SSD and start recording Press and hold the power b...

Страница 8: ...ll say READY The supplied SD card is for software installation only and not suitable for video recording You ll find a list of recommended SD cards on page 14 Inserting a SSD You can insert a 2 5 9 5 mm SSD formatted in either the HFS or exFAT file systems into Cinema Camera and Production Camera 4K Step 1 Open the SSD door on the right hand side of the camera Step 2 With the gold SATA contacts fa...

Страница 9: ...lossless compressed CinemaDNG RAW or Apple ProRes 422 HQ video formats To select the desired video format Step 1 Press the MENU button Step 2 Select the REC menu and use the selection arrows to set the desired recording format Step 3 Press the MENU button to exit Your camera is now ready to record in the video format you have selected The current recording format is shown on the left of the status...

Страница 10: ... skip to the start of the next clip Press the reverse button once to go to the start of the current clip or press twice to skip back to the start of the previous clip To immediately view your recorded clip on a Blackmagic Camera simply press the Play button on the transport controls Blackmagic Pocket Cinema Camera Blackmagic Cinema Camera Blackmagic Production Camera 4K 1920 x 1080p23 98 1920 x 10...

Страница 11: ...or 240GB SSD Professional Video Series Digistor 480GB SSD Professional Video Series Intel 335 Series 240GB SSD Intel 520 Series 240GB SSD Intel 520 Series 480GB SSD Kingston 120GB SSDNow V 200 Kingston 240GB SSDNow V 200 Kingston HyperX 240GB OCZ 240GB Deneva 2 firmware 2 22 OCZ 240GB Vertex 3 OCZ 480GB Vertex 3 OWC Mercury Extreme Pro 6G SSD PNY 240GB Prevail SSD firmware 5 0 2 Sandisk Extreme 48...

Страница 12: ...SD to your computer with an external dock or cable adapter and dismiss any message offering to use your SSD for Time Machine backups Step 2 Go to Applications Utilities and launch Disk Utility Step 3 Click on the disk icon of your SSD and then click the Erase tab Step 4 Set the Format to Mac OS Extended Journaled or exFAT Step 5 Type a Name for the new volume and then click Erase Your SSD will qui...

Страница 13: ...d out the performance of your media drives with a single click of the Start button Disk Speed Test will even show you how many streams of video your storage is capable of handling Disk Speed Test is included free in the Blackmagic Camera Software Utility supplied with your Blackmagic Cinema Camera and Production Camera 4K The Blackmagic Camera Software Utility can also be downloaded from our websi...

Страница 14: ...ckly be formatted and made ready for use Preparing SD Cards on a Windows computer The Format dialog box can format a drive in the exFAT format on a Windows PC Step 1 Plug your SD card into your computer s SD card slot or SD card reader Step 2 Open the Start Menu or Start Screen and choose Computer Right click on your SD card Step 3 From the contextual menu choose Format Step 4 Set the file system ...

Страница 15: ...l audio It s important to select the appropriate seting or your audio may sound too quiet or too loud The camera will automatically switch to line level if the audio is too loud for a sustained period HDMI Out The micro HDMI port of your Pocket Cinema Camera outputs 10 bit 4 2 2 HD video at 1920 x 1080 while recording It can be used to output video to routers monitors capture devices broadcast swi...

Страница 16: ...I so it can be used to output uncompressed 10 bit 4 2 2 video to routers monitors SDI capture devices broadcast switchers and any other SDI devices Production Camera 4K supports 6G SDI so it can be used to connect to any SDI monitor as well as 4K switchers such as ATEM Production Studio 4K Thunderbolt When connected to a Mac OS X or Windows computer with Thunderbolt technology your Cinema Camera o...

Страница 17: ...ID with the onscreen keyboard When you have finished entering a new camera ID select the Enter button to save the new camera ID or select Cancel to discard any changes Setting Date and Time To set date and time on your Pocket Cinema Camera select the or buttons to change the year month and day settings Time is set to 24 hour format on Blackmagic Cameras To set the time select the and keys to make ...

Страница 18: ...500K and 7500K for a variety of daylight conditions such as time of day Adjust the White Balance settings using the arrow icons in the menu Shutter Angle Shutter angle compliments the ISO setting by regulating the amount of light on the sensor 360 degrees is considered wide open and will retain a significant amount of motion blur This would be best for low light conditions as it allows the maximum...

Страница 19: ... will automatically switch to line level input if the input levels are over the limit for a sustained period of time Channel 1 Input Level Move the audio slider icon left or right to increase or decrease levels for channel 1 The external audio input overrides the built in microphone and is recorded to audio channel 1 Channel 2 uses Channel 1 Input Select On if you only have channel 1 input and wan...

Страница 20: ...recording formats Dynamic Range Blackmagic Cameras have two dynamic range settings Film The film setting shoots video using a log curve and gives you 13 stops of dynamic range on both Pocket Cinema Camera and Cinema Camera or 12 stops on Production Camera 4K The Film dynamic range setting maximises the information in your video signal to help you get the most out of color grading software such as ...

Страница 21: ...speed effect when played back The format of each still frame is based on your recording format so if you set the camera to record in ProRes the Time Lapse setting will maintain this format The frame rate will be based on the video frame rate you have set the camera to i e 24fps so your time lapse footage can be incorporated into your workflow easily When the REC button is pressed in Time Lapse mod...

Страница 22: ... way Blackmagic Cinema Camera and Production Camera 4K Clips are recorded to your SSDs in the CinemaDNG RAW format or to a ProRes or DNxHD QuickTime movie depending upon which recording format you have chosen Blackmagic Cinema Camera and Production Camera 4K use the following file naming convention when recording video Camera ID _ Reel Number _ yyyy mm dd _ hhmm _C Clip number mov The table below ...

Страница 23: ...es an indication of exposure levels Diagonal lines will appear across any part of the video that exceeds the zebra exposure level Turn zebra on and select the desired zebra warning level by using the left and right arrows SDI HDMI Overlays You can monitor your video on an external display using the HDMI port on Pocket Cinema Camera or the SDI port on Cinema Camera and Production Camera 4K The SDI ...

Страница 24: ... press the forward and reverse buttons on the transport controls Focus Button on Pocket Cinema Camera When using Pocket Cinema Camera with an autofocus lens press the FOCUS button for focus peaking or autofocus Press the FOCUS button once to auto focus Press the FOCUS button twice for focus peaking When using a manual lens press the FOCUS button once for focus peaking Focus Button on Cinema Camera...

Страница 25: ...enient summary of the camera s current settings Battery Life Indicator When the remaining charge drops below 25 capacity the status strip will show the battery status in red to warn you that battery life is running low SD SSD Activity Icons The status strip displays important information showing the state of the inserted media Moving Dots When you see the moving dots the camera is checking and pre...

Страница 26: ...of clips to search through saving valuable time when you are editing All metadata is compatible with popular software such as Final Cut Pro X and DaVinci Resolve Cinema Camera Production Camera 4K Step 1 Tap the touchscreen once to make the slate appear Step 2 To enter or change details tap the text you wish to change and an onscreen keyboard will appear Type in the desired information and press t...

Страница 27: ...rt always outputs HD1080p video in the uncompressed 10 bit format The Blackmagic Camera Utility installs Blackmagic UltraScope software for waveform monitoring of your camera during recording and playback Blackmagic UltraScope allows you to monitor almost every aspect of the video you record with your Cinema Camera or Production Camera 4K Connect to your computer via the Thunderbolt port of your C...

Страница 28: ...scopes that let you monitor all aspects of your video signal which is perfect for checking levels on your camera while shooting Any adjustments made to the camera can immediately be seen with Blackmagic UltraScope Simply connect a Thunderbolt cable from your camera to a Thunderbolt port on your computer and away you go Installation Requirements The Blackmagic UltraScope software interface requires...

Страница 29: ...using the hot key CMD F on Mac OS X In2 upview selectthedesiredleftandrightscopesbyopeningtheView menuorbyright clickinganywhere in the UltraScope window Make your selections from the Left View and Right View menu options If you want the scopes to swap sides select the left or right view and set it to be the same as the other view The scopes will swap sides because the 2 up view never displays the...

Страница 30: ...the SDI output will be set to 1080i50 and 1080i59 94 respectively This allows you to work with most switchers which only support interlaced high definition formats Connecting to Monitors Although you can use the camera s LCD to monitor your image SDI monitoring can be really handy if the camera is mounted in a way where accessing the LCD is tricky or impractical such as secured high up for a bird ...

Страница 31: ...afely using either Mac OS X or Windows first Working with Files from SD Cards You can access your ProRes or CinemaDNG files straight from your SD card with any Mac OS X or Windows computer that features an SD card slot or by using an SD card reader Step 1 Remove the SD card from your Pocket Cinema Camera and insert it into the SD card slot of your computer or SD card reader The SD card can be acce...

Страница 32: ...ll occur after the edit To convert your RAW clips using DaVinci Resolve Step 1 Create a new project and set your video resolution and frame rate to match your RAW video clips In this example we ll use the 1080p format with a frame rate of 25 Step 2 Import your CinemaDNG RAW clips into the Media Pool Step 3 Go to Project Settings and set your Input Settings to Scale Entire Image to Fit Step 4 Go to...

Страница 33: ...vidual clip from the Resolve timeline The converted clips can now be imported into your editing software You can always make adjustments to your grade by exporting an XML from your editing software Using Final Cut Pro X To edit Apple ProRes 422 HQ clips using Final Cut Pro X you need to create a new project matching your clips video format and frame rate For this example clips are set using ProRes...

Страница 34: ...in editing Using Adobe Premiere Pro CC To edit your Apple ProRes 422 HQ or DNxHD clips using Adobe Premiere Pro CC you need to create a new project matching your clips video format and frame rate For this example clips are set using ProRes 422 HQ 1080p25 camera settings Step 1 Launch Adobe Premiere Pro CC In the Welcome window select Create New New Project A window will open containing project set...

Страница 35: ...HD 1080 Step 4 Make sure bit depth is set to 10 bit and frame type is Progressive Step 5 From the Config Template dropdown menu select 1920x1080 25000p cfg Step 6 Leave the Preferred Format set to ProRes 422 HQ and click Create Step 7 Click on the New button under the User heading Step 8 When the Create New User Profile window opens type your user name and click Create Step 9 When the Project and ...

Страница 36: ...taller Double click the installer and follow the onscreen prompts to complete the installation How to Update the Camera Software After installing the latest Blackmagic Camera Utility on your computer connect a USB cable between the computer and the camera On Pocket Cinema Camera the mini USB 2 0 port is located inside the battery terminal On Cinema Camera and Production Camera 4K the mini USB 2 0 ...

Страница 37: ...ly push into the camera To remove the sun shield either Option 1 Hold the top of the shield in the middle and gently pull out making sure it releases evenly on both sides Option 2 Using your thumbs gently press the side locking tabs outwards using equal pressure and pull out the shield Do not pull the sun shield out one side at a time as you may damage the locking tabs Carry Strap Cinema Camera an...

Страница 38: ...roduction Camera 4K allow shooting in locations where you need to move around quickly with your camera The handles let you steady your shot and keep up with the action On the underside of the camera locate the screw thread and insert the guide pin locking the handles to the camera ...

Страница 39: ...enu to reveal the version number On Windows open Blackmagic Camera Utility from your Start menu or Start Screen Click on the Help menu and select About Blackmagic Camera Utility to reveal the version number How to Get the Latest Software Updates After checking the version of Blackmagic Camera Utility software installed on your computer please visit the Blackmagic Support Center at www blackmagicde...

Страница 40: ...e to unscrew them Keep the screws as you will need them again Step 3 Gentlyliftthefanmoduleupandoutofthe camera taking care NOT to pull the wires that connect to the inside of the camera Accidentally pulling on these wires could cause them to become unplugged from an inaccessible location inside the camera which would need to be fixed by a Blackmagic Design service center Step 4 Locate the white p...

Страница 41: ...epair or service the product b to repair damage resulting from improper use or connection to incompatible equipment c to repair any damage or malfunction caused by the use of non Blackmagic Design parts or supplies or d to service a product that has been modified or integrated with other products when the effect of such a modification or integration increases the time or difficulty of servicing th...

Отзывы: