6
BASIC TROUBLESHOOTING GUIDE
PROBLEM 1: THE UNIT HAS NO POWER /MAIN POWER LED DOES
NOT LIGHT UP
1. Check if the unit is switched ON.
2. Check the fuse. Replace with the same type of fuse if blown.
3. Check the power cord and make sure there are no disconnections.
4. Verify that the unit is properly connected to the power source.
PROBLEM 2: SOLDERING IRON DOES NOT RISE IN TEMPERATURE
Description: Main power LED lights up and so does the heater LED but sol-
dering iron temperature is relative low and is not heating up.
SOLUTION:
Soldering iron cord may be damaged and needs to be replaced or
repaired.
Heating element may be damaged and needs to be replaced
PROBLEM 3: SOLDERING IRON TEMPERATURE IS INTERMITTENT
Description: Main power LED lights up and so does the heater LED but sol-
dering iron temperature rises and falls uncontrollably.
SOLUTION:
Soldering iron plug may be loose from the receptacle unplug the
soldering iron and reattach.
Soldering iron cord may be damaged or loose and needs to be
replaced or repaired. See trouble shooting soldering iron cords
section of this manual.
PROBLEM 4: SOLDER WOULD NOT STICK TO THE SOLDERING TIP
Description: Soldering iron is able to quickly melt solder but cannot cause
the solder to attach to the tip.
SOLUTION:
Soldering iron tip may already be too dirty or oxidized . Please see
our solder tip maintenance guide on how to clean soldering tips.
Temperature could be set too high causing solder to quickly burn
away, Please adjust to a more suitable lower temperature range.
3
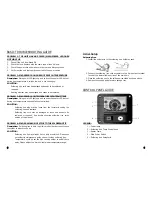
Initial Setup
Soldering Iron
1. Install the solder wire to the soldering iron holder as seen.
2. Connect the soldering iron cord assembly to the 6-pin output terminal
found at the lower middle portion of the main unit.
3. Place the soldering iron to the soldering iron stand as shown above.
4. Dampen the sponge and place into sponge tray.
LEGEND:
1 — Power lamp
2 — Soldering Iron Temp Control knob
3 — Heater Lamp
4 — Main Power Switch
5 — Soldering Iron Receptacle
CONTROL PANEL GUIDE
3
5
1
2
4


