background image

Receiving and reading messages  —  Managing Address Book attachments

Installation and User’s Guide

99

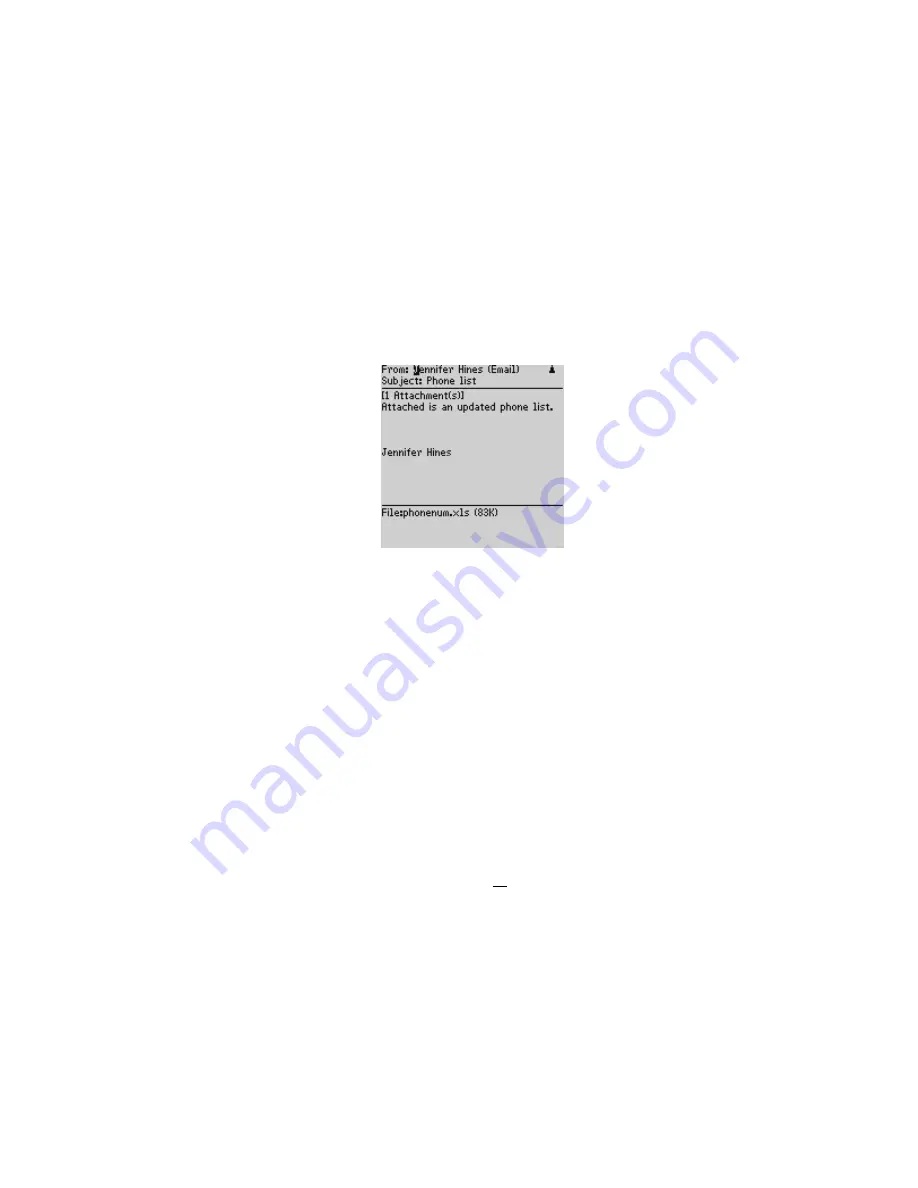
displayed at the top of the message.) The name of the
attachment and the size of the file will appear at the end of the
message.

3.

Click the trackwheel to view the menu. Scroll to Forward
Message and click. Select a recipient and a send method. 

4.

You can type a message before you click to view the menu and
select Send Message. The sent message will include the file
attachment.

You return to the 

Messages

 screen where you can view the sent

message’s status.

Managing Address Book 
attachments

The handheld supports attachments in the form of Address Book
entries. If you have received a message with this type of attachment,
follow this procedure to open the attachment and add it to your
handheld’s contact database:

1.

In the 

Home

 screen, scroll to the 

MESSAGES

 icon and click.

Содержание H1100

Страница 1: ...Installation and User s Guide iPAQTM BlackBerryTM H1100 Handheld...

Страница 2: ...are trademarks of Puma Technology Inc that may be registered in some jurisdictions Mobitex is a trademark of the Swedish Telecommunications Administration that may be registered in some jurisdictions...

Страница 3: ...not installed and used in accordance with the manufacturer s instructions may cause interference harmful to radio communications There is no guarantee however that interference will not occur in a pa...

Страница 4: ...his device complies with Industry Canada RSS 119 under certification number 2503 195 634A IC Class B compliance This device complies with the Class B limits for radio noise emis sions as set out in th...

Страница 5: ...dheld 21 Handheld components 21 Turning on your handheld 24 Turning off the handheld 25 Description of keys 25 Setting the date and time 39 Setting message notification 39 Setting message delete 40 Us...

Страница 6: ...the auto signature 81 Receiving delivery confirmation 82 Attaching Address Book entries 84 Using AutoText 85 Automatic formatting 90 Inserting symbols 92 Summary and tips 93 Receiving and reading mes...

Страница 7: ...ks function 139 Using the Calendar function 144 Summary and tips 157 Using the MemoPad and Calculator 159 Using the MemoPad function 159 Using the Calculator function 162 Summary and tips 166 Customiz...

Страница 8: ...Limited Software License Agreement 197 Terms and Conditions 197 LIMITED WARRANTY 201 General Terms 201 Options and Non Compaq Software 203 Transfer of Ownership 204 Warranty Period 204 Warranty Servic...

Страница 9: ...s fuel storage and distribution areas chemical plants where blasting operations are in progress or in any other area in which restrictions on radio transmissions are imposed In addition the iPAQ Black...

Страница 10: ...oring your handheld while in a vehicle Do not place the iPAQ BlackBerry H1100 Handheld or its charging cradle on any unstable surface such as a cart stand tripod bracket or table It may fall causing s...

Страница 11: ...cradle from the wall and refer the handheld and charging cradle for service to qualified personnel if the power supply cord or plug is damaged liquid has been spilled or objects have fallen into the...

Страница 12: ...only with a dry cloth Do not install near any heat sources such as radiators heat registers stoves or other apparatus including amplifiers that produce heat Do not defeat the safety purpose of the po...

Страница 13: ...operate normally or has been dropped WARNING To reduce the risk of fire or electric shock do not expose this apparatus to rain or moisture Adjust only those controls that are covered in this manual An...

Страница 14: ......

Страница 15: ...r of messaging with your handheld using functions such as Messages Receive read reply to compose forward save file and delete messages Compose Create and send messages to Internet email addresses and...

Страница 16: ...es Power Off Turn off the handheld at night or on weekends New for version 2 0 The iPAQ BlackBerry Handheld pre installed with BlackBerry version 2 0 software now supports folder management which give...

Страница 17: ...rected See the Redirector Settings online help for more information For a complete list of new features for version 2 0 of the software refer to the README txt file found on your installation CD ROM C...

Страница 18: ...s your email client and In Outlook if you select Tools Services the dialog box contains a list of services that includes Microsoft Exchange Server About this guide This guide provides information for...

Страница 19: ...Welcome to your iPAQ BlackBerry Solution Installation and User s Guide 19 Customer support For customer support U S and Canada 1 800 OK COMPAQ Web www compaq com support or www compaq com H1100...

Страница 20: ......

Страница 21: ...eiving email Handheld components Figure 1 Front view of handheld Here are some details on the handheld s main components LCD screen The LCD screen is your interface with functions such as composing an...

Страница 22: ...punctuation and special characters can be generated using the orange ALT key in combination with the other keys For easy typing hold the device in both hands and use your thumbs Roll and click the tra...

Страница 23: ...e information on installation procedures and serial connection details Docking cradle The docking cradle provides a link between the handheld and your PC so that you may use the Desktop Software provi...

Страница 24: ...the top right corner of the Home screen next to the battery icon will be replaced by BAT This is an indication that it is time to recharge the handheld In this state all radio functions such as sendi...

Страница 25: ...chart describes special keyboard and trackwheel combinations that will help you navigate compose messages and configure options on the handheld Tip You can also select a function by pressing the under...

Страница 26: ...cters When composing a message or entering text press and hold a letter key while rolling the trackwheel to scroll through international characters characters with accents When the desired character a...

Страница 27: ...pitalize alpha characters Press the SHIFT key once to capitalize the next character that you type Press and hold the SHIFT key while you type so that all letters are capitalized Press and hold the let...

Страница 28: ...elect more than one message You can file delete or save these messages or mark them read or unread ENTER key Carriage returns select highlighted items Press the ENTER key to insert a regular carriage...

Страница 29: ...l to a date in the Messages screen and press DEL a message appears asking if you wish to delete all messages prior to that date Escape key under trackwheel Esc from screens menus Press the ESC key to...

Страница 30: ...press the associated alpha key under the desired symbol You will return to your message with the symbol inserted LCD interface The handheld s LCD screen is composed of the Home screen function screens...

Страница 31: ...activate backlighting Backlighting is disabled after 20 seconds if you do not press a key or move the trackwheel You can manually turn off the backlighting by pressing the silver key again Function sc...

Страница 32: ...sages to Internet email addresses or directly through peer to peer PIN option Saved Messages Store important messages for future reference Search Messages Locate messages in seconds with the powerful...

Страница 33: ...ant notes and memos Calculator Perform basic mathematical operations and conversions Options Customize the way the handheld notifies you of messages set the password customize Autotext set the date ti...

Страница 34: ...ress Book function menu Icons and graphical tools Turn Wireless On Turn Wireless Off Turn the handheld s radio off when it may interfere with other radio communications such as during flight You will...

Страница 35: ...the handheld s functions Home screen display In any of the function screens press the ESC key to return to this Home screen For a description of each function see page 31 Handheld status icons These...

Страница 36: ...ending sent and received messages Data is being sent Data is being received ALT key mode is activated SHIFT key mode is activated NUM lock mode is activated Unread messages waiting Icon Description Me...

Страница 37: ...Appointment or the Daily Alarm screens Use the menu While in an option field click to view the menu Scroll to Change Options and click A dialog box appears where you can scroll through your options O...

Страница 38: ...roll through your options Release the SPACE key once you have set the field to your preference This method is used throughout the guide Navigational icons These icons appear on the handheld s LCD scre...

Страница 39: ...e and click The Date Time screen appears Scroll to the field you would like to set then press the SPACE key to scroll through your options 3 Click the trackwheel to view the menu Scroll to Save Option...

Страница 40: ...e menu Scroll to Save Options and click You return to the Device Options screen See page 175 for more information on the notification options Setting message delete You can configure your Messages scr...

Страница 41: ...held is left idle for that amount of time you will need to type your password to use the handheld You can also manually activate the password security screen by selecting the Lock function from the Ho...

Страница 42: ...have to enter your password again to verify it Note If you have entered information in the Owner screen of the Options function it will appear on the password security screen We recommend that you in...

Страница 43: ...your options Release the SPACE key once you have set the field to your preference 4 Click the trackwheel to view the menu Scroll to Save Options and click You return to the Device Options screen If t...

Страница 44: ...ENTER to open the Security screen Note The password security screen will show your contact information if you have entered it in the Owner screen or it will prompt you to Press any key Type the first...

Страница 45: ...d again to verify it 5 Click the trackwheel to view the menu Scroll to Save Options and click You return to the Device Options screen with your password changed To disable password protection Once you...

Страница 46: ...Using password protection 46 3 While in the Password field of the Security screen press the SPACE key to change the Password option to Disabled 4 Click the trackwheel to view the menu Scroll to Save O...

Страница 47: ...protection You re now ready to start sending email Getting to know your handheld Tips Press the first letter of an item in an options list menu or choice list to jump directly to the item Press Y to...

Страница 48: ......

Страница 49: ...are on your PC 4 Connect the handheld to your PC using the cradle 5 Enable email redirection 6 Send a test message 7 Read the test message Turning the radio on and off When you receive your handheld y...

Страница 50: ...radio when on an airplane in a hospital or any place where it may interfere with other radio transmissions and frequencies The icon will change depending on whether the wireless radio is on or off The...

Страница 51: ...ge if you have one or more bars beside the coverage indicator in the top right corner of the Home screen Register your handheld using this procedure 1 In the Home screen scroll to the OPTIONS icon and...

Страница 52: ...open the README file and run the Desktop Software right away After installation when you have restarted your PC you will be prompted to choose an email box profile from a drop down list your profile...

Страница 53: ...COM port on the back of your PC Connect the AC adapter to the cradle cable as shown below Plug the AC adapter into an available power outlet 3 Secure the handheld in the cradle by inserting the conne...

Страница 54: ...ttom of the cradle with one hand and gently pull the handheld up out of the cradle Note The message Handheld not found will appear if the PC cannot detect the handheld on a serial port If the handheld...

Страница 55: ...eiving email If your company will be redirecting email to your handheld using the BlackBerry Enterprise Server software you do not have to run the Desktop Redirector Please ensure that your IT adminis...

Страница 56: ...e New Address screen enter your own email address information and press ENTER after each field 4 Click the trackwheel to view the menu Select Save Address by clicking again You return to the To screen...

Страница 57: ...he following icons to the left of the message header to indicate the message s status See Chapter 4 for more information on composing and sending messages Reading a message When you receive your test...

Страница 58: ...essage appears on your screen Scroll down to read the entire message Scroll up past the subject line of the message to view the current folder the message status the recipient s the sender and the dat...

Страница 59: ...n your PC connect the handheld to your PC and enable email redirection Read on to learn more about the Desktop Software Note If you slide the handheld out of the holster within five seconds of notific...

Страница 60: ......

Страница 61: ...s onto the handheld all using the Desktop Software s convenient Windows interface Installation and setup The previous chapter Start sending email described installing the Desktop Software and connecti...

Страница 62: ...lication Loader is connecting to your handheld and is reading your handheld s configuration At the same time your handheld s LCD will read Loader activity Wait until initialization is complete and the...

Страница 63: ...ct and click Finish 6 The Load Progress dialog box appears and the new files are added to your handheld 7 When loading is complete the Loader dialog box will indicate whether loading was successful If...

Страница 64: ...dialog box will chart the progress of the data transfer from the handheld to your PC Once the information has been saved to your PC you return to the Backup and Restore window To import files from you...

Страница 65: ...file name that contains the information you want to restore and click Open 3 A dialog box will chart the progress of the data transfer from the PC to your handheld Once the information is retrieved a...

Страница 66: ...ou reconcile your email You can change the placement of your email messages on your handheld only by selecting Import moves and deletes to handheld only Or you can choose to synchronize any moves Note...

Страница 67: ...e cradle and connect it to your PC In the Desktop Manager double click Intellisync The Intellisync window appears Note If you select the second option you need to select which location should dominate...

Страница 68: ...dows such as field mapping synchronization filters and conflict resolution settings depending on the translator that you have selected See the online help for more information 5 Once you have configur...

Страница 69: ...handheld These defaults can be disabled enabled or deleted The CC Default filter sends only the message header to your handheld when your address appears in the CC field of the message The To and BCC...

Страница 70: ...click OK To add a redirection filter Filters help you manage your email by automatically performing actions on received messages using filter settings rules Rules are the sets of conditions and actio...

Страница 71: ...ckup and restore information synchronize email and PIM and redirect email In the next chapter you ll discover more about composing and sending email Note As each email message arrives at your PC the f...

Страница 72: ......

Страница 73: ...d offers for advanced composing and sending capabilities Setting message options You can change the message options for all message types received saved and sent You can choose Display Time shows the...

Страница 74: ...ions and click 3 The Message List Options screen appears Scroll to the field you would like to set then press the SPACE key to scroll through your options Release the SPACE key once you have set the o...

Страница 75: ...time you reconcile email using the Intellisync tool 1 In the Home screen scroll to the MESSAGES icon and click 2 Click to view the menu Scroll to Options and click In the Message List Options screen...

Страница 76: ...o Options and click 3 The Current Message Options screen appears In the Importance field press the SPACE key to change the importance level of the message you are composing from Normal to High Note An...

Страница 77: ...ting contact s name for which you have a PIN included in the contact s information Click the trackwheel to view the menu Scroll to Use PIN and click Note An exclamation mark appears beside the sent me...

Страница 78: ...Once you have finished composing your message click the trackwheel to view the menu Scroll to Send Message and click You return to the Messages screen where a checkmark will appear to indicate that th...

Страница 79: ...n scroll to the COMPOSE icon and click 2 The To screen appears Scroll to Use Once and click to view the menu Select a send method either Email or PIN For this exercise select Use Email 3 The One Time...

Страница 80: ...cipient and choose whether recipients are addressed directly To carbon copied CC or blind carbon copied BCC See the Address Book chapter for information on adding contacts to your Address Book 1 In th...

Страница 81: ...sing your message 5 When you have finished composing your message click to view the menu Scroll to Send Message and click Customizing the auto signature Once you install the Desktop Software an auto s...

Страница 82: ...receive confirmation when sending a message by email 1 In the Home screen scroll to the COMPOSE icon and click 2 Select the recipients of the message by following the standard email message procedure...

Страница 83: ...sage and then send it When the message has been delivered to the recipient s handheld you will receive a new message indicating that your sent message has arrived Note You will have to use the Select...

Страница 84: ...message click the trackwheel to view the menu Scroll to Attach Address and click 3 The Attach screen appears listing all of your contacts names Scroll to a contact and click to view the menu Scroll t...

Страница 85: ...tomatically enter commonly used strings of words into a message by typing only one keyword Automatically insert punctuation and symbols into your message without using the ALT key or symbols library H...

Страница 86: ...ing AutoText 86 3 As soon as you press the SPACE key the correct spelling replaces the error To add a new AutoText entry You may want to customize your AutoText database by adding specific AutoText en...

Страница 87: ...e keyword and replacement text in each field then click the trackwheel to view the menu Select Save Item by clicking again You can test your new entry by typing the keyword while you compose your mess...

Страница 88: ...roll to Insert Macro and click In the Insert Macro screen scroll to a macro and click The list of macros includes Short date Long date Short time Long time Owner name Owner info Backspace Delete and 4...

Страница 89: ...croll horizontally while you make your edits Make your changes to the current entry 4 Click the trackwheel to view the menu Scroll to Save Item and click You will return to the AutoText screen where y...

Страница 90: ...an perform a search to find an entry quickly 1 In the Home screen scroll to the OPTIONS icon and click 2 The Device Options screen appears Scroll to AutoText and click In the AutoText screen type the...

Страница 91: ...d option set to either Slow or Fast for this feature to work See page 177 for details on the Screen Keyboard options Auto punctuation You can insert a period automatically at the end of a sentence or...

Страница 92: ...or ALT again to turn off num lock mode Inserting symbols You can enhance your messages by inserting symbols from the handheld s symbols library 1 In the Home screen scroll to the COMPOSE icon and cli...

Страница 93: ...has been inserted Summary and tips In this chapter you learned more about composing and sending email Not only have you learned about sending methods but you have also been introduced to the time savi...

Страница 94: ...age the letter following the period will automatically be capitalized Type the first letters of the name or the initials separated by a space to find a specific contact in the To field Press ALT CAP R...

Страница 95: ...tions Once you have read a new message click the trackwheel to view your options Mark Unread Mark the current message as unread If you synchronize the handheld with your desktop the message will remai...

Страница 96: ...andheld Reply to All with Text Send a reply to all recipients and include the text of the original message as part of the reply Delete Message Delete the open message Show Qualified Address Show the S...

Страница 97: ...to your handheld and the remainder is stored in your email Inbox You can receive the rest of your message by following this procedure 1 In the Home screen scroll to the MESSAGES icon and click 2 Open...

Страница 98: ...meone else The original message with the attached file is forwarded through your email Inbox 1 In the Home screen scroll to the MESSAGES icon and click 2 Open a received message that has a file attach...

Страница 99: ...thod 4 You can type a message before you click to view the menu and select Send Message The sent message will include the file attachment You return to the Messages screen where you can view the sent...

Страница 100: ...e its name and size 3 With your cursor in the name of the Address Book attachment click the trackwheel to view the menu Click Open Attachment The Address Attachment screen opens and you can view the i...

Страница 101: ...ESSAGES icon and click 2 Open a received message and read it Scroll to the top of the message Place your cursor in the From field and click to view the menu 3 Scroll to Add to Address Book and click T...

Страница 102: ...eiving and reading messages Tips Press ALT and roll the trackwheel to page up and down in the Messages screen Press M to go to the Messages screen while in the Home screen or Saved Messages screen Pre...

Страница 103: ...o go to the previous message when viewing or previous day when in the Messages screen Press U to go to the next unread message in the list Press R when in a message to reply without text to the sender...

Страница 104: ......

Страница 105: ...ges into folders See Chapter 2 Start Sending Email for more information on installing the Desktop Software The first time you synchronize your handheld and PC the names and structure of the folders in...

Страница 106: ...u want to store the message You can expand the folders that appear in the File Message screen to go to one of your Inbox subfolders Click to view the menu then select Open Folder by clicking again 4 O...

Страница 107: ...eeds to delete old messages to free memory space saved messages are not deleted If you have set the Message List Options to delete messages from the desktop and the handheld you should save messages i...

Страница 108: ...e and click 3 Click the trackwheel to view the menu Scroll to Save Message and click The message Copying to saved folder flashes on the screen and the message is copied to the Saved Messages screen bu...

Страница 109: ...aved you can delete the message from the Messages screen See page 119 for more information on deleting messages To remove messages from the Saved Messages screen You can remove sent and received messa...

Страница 110: ...in the To screen click the trackwheel to view the menu Scroll to Save Message and click 3 The Messages screen appears An icon beside the message indicates that the message is saved but has not been s...

Страница 111: ...o save again or to send the message Searching messages Use the handheld s search function to locate specific messages You can specify and save the terms of several searches and use them at any time Yo...

Страница 112: ...r field press the SPACE key The Select Folder screen appears listing the top level structure of your folders Scroll to your mailbox and click to view the menu Select Open Folder by clicking again Cont...

Страница 113: ...messages or only the saved messages which match your search terms 6 After you have set the terms of your search click the trackwheel to view the menu 7 To perform a one time search without saving any...

Страница 114: ...hotkey you can use ALT the hotkey to carry out the search in the Messages or Saved Messages screens When you enter text in the Subject or Message field the Search Messages function will search for ph...

Страница 115: ...ome screen scroll to the SEARCH MESSAGES icon and click 2 The Search Messages screen appears Click the trackwheel to view the menu Scroll to Recall Search and click 3 Your saved searches are listed Se...

Страница 116: ...it a search once 1 In the Home screen scroll to the SEARCH MESSAGES icon and click 2 The Search Messages screen appears Click the trackwheel to view the menu Scroll to Recall Search and click 3 Your s...

Страница 117: ...ches are listed Select the search that you want to delete then click to view the menu Scroll to Delete Search and click 4 A dialog box appears asking if you are sure you want to delete the selected se...

Страница 118: ...eceived from that contact This feature is helpful if you want to search for all messages relating to a new message that you have received 1 In the Home screen scroll to the MESSAGES icon and click 2 S...

Страница 119: ...you can delete a message without opening it This procedure also applies for deleting messages from the Saved Messages screen 1 In the Home screen scroll to the MESSAGES icon and click 2 In the Message...

Страница 120: ...ge You can delete a message while it is open without returning to the Messages screen 1 In the Home screen scroll to the MESSAGES icon and click 2 Open the message you want to delete by clicking to vi...

Страница 121: ...s no longer listed To delete multiple messages You can delete all messages prior to a particular date by selecting a date field 1 In the Home screen scroll to the MESSAGES icon and click In the Messag...

Страница 122: ...Delete On field to Desktop and Handheld See page 73 for more information on setting the Message List Options Tip You can also delete multiple messages that aren t date specific In the Messages screen...

Страница 123: ...message you can edit its text add or change the recipient or change the send method 1 In the Home screen scroll to the MESSAGES icon and click 2 In the Messages screen scroll to a sent message that yo...

Страница 124: ...our message is not sent properly on the first attempt you can resend the message to the same recipient If you want to send the message to a different recipient you must use the Forward Message or Edit...

Страница 125: ...ktop Software the messages will remain marked unread on both your desktop and your handheld 1 In the Home screen scroll to the MESSAGES icon and click 2 Scroll to a read message Click to view the menu...

Страница 126: ...d clicking again You can also mark multiple messages as unread In the Messages screen hold the SHIFT key while rolling the trackwheel to select multiple messages Click the trackwheel to view the menu...

Страница 127: ...s in the list will be marked as read Summary and tips In this chapter you learned how to manage your messages more effectively Message management on the handheld is similar to managing messages on you...

Страница 128: ...ed Messages screens Press ALT O to view Outbox messages Press ALT a hotkey to carry out a search in the Messages or Saved Messages screens You can specify the hotkey Press V to go to the Saved Message...

Страница 129: ...In your Address Book options you can decide how you want to sort your addresses whether or not you want confirmation of deleted addresses and whether or not you want to allow duplicate names 1 In the...

Страница 130: ...y default this is set to Yes 4 Scroll to the field you would like to set then press the SPACE key to scroll through your options Release the SPACE key once you have set the option to your preference 5...

Страница 131: ...n also type your contact s full name in the First or Last field and press ENTER The first name will appear in the First field and the last name will appear in the Last field Note You can have up to th...

Страница 132: ...ield supports alpha numeric and symbol characters Last Type your contact s last name This field supports alpha numeric and symbol characters Email Type your contact s email address This field supports...

Страница 133: ...meric and symbol characters Work Type your contact s business phone number This field supports numeric characters and the x and characters without having to hold down the ALT key Home Type your contac...

Страница 134: ...This field supports alpha numeric and symbol characters State Prov Type your contact s state or province This field supports alpha numeric and symbol characters ZIP Postal Code Type your contact s zi...

Страница 135: ...elect the Address Book entry that you want to edit and click to view the menu Scroll to Edit Address and click 3 In the Edit Address screen use the trackwheel to move from field to field Press the ALT...

Страница 136: ...x will appear only if Confirm Task Delete is enabled in the Address Book Options screen You return to the Address Book screen and you can see that the entry is no longer listed Searching addresses The...

Страница 137: ...and search for addresses In the next chapter you will learn about managing your tasks and appointments Note The handheld searches the First Last and Company names of contacts to find the first instanc...

Страница 138: ......

Страница 139: ...ointment the location and any additional notes Using the Tasks function The handheld s Tasks function allows you to keep a list of tasks to be completed Tasks can be sorted by subject priority due dat...

Страница 140: ...is option is set to Subject Confirm Task Delete Select whether or not you want to confirm deleting task entries By default this option is set to Yes 4 Scroll to the field you would like to set then pr...

Страница 141: ...e Status Priority and Due Date fields use the SPACE key to scroll through your options Release the SPACE key once you have set the field to your preference 4 Click to view the menu then scroll to Save...

Страница 142: ...our options are None or By Date If you select None no due date will be recorded for this task If you select By Date you can select the date on which this task is due Notes Type any reference notes you...

Страница 143: ...ed To change a task s status 1 In the Home screen scroll to the TASKS icon and click 2 In the Tasks screen select the task for which you want to change the status then click to view the menu 3 Dependi...

Страница 144: ...dar screen click to view the menu Scroll to Options and click 3 The Calendar Options screen appears displaying the following three options First day of week Set on which day your week starts By defaul...

Страница 145: ...r screen click to view the menu Scroll to View Day View Week View Month or View Agenda and click depending on which view you would like to use If you switch to another view and then exit the Calendar...

Страница 146: ...ugh them All appointments are marked with an outlined box spanning the length of the appointment If the appointment is an all day appointment dots will span the entire day When your cursor is on an ap...

Страница 147: ...t is an all day appointment the day will be in bold text The position of the bar depends on the start time set for the appointment For example the bar for afternoon appointments will typically appear...

Страница 148: ...ointments 1 In the Home screen scroll to the CALENDAR icon and click 2 In the Calendar screen click to view the menu Scroll to New Appointment and click 3 In the New Appointment screen use the trackwh...

Страница 149: ...nt fields The New Appointment screen contains the following fields Subject Type the subject for the appointment Location Type the location where the appointment is to be held Start Date Select the sta...

Страница 150: ...t time Recurrence Set whether or not the appointment is a recurring appointment The default is None See below for more details on setting the recurrence for appointments Notes Type any reference notes...

Страница 151: ...he desired option appears on screen Your options are Day Week Month and Year For this example select Day to set an appointment recurring on a daily basis 5 In the Every field press the SPACE key until...

Страница 152: ...d click You return to the New Appointment screen with your recurring appointment settings entered Save your appointment by clicking to view the menu scrolling to Save Appointment and clicking To view...

Страница 153: ...In the Calendar screen select a day that has appointments and click to view the menu Scroll to View Appointments and click The appointments for the selected day are listed 3 If you want to view the de...

Страница 154: ...wn To view the appointments for a specific date 1 In the Home screen scroll to the CALENDAR icon and click 2 In the Calendar screen click the trackwheel to view the menu Scroll to Go to Date and click...

Страница 155: ...pointment you can edit all occurrences of the appointment choose Edit all dates or you can edit only the selected appointment choose Edit this 3 The Edit Appointment screen appears displaying all of t...

Страница 156: ...l to view the menu Scroll to Delete Appointment s and click 3 A dialog box appears asking if you want to delete the appointment Click Yes If your appointment is a recurring appointment you can delete...

Страница 157: ...ps Press DEL to delete a task or appointment Press T to go to the top task or appointment in the list Press B to go to the bottom task or appointment in the list Press C to create a new task or appoin...

Страница 158: ...nt at a selected time or view an appointment if one is highlighted Press SHIFT and roll the trackwheel in Day or Week view to highlight the hours during which an appointment will take place When you c...

Страница 159: ...A Calculator function is also included which helps you to perform simple mathematical operations and conversions Using the MemoPad function You can use the MemoPad function to add edit view and delete...

Страница 160: ...g the memo click to view the menu Select Save by clicking again You return to the MemoPad screen where your new memo appears in alphabetical order To view memos 1 In the Home screen scroll to the MEMO...

Страница 161: ...memo click to view the menu Select Save by clicking again To delete memos 1 In the Home screen scroll to the MEMOPAD icon and click 2 In the MemoPad screen scroll to the memo you want to delete 3 Clic...

Страница 162: ...o perform mathematical operations You can use the handheld s calculator to perform mathematical operations 1 In the Home screen scroll to the CALCULATOR icon and click 2 The Calculator screen appears...

Страница 163: ...calculations You can review edit delete or insert entries on the tape 1 In the Home screen scroll to the CALCULATOR icon and click 2 In the Calculator screen scroll to Menu and click Select Switch to...

Страница 164: ...alculator Using the Calculator function 164 3 Scroll through your calculations on the tape to review them 4 Scroll to an entry that you want to change then click to view the menu Scroll to edit the en...

Страница 165: ...to yards kilometres to miles kilograms to pounds and Celsius to Fahrenheit and vice versa 1 In the Home screen scroll to the CALCULATOR icon and click 2 In the Calculator screen type the number that y...

Страница 166: ...results are shown on the calculator s display To exit the calculator In the Calculator screen scroll to Menu and click Scroll to Close and click Summary and tips In this chapter you learned how to use...

Страница 167: ...Press T to go to the top memo in the list Press B to go to the bottom memo in the list Press ESC to exit the MemoPad screen Press DEL to delete a memo Press ENTER to view a memo Calculator Press D to...

Страница 168: ......

Страница 169: ...your specific needs Setting the alarm The handheld has an Alarm function that you can set to tone at the same time every day Choose from six different tone settings and three volume levels 1 In the H...

Страница 170: ...On Off Select whether or not you want the alarm to sound The default is Off Tune Select the tune you wish to hear when the alarm sounds You can hear each tune by scrolling through the options The defa...

Страница 171: ...ONS icon and click 2 The Device Options screen appears Scroll to the handheld option that you want to change and click the trackwheel 3 Scroll to the field that you want to change then press the SPACE...

Страница 172: ...n Set the handheld to turn on automatically at a specific time throughout the week Weekday Off Set the handheld to turn off automatically at a specific time throughout the week Weekend On Set the hand...

Страница 173: ...e Support The setting only needs to be set once It should only be set to Ignore if you live in a state or province that does not recognize daylight savings time When this setting is set to Support the...

Страница 174: ...ge 49 for a shortcut for turning your radio on and off Status Shows the status of the network It is set to either Pending or Active depending on what you have specified in the Roaming field Note The e...

Страница 175: ...ne Tune Select the tune you wish to hear when you are notified of a new message You can hear each tune by scrolling through the options The default is Tune 1 Volume Select the volume for your notifica...

Страница 176: ...from either Yes or No The default is Yes If you set this field to Yes and have the Level 1 Notify Only field set to Yes you will be notified of Level 1 messages PIN messages and pending appointments...

Страница 177: ...els and font size You can also change the key rate and tone Screen Contrast Adjust the screen s contrast if you re having trouble seeing the interface If you are using the handheld in low light try th...

Страница 178: ...k signal Battery Shows the percentage of remaining battery life Memory Free Shows the amount in bytes of available RAM File Free Shows the amount in bytes of available memory to store messages address...

Страница 179: ...Calculator function Calendar Shows the current version of the Calendar and Tasks functions Crypto SK Shows the current version of the Crypto SK DLL Database Shows the current version of the Database...

Страница 180: ...gain insert it into the charging cradle connect the cradle to a power outlet and after a few moments the Home screen will appear Note You can also activate the handheld from storage mode by inserting...

Страница 181: ...to customize your handheld s options You can set a number of handheld features including the alarm auto on off AutoText date time message services network settings notify owner screen keyboard securit...

Страница 182: ......

Страница 183: ...e Battery too low for handheld usage Press any key to close this dialog box Recharge the handheld s battery See page 23 for information The handheld can be kept at a full charge by simply topping up t...

Страница 184: ...information on the handheld to your PC using the Desktop Software s Backup and Restore tool If you expect that you will not be using your handheld for many weeks or months then you should put the hand...

Страница 185: ...e is called the Home screen Press the ESC key repeatedly until you return to the Home screen See page 25 for more information on other shortcuts Select Close from an application s menu or in the Devic...

Страница 186: ...d s radio has been turned on select the TURN WIRELESS ON icon and check that you are within range of network coverage check the coverage indicator in the Home screen See page 49 for more information C...

Страница 187: ...Is your handheld in the cradle connected to your PC By default if the handheld is in the cradle you will not receive any messages on your handheld while the Desktop Software is running Take the handhe...

Страница 188: ...fied when new messages arrive even though I have set the handheld to notify me Ensure that the volume setting of the notification options is set to either Low Medium High or Escalating rather than Off...

Страница 189: ...es as your reply message In the Home screen scroll to the MESSAGES icon and click In the Messages screen scroll to the new message and click The message contains a question that requires a response Cl...

Страница 190: ...t of frequently asked questions and answers refer to the online help How do I check if the Desktop Redirector is running If the Desktop Redirector is running the icon appears in the Windows SysTray in...

Страница 191: ...arriving in your Inbox The email Redirector recognizes these Relay messages and automatically deletes them Microsoft Outlook will notify you of these incoming Relay messages so the envelope icon will...

Страница 192: ...created in step 1 This subfolder will be under Contacts You may have to double click the displayed folders to view all subfolders Click the Add button In the bottom list select the Global folder and...

Страница 193: ...ssage how can I find out what it means You ll find a list of possible error messages and tips for what to do when you get an error message in the Desktop Redirector and Desktop Manager online help fil...

Страница 194: ...eld will not be lost If you were in the process of composing a message however the message will be lost If you reset your handheld you will not lose the connection with your PC After you reset your ha...

Страница 195: ...D with backlighting 160 x 160 pixel viewing area Controls Thumb operated trackwheel PC style keyboard Message Notification Red LED indicator audible beeper mechanical vibrator on screen notification c...

Страница 196: ...ty 5 95 Non condensing Network Support 900 MHz Mobitex networks Interface Protocols MASC Mobitex Asynchronous Communications Protocol RAP RIM s Radio Access Protocol Transmitting 896 to 902 MHz 12 5 k...

Страница 197: ...oduct 2 0 GRANT OF LICENSE 2 1 This RIM Software License Agreement LICENSE hereby grants You a non exclusive non transferable right to use the SOFTWARE in the United States and Canada solely in conjun...

Страница 198: ...are included 3 4 You may not decompile disassemble or otherwise reverse engineer the SOFTWARE or any part of it You do not have the right to obtain or use any source code for the SOFTWARE 3 5 The SOFT...

Страница 199: ...UDING BUT NOT LIMITED TO IMPLIED WARRANTIES OR CONDITIONS OF MERCHANTABILITY FITNESS FOR A PARTICULAR PURPOSE AND NONINFRINGEMENT EACH WITH RESPECT TO THE SOFTWARE THE ACCOMPANYING PRODUCT MANUAL S AN...

Страница 200: ...MEDIA UPON WHICH THE SOFTWARE IS RECORDED 4 6 This SOFTWARE is provided with RESTRICTED RIGHTS Use duplication or disclosure by the U S Government is subject to restrictions as set forth in DFARS 227...

Страница 201: ...Hardware was first purchased by YOU as an original end user and ii the period ending upon your breach of the End User s Agreement entered into when YOU ordered the Compaq iPAQ BlackBerry Wireless Emai...

Страница 202: ...than Compaq or a Compaq authorized service provider except for End User Replaceable Parts if available for your product in the servicing country Limitations of Remedy Compaq is not liable for any dam...

Страница 203: ...f incidental or consequential damages for consumer products In such states or countries the exclusion or limitation of this Limited Warranty may not apply to you This Limited Warranty gives you specif...

Страница 204: ...Wireless Email Solution Warranty Service If your Compaq iPAQ BlackBerry Wireless Email Solution needs service call the Compaq Technical Phone Support Center at 1 800 OK COMPAQ A technical support spec...

Страница 205: ...error messages Add on options Third party hardware or software Detailed questions 1 800 345 1518 Toll free access to PaqFax which is a system for requesting and receiving technical information and muc...

Страница 206: ......

Страница 207: ...izing options 129 deleting entries 136 description of 15 32 editing entries 135 fields 132 searching 136 setting options 129 summary 137 tips 137 using 129 viewing entries 134 agenda see calendar alar...

Страница 208: ...ery FAQs 183 recharging 23 C calculator description of 16 33 exiting 166 performing conversions 165 performing mathematical operations 162 summary 166 tips 166 using 162 using tape 163 calendar adding...

Страница 209: ...scription of 23 creating response lists 188 customer support 19 customizing address book options 129 auto signature 81 calendar options 144 handheld options 169 level of importance 76 message options...

Страница 210: ...61 disabling alarm 169 password security screen 45 E editing addresses 135 appointments 155 autotext entries 89 entries on tape 163 memos 161 searches 115 sent messages 123 task status 143 tasks 142...

Страница 211: ...ications 195 status icons 35 trackwheel 22 turning off 25 turning on 24 handheld options about 172 auto on off 172 autotext 172 date time 173 description of 172 message service 174 network settings 17...

Страница 212: ...05 tasks 139 marking all messages as read 126 marking messages as unread 125 memopad adding memos 159 deleting memos 161 description of 16 33 editing memos 161 summary 166 tips 166 using 159 viewing m...

Страница 213: ...g one time messages 79 sending to multiple contacts 80 sending to other handhelds 77 setting level of importance 76 setting message options 73 setting notification options 39 status icons 36 summary 9...

Страница 214: ...6 reading messages 57 95 recalling searches 115 received messages options 95 saving 108 receiving address book attachments 99 confirmation of messages 82 long messages 97 messages 95 recharging batter...

Страница 215: ...ages 111 security changing the password 44 disabling password protection 45 enabling password protection 42 generating a key for the handheld 54 locking the handheld 44 using password protection 40 se...

Страница 216: ...icons 141 summary 157 tips 157 using 139 viewing 142 technical support 19 time setting 173 tips address book 137 composing and sending messages 93 handheld 47 managing messages 127 memopad and calcula...

Страница 217: ...w autotext entry 87 memopad 159 password protection 40 tape 163 tasks 139 V viewing addresses 134 appointments 152 appointments for a specific date 154 memos 160 messages 57 next and previous appointm...

Отзывы: