background image

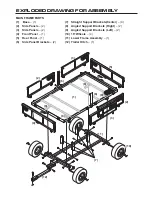
EXPLODED DRAWING FOR ASSEMBLY

MAIN FRAME PARTS

(1)

Base – (1)

(2)

Side Panels – (2)

(3)

Side Panels – (2)

(4)

Front Panel – (1)

(5)

Rear Panel – (1)

(6)

Side Panel Brackets – (2)

(7)

Straight Support Brackets(Center) – (4)

(8)

Angled Support Brackets (Right) – (2)

(9)

Angled Support Brackets (Left) – (2)

(10) 16” Wheels – (4)

(11) Lower Frame Assembly – (1)

(12) Trailer Hitch – (1)

(1)

(2)

(3)

(2)

(5)

(3)

(4)

(6)

(6)

(7)

(8)

(9)

(10)

(11)

(12)

(9)

(8)

Содержание MH1100-1

Страница 1: ... Do not tow cart in excess of 15 mph never tow behind car or truck Warning Not for high speed or highway use CAUTION Read understand and follow ALL instructions before using this product Monster Wagon RMM Corporation 7677 Equitable Drive Minneapolis MN 55344 800 304 1316 www black cat products com REV 3 05 ...

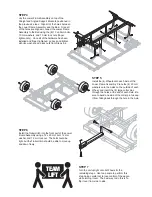
Страница 2: ...mbly Account for all parts and hardware before beginning assembly If any parts are missing damaged or if you have questions or need additional instructions DO NOT RETURN THIS PRODUCT TO THE RETAILER call the manufacturer at 1 800 304 1316 Tools required for assembly Metric Socket Set Wrenches and pliers STEP 2 For this step you will need to remove the 4 Straight Support Brackets that are shipped a...

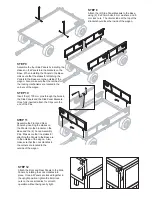
Страница 3: ...of the Lower Frame Assembly using a 12 x 60 mm bolt 12 mm washer and 12 mm lock nut The bolt should be tight but the Trailer Hitch should be able to move up and down freely STEP 5 Install the 4 Wheels onto each Axle of the Lower Frame Assembly Place the 4 20 mm washers onto the Axles on the outside of each Wheel and insert the 4 large cotter pins through the holes at the end of each Axle Be sure t...

Страница 4: ... Insert the 2 100 mm pins through the holes in the Side Panels and the Side Panel Brackets Once fully inserted attach the Clips onto the end of the Pins STEP 12 Attach the Front and Rear Panels to the Side Panels by rotating the Lock Handles into place Once all Panels are locked together in the upright position tighten the 8mm lock nuts on the Lock Handles for smooth operation without being overly...

Страница 5: ... 3 Side Panels 2 4 Front Panel 1 5 Rear Panel 1 6 Side Panel Brackets 2 7 Straight Support Brackets Center 4 8 Angled Support Brackets Right 2 9 Angled Support Brackets Left 2 10 16 Wheels 4 11 Lower Frame Assembly 1 12 Trailer Hitch 1 1 2 3 2 5 3 4 6 6 7 8 9 10 11 12 9 8 ...

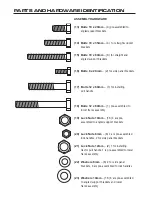
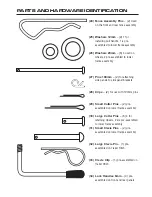
Страница 6: ...installing pull handle 18 Bolts 12 x 80mm 1 pre assembled to lower frame assembly 19 Lock Nuts 10mm 16 4 are pre assembled to angled support brackets 20 Lock Nuts 8mm 6 4 are pre assembled lock handles 2 for side panel brackets 21 Lock Nuts 12mm 2 1 for installing tractor pull handle 1 is pre assembled to lower frame assembly 22 Washers 8mm 6 2 for side panel brackets 4 are pre assembled to lock h...

Страница 7: ...Pins 100mm 2 for attaching side panels to side panel brackets 28 Clips 2 for use with 100mm pins 29 Small Cotter Pins 2 pre assembled on lower frame assembly 30 Large Cotter Pins 6 4 for retaining wheels 2 are pre assembled to lower frame assembly 31 Small Clevis Pins 2 pre assembled on lower frame assembly 32 Large Clevis Pin 1 pre assembled on Trailer Hitch 33 Clevis Clip 1 pre assembled on Trai...

Отзывы: