20
4- AND 8-LINE CALLER ID
4. Installation
To install a system of one or more 4- or 8-Line Caller ID units after you’ve
configured them (see
Chapter 3
), take these steps, referring to the appropriate
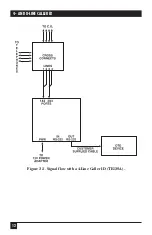
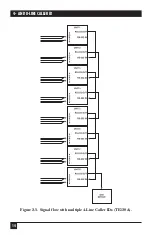
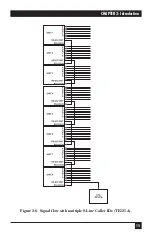
illustrations among Figures 2-3 through 2-6 in
Section 2.2
:
NOTE
If you want to install a daisychain that includes both 4-Line and 8-Line
units:
1. Such a daisychain supports only 32 lines. If you’ll need to monitor
more lines than that, you’ll need to chain 8-Line units only.
2. All of the 4-Line units must be installed “ahead” of the 8-Line
units. That is, in the sequence of the daisychain, all of the 4-Line units
must be closer to the DTE than any of the 8-Line units.
3. Such mixed daisychains need to be assigned unit numbers (see
Section 3.2
) as if the 8-Line units take up two “slots.” For example, if you
were chaining three 8-Line units with two 4-Line units, you’d place one
8-Line unit at the end of the chain and number it “1”; then you’d place
the two other 8-Line units in sequence and number them “3” and “5”;
then you’d place one of the two 4-Line units and number it “6”; and
you’d place the second 4-Line unit at the head of the chain, attached to
the DTE, and number it “7.”
1. Attach line splitters or cross-connects to your site’s phone-line jacks so that
you can send the incoming phone signals to both your telephones and the
Caller ID system. If it’s not possible to plug cross-connects directly into your
site’s phone jacks, you’ll need to use the standalone type of cross-connects
and run standard phone cables from the phone jacks to them.
2. Run standard phone cable from one output of the line splitters or cross-
connects to your telephones.
3. Place your Caller ID units close to AC-power outlets. The first unit must be
within 50 ft. (15.2 m) of the DTE that will be receiving the Caller ID
information; if you’re daisychaining, each successive unit needs to be within
50 ft. (15.2 m) of the one before.
4-Line units:
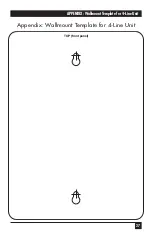
A 4-Line unit can be mounted on a wall by hanging it from a
pair of bolts or screws secured into a wall stud. If you want to do this, you
might want to photocopy the mounting template in the
Appendix
and use it
as a guideline for how much wall area you’ll need and where you’ll need to
position the bolts/screws.
Содержание TE120A
Страница 13: ...12 4 AND 8 LINE CALLER ID Figure 2 3 Signal flow with a 4 Line Caller ID TE120A ...
Страница 14: ...13 CHAPTER 2 Introduction Figure 2 4 Signal flow with an 8 Line Caller ID TE121A ...
Страница 15: ...14 4 AND 8 LINE CALLER ID Figure 2 5 Signal flow with multiple 4 Line Caller IDs TE120A ...
Страница 16: ...15 CHAPTER 2 Introduction Figure 2 6 Signal flow with multiple 8 Line Caller IDs TE121A ...
Страница 28: ...27 APPENDIX Wallmount Template for 4 Line Unit Appendix Wallmount Template for 4 Line Unit TOP front panel ...
Страница 29: ...NOTES ...


