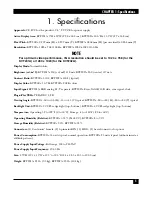
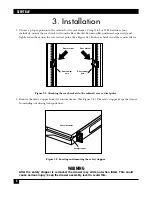
Black Box ServTray KVT201A Скачать руководство пользователя страница 9

SERVTRAY

8

3. Installation

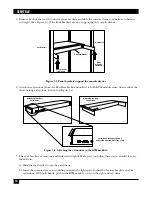
1. Choose a proper position in the cabinet for the rack drawer. Using 10-32 or 12-24 hardware (not

included), mount the rear brackets (from the Rear Bracket Extension Kit, purchased separately) and
lightly fasten them onto the rear vertical poles. (See Figure 3-1.) Both rear brackets will be removed later.

Figure 3-1. Attaching the rear brackets to the cabinet’s rear vertical poles.

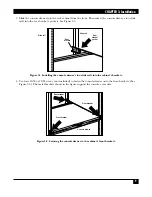
2. Remove the safety stopper from the console drawer. (See Figure 3-2.) The safety stopper keeps the drawer

from sliding out during transportation.

Figure 3-2. Locating and removing the safety stopper.

WARNING

After the safety stopper is removed, the drawer may slide out when tilted. This could
cause serious injury; keep the drawer assembly level to avoid this.

Rear bracket

Rear vertical

pole

Rear vertical

pole

Rear bracket

Safety stopper

Console drawer

Содержание ServTray KVT201A

Страница 1: ...pport 24 hours a day 7 days a week Call 724 746 5500 or fax 724 746 0746 Mailing address Black Box Corporation 1000 Park Drive Lawrence PA 15055 1018 Web site www blackbox com E mail info blackbox com...

Страница 2: ...couraged to try to correct the interference by one of the following measures Reorient or relocate the receiving antenna Increase the separation between the equipment and receiver Connect the equipment...

Страница 3: ...por los orificios de ventilaci n 10 El equipo el ctrico deber ser situado fuera del alcance de fuentes de calor como radiadores registros de calor estufas u otros aparatos incluyendo amplificadores q...

Страница 4: ...on Centronics is a registered trademark of Centronics Corporation PS 2 is a registered trademark of International Business Machines Corporation UL is a registered trademark of Underwriters Laboratorie...

Страница 5: ...Y 4 Contents Chapter Page 1 Specifications 5 2 Introduction 6 2 1 Overview 6 2 2 What s Included 6 3 Installation 8 4 Operation 13 5 Troubleshooting 14 5 1 Calling Black Box 14 5 2 Shipping and Packag...

Страница 6: ...1A RGB analog H V separate KVT202A Even Odd R G B data sync signal clock Plug n Play VESA VESA DDC 1 2B Viewing Angle KVT201A 60 to 60 H 55 to 45 V typical KVT202A 80 to 80 H 80 to 80 V typical Backli...

Страница 7: ...r Bracket Extension Kit described in Section 2 2 A KVM module is included with the ServTray To control more than one PS 2 server connect the ServTray to a ServSwitch The KVM module comes with a univer...

Страница 8: ...epth of a rack cabinet enclosure Depth RMB1 RMB2 RMB3 RMB4 RMB5 inch cm inch cm inch cm inch cm inch cm Minimum 19 5 49 5 22 625 57 5 26 625 67 6 30 5 77 5 34 5 87 6 Maximum 22 375 56 8 27 75 70 5 31...

Страница 9: ...Figure 3 1 Attaching the rear brackets to the cabinet s rear vertical poles 2 Remove the safety stopper from the console drawer See Figure 3 2 The safety stopper keeps the drawer from sliding out duri...

Страница 10: ...rawer s two slide rails into the cabinet s brackets 4 Use four 10 32 or 12 24 screws not included to fasten the console drawer onto the front brackets See Figure 3 4 The metal brackets shown in the fi...

Страница 11: ...Attaching the extensions to the KVM module 7 The rear brackets extensions and slide rails fit tightly Make sure you follow these steps carefully for easy installation a Slide the rear brackets onto th...

Страница 12: ...onnectors on the KVM module and attached cable are firmly mated See Figure 3 8 Figure 3 8 Centronics connectors 11 Connect the power supply to the power jack on the KVM module 12 For operation pull th...

Страница 13: ...on a PS 2 CPU via the CPU Cable shown in Figure 3 9 Figure 3 9 Cable for connecting the KVM module to a computer Using the gender changer this cable attaches to the HD15 and 6 pin mini DIN connectors...

Страница 14: ...anel on or off via the power switch 3 in Figure 4 1 4 Use the keyboard status keys Num Lock Caps Lock and Scroll Lock to view status The Num Lock key labeled 4 shows the Keyboard Num Lock status on or...

Страница 15: ...e a complete description including the nature and duration of the problem when the problem occurs the components involved in the problem any particular application that when used appears to create the...

Страница 16: ...1000 Park Drive Lawrence PA 15055 1018 724 746 5500 Fax 724 746 0746 Copyright 2004 Black Box Corporation All rights reserved...

Отзывы: