background image

SERVSELECT III INSTALLER/USER GUIDE

18

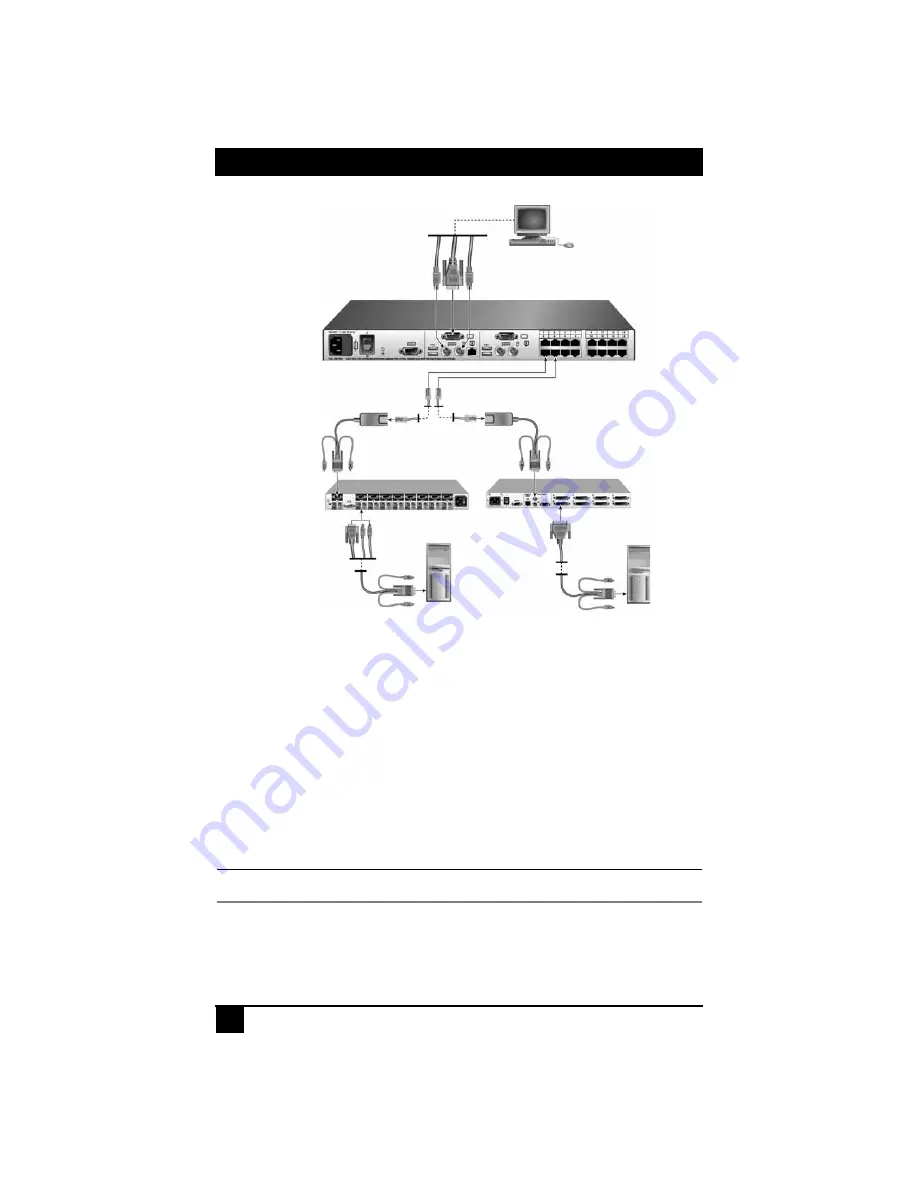
Figure 3-4.   ServSelect III Switch Configuration with Legacy KVM Switches 

To add a legacy KVM switch:

1.

Mount the primary KVM switch into your rack cabinet. 

2.

Connect one end of a CAT 5 cable to an available port on the back of your ServSelect 
III switch.

3.

Attach the keyboard, monitor and mouse connectors of the SAM to a user port on 
your cascaded switch.

4.

Attach the other end of the CAT 5 cabling to the RJ45 connector on the SAM.

5.

Connect the servers to your cascaded switch according to the instructions included 
with the switch.

6.

Power cycle the cascaded switch to enable its local user port to recognize the SAM.

7.

Repeat steps 2 to 6 for all cascaded switches you wish to attach to your system.

NOTE:

A ServSelect III can also be used as a secondary switch in the configuration shown in Figure 3-4.

To connect local peripherals:

1.

Select the keyboard, monitor and mouse to be connected to local user A.

2.

Locate the port set labeled A on the back of the switch. Connect these peripherals to 
their respective ports.

ServSelect III 

SAM

Server 2

Server 1

SAM

PS/2, USB, Sun and serial 
cables are available

Содержание ServSelect III

Страница 1: ...500 or fax 724 746 0746 Mailing address Black Box Corporation 1000 Park Dr Lawrence PA 15055 1018 World Wide Web www blackbox com Email info blackbox com Copyright 2007 Black Box Corporation All rights reserved KV21008A R2 KV22008A R2 KV22016A R2 KV21008E R2 KV22008E R2 KV22016E R2 KV21008A KV22008A KV22016A KV21008E KV22008E KV22016E ...

Страница 2: ......

Страница 3: ...f computers including a mix of IBM PC RS 6000 Apple Macintosh Sun Microsystems and SGI compatibles among multiple users with different access levels Does your switch have to sit solidly on a work table and use regular everyday cables Or does it have to be mounted in an equipment rack and use convenient many to one cables No matter how large or small your setup is no matter how simple or how comple...

Страница 4: ...ulation of Industry Canada Le présent appareil numérique n émet pas de bruits radioélectriques dépassant les limites applicables aux appareils numériques de la classe A prescrites dans le Règlement sur le brouillage radioélectrique publié par Industrie Canada EUROPEAN UNION DECLARATION OF CONFORMITY This equipment has been tested and found to comply with the limits for a Class A computing device i...

Страница 5: ... ServSwitch ServSelect and ServSelect IP are trademarks of BLACK BOX Corporation Apple Mac and Macintosh are registered trademarks of Apple Computer Inc IBM PS 2 and RS 6000 are registered trademarks of International Business Machines Corporation Microsoft HyperTerminal Windows Windows NT and Windows XP are trademarks or registered trademarks of Microsoft Corporation in the United States and or ot...

Страница 6: ...SERVSELECTTM III INSTALLER USER GUIDE 4 ...

Страница 7: ...ches 17 3 7 Setting Up Your ServSelect III Switching System 19 4 Basic Operations 21 4 1 Controlling Your System at the Analog Ports 21 4 2 Viewing and Selecting Ports and Servers 21 4 3 Navigating the OSD Interface 23 4 4 Configuring OSD Interface Menus 25 4 5 Displaying Version Information 36 4 6 Scanning Your System 38 4 7 Running System Diagnostics 39 4 8 Broadcasting to Servers 42 4 9 Changin...

Страница 8: ...SERVSELECT III INSTALLER USER GUIDE 6 ...

Страница 9: ...ced in the EMC and or safety reports and certificates are printed on the label applied to this product Mechanical Height x Width x Depth 1 75 x 17 00 x 11 00 in 1U form factor 4 45 x 43 18 x 27 94 cm Weight 8 lbs 3 6 kg without cables Environmental Power Power consumption 12 5 W AC input power max 40 W Heat dissipation 92 BTU Hr Humidity 20 80 non condensing operating 5 95 non condensing nonoperat...

Страница 10: ...I cables Connectors RJ 45 Sync Types Separate horizontal and vertical Plug and Play DDC2B Video Resolution Analog Port Maximum 1280 x 1024 75 Hz Update Port Number 1 Type Serial RS 232 Connector DB9 Male Analog Port Sets Number 1 or 2 Type PS 2 USB VGA and ACI Connectors PS 2 miniDIN 15 pin D RJ 45 USB Type A ServSelect III Product Specifications ...

Страница 11: ...vSelect III has either eight or 16 server ports for connecting SAMs Utilizing a SAM you can attach additional switches to expand your ServSelect III switching system This flexibility allows you to add capacity as your data center grows Reduced cost Server Access Cables SACs are also available Multiplatform support The SAMs available with the ServSelect III support PS 2 Sun USB and serial server en...

Страница 12: ...lect III switching system is always running the most current version available Both the ServSelect III and the SAMs are Flash upgradable See Appendix A for more information NOTE ServSelect III cables are not firmware upgradable Cascading expansion The ServSelect III provides support for up to 16 directly attached servers and can conveniently scale to support more You can expand your system using c...

Страница 13: ...d potentially fatal shock hazard and possible damage to equipment please observe the following precautions Do not use a 2 wire extension cord in any BLACK BOX product configuration Test AC outlets at the computer and monitor for proper polarity and grounding Use only with grounded outlets at both the computer and monitor When using a backup Uninterruptible Power Supply UPS power the computer the m...

Страница 14: ...s not compromised Mechanical Loading Mounting of the equipment in the rack should be such that a hazardous condition is not achieved due to uneven mechanical loading Circuit Overloading Consideration should be given to the connection of the equipment to the supply circuit and the effect that overloading of circuits might have on overcurrent protection and supply wiring Consider equipment nameplate...

Страница 15: ...rackmounted using the brackets supplied in your rackmounting kit Before installing the switch and other components in the rack cabinet if not already installed stabilize the rack in a permanent location Install your equipment starting at the bottom of the rack cabinet then work to the top Figure 3 1 ServSelect III Switch Horizontal Installation CAUTION Rack Loading Overloading or uneven loading of...

Страница 16: ...acket and the holes in the mounting rail then into the cage nuts or clip nuts 3 3 Installing the ServSelect III Switch Plug the supplied power cord into the back of the appliance and then into an appropriate power source Figure 3 2 illustrates one possible configuration for your ServSelect III switch CAUTION To reduce the risk of electric shock or damage to your equipment Do not disable the power ...

Страница 17: ... mouse ports on the first server you will be connecting to the appliance 3 Attach one end of a CAT 5 cable to the RJ45 connector on the SAM 4 Connect the other end of the CAT 5 cable to the desired port on the back of your ServSelect III switch 5 Repeat steps 2 through 4 for each server you wish to attach Analog User B Configuration Port for updating firmware ServSelect III Switch KV22016A Shown S...

Страница 18: ...vSelect III switch will connect to the user port on each cascaded ServSelect III switch Each cascaded switch can then be connected to a server with a SAM or SAC The example shown in Figure 3 3 shows one ServSelect III switch cascaded under the main switch enabling the connection of up to 15 primary servers and 16 secondary servers Using this configuration you could cascade 16 ServSelect III switch...

Страница 19: ...ry cascaded ServSelect III switches you wish to attach Figure 3 3 ServSelect III Switch Configuration with a Cascaded Switch 3 6 Adding Legacy Switches You can add legacy switches to the ServSelect III switching system for easy integration into your existing configuration In a cascaded system each user port will accommodate up to 24 servers Analog User B ServSelect III Switch User Ports 15 Primary...

Страница 20: ...M 5 Connect the servers to your cascaded switch according to the instructions included with the switch 6 Power cycle the cascaded switch to enable its local user port to recognize the SAM 7 Repeat steps 2 to 6 for all cascaded switches you wish to attach to your system NOTE A ServSelect III can also be used as a secondary switch in the configuration shown in Figure 3 4 To connect local peripherals...

Страница 21: ...rt set labeled B 4 Bundle and label the cables for easy identification 3 7 Setting Up Your ServSelect III Switching System The ServSelect III switching system enables you to auto detect and configure each port on your appliance Chapter 4 provides detailed instructions on name customization and OSD setup and configuration ...

Страница 22: ...SERVSELECT III INSTALLER USER GUIDE 20 ...

Страница 23: ...list by default when you first launch the OSD The Port column indicates the user port to which a server is connected If you connect a legacy KVM switch to the main ServSelect III switch or a cascaded ServSelect III switch the port numbering displays the cascade port first then the switch port to which the server is connected For example in Figure 4 1 servers 04 03 and 01 02 are connected to switch...

Страница 24: ...ton is depressed type the first few characters of the name of the server or the EID number to establish it as unique and press Enter To select the previous server Press Print Screen and then Backspace This key combination toggles you between the previous and current connections OSD Interface Status Symbols Symbol Description SAMs and ServSelect III cables are online green circle SAMs and ServSelec...

Страница 25: ...ss Print Screen If the display order of your server list is by port Port button is depressed type the port number and press Enter or If the display order of your server list is by name or EID number Name or EID but ton is depressed type the first few characters of the name of the server or the EID number to establish it as unique and press Enter 2 To switch back to the previous server press Print ...

Страница 26: ...ages a user from a server no server is selected Status flag displays Free This only applies to the 0 on the keyboard and not the keypad Print Screen Pause Immediately turns on screen saver mode and prevents access to that specific console if it is password protected Up Down Arrows Moves the cursor from line to line Right Left Arrows Moves the cursor between columns When editing a text box these ke...

Страница 27: ...s Feature Purpose Menu Change the server listing between numerically by port or EID number and alphabetically by name Change the Screen Delay Time before the OSD interface displays after pressing Print Screen Flag Change display timing color or location of the status flag Broadcast Set up to simultaneously control multiple servers through keyboard and mouse actions Scan Set up a custom scan patter...

Страница 28: ...unts are disabled with the exception of the User button Assigning server names Use the Names dialog box to identify individual servers by name rather than by port number The Names list is always sorted by port order Names are stored in the SAM or SAC so even if you move the module cable to another user port the name and configuration will be recognized by the switch NOTE If a server is turned off ...

Страница 29: ...click OK in the Names dialog box 4 Repeat steps 1 to 3 for each server in the system 5 Click OK in the Names dialog box to save your changes or Click X or press Escape to exit the dialog box without saving changes NOTE If a SAM has not been assigned a name the EID is used as the default name Assigning device types The ServSelect III switch automatically discovers cascaded KVM switches but you will...

Страница 30: ...lly 06 01 06 02 and so on To assign a device type 1 In the Devices dialog box select the desired port number 2 Click Modify The Device Modify dialog box displays Figure 4 6 Device Modify Dialog Box 3 Choose the number of ports supported by your cascaded switch and click OK If the number of desired ports is not listed click Other and type in port number between 4 and 24 ports 4 Repeat steps 1 to 3 ...

Страница 31: ...order of servers 1 Select Name to display servers alphabetically by name or Select EID to display servers numerically by EID number or Select Port to display servers numerically by port number 2 Click OK To set up key sequences to launch the OSD interface 1 Click the box next to the key sequence you want to start the OSD interface Uncheck ing all boxes will leave Print Screen as the default 2 Clic...

Страница 32: ...ted in the OSD interface or your keyboard will not be mapped correctly Figure 4 8 Keyboard Dialog Box To change the keyboard country code 1 Press Print Screen to launch the OSD interface The Main dialog box will appear 2 Click Setup Keyboard The Keyboard dialog box displays 3 Select your desired keyboard country code and click OK 4 A Keyboard Warning dialog box will appear to confirm your changes ...

Страница 33: ...anguage 1 Press Print Screen to launch the OSD interface The Main dialog box will appear 2 Click Setup Language The Language dialog box displays 3 Select your desired language 4 Click OK for changes to take effect Figure 4 10 Language Dialog Box ...

Страница 34: ...tup Flag The Flag dialog box displays Figure 4 11 Flag Dialog Box To determine how the status flag is displayed 1 Select Name or EID to determine what information will be displayed 2 Select Displayed to show the flag all the time or select Timed to display the flag for only five seconds after switching 3 Select a flag color in Display Color 4 In Display Mode select Opaque for a solid color flag or...

Страница 35: ...ges after your console remains unused for a specified Inactivity Time Once engaged your console will remain locked until you press any key or move the mouse You will then need to type in your password to continue Use the Security dialog box to lock your console with password protection set or change your password and enable the screen saver NOTE If a password has been previously set you will have ...

Страница 36: ...lay activation of password protection and the screen saver feature 4 For Mode select Energy if your monitor is ENERGY STAR compliant otherwise select Screen CAUTION Monitor damage can result from the use of Energy mode with monitors not compliant with ENERGY STAR 5 Optional Click Test to activate the screen saver test which lasts 10 seconds then returns you to the Security dialog box 6 Click OK To...

Страница 37: ...se Energy if your monitor is ENERGY STAR compliant otherwise select Screen CAUTION Monitor damage can result from the use of Energy mode with monitors not compliant with ENERGYSTAR 5 Optional Click Test to activate the screen saver test which lasts 10 seconds then returns you to the Security dialog box 6 Click OK NOTE Activation of the screen saver mode disconnects the user from a server no server...

Страница 38: ...rint Screen The Main dialog box will appear 2 Click Commands Display Versions The Version dialog box displays The top half of the box lists the subsystem versions in the appliance Figure 4 14 Version Dialog Box 3 Click the Target button to view individual SAM and SAC version information The Target Selection dialog box displays Figure 4 15 Target Selection Dialog Box 4 Select a SAM or SAC to view a...

Страница 39: ...sioning a SAM module restores the factory defaults in Sun USB and PS 2 SAM modules only 1 Press Print Screen The Main dialog box will appear 2 Click Commands Display Versions The Version dialog box displays 3 Click the Target button to view individual SAM module version information The Target Selection dialog box displays 4 Click the Decommission button 5 Click OK to to reset the SAM module to fac...

Страница 40: ... dialog box will appear 2 Click Setup Scan The Scan dialog box displays Figure 4 18 Scan Dialog Box 3 The dialog box contains a listing of all servers attached to your appliance Click the checkbox next to the servers you wish to scan or Double click on a server s name or port or Press Alt and the number of the server you wish to scan You can select up to 16 servers from the entire list 4 In the Sc...

Страница 41: ... interface is open or Move the mouse or press any key on the keyboard if the OSD interface is not open Scanning will stop at the currently selected server 2 Press Print Screen The Main dialog box will appear 3 Click Commands The Commands dialog box displays 4 Clear Scan Enable 4 7 Running System Diagnostics You can validate the integrity of your system through the Run Diagnostics command This comm...

Страница 42: ...SERVSELECT III INSTALLER USER GUIDE 40 NOTE SAMs may appear to be offline while being upgraded Figure 4 20 Diagnostics Dialog Box ...

Страница 43: ... the condition of the main board RAM Firmware CRCs Reports on the condition of the main board RAM Comm Interfaces Validates the current firmware images stored in the system s Flash Switch Controller test Verifies the switch matrix controller is accessible and functional Local Video Indicates the condition of the local video monitor On line Targets Indicates the total number of currently connected ...

Страница 44: ...e test is complete when the last test s symbol displays 4 8 Broadcasting to Servers The analog user can simultaneously control more than one server in a system to ensure that all selected servers receive identical input You can choose to broadcast keystrokes and or mouse movements independently NOTE You can broadcast to up to 16 servers at a time one server per port To access the Broadcast dialog ...

Страница 45: ...the mouse and or keyboard checkboxes for the servers that are to receive the broadcast commands or Press the Up or Down Arrow keys to move the cursor to the target server Then press Alt K to select the keyboard checkbox and or Alt M to select the mouse checkbox Repeat for additional servers 2 Click OK to save the settings and return to the Setup dialog box Click X or press Escape to return to the ...

Страница 46: ... The Main dialog box will display 2 Click Setup Switch The Switch dialog box displays Figure 4 24 Switch Dialog Box 3 Select either Preemptive or Cooperative as your switch mode 4 Click OK to save changes Click X or press Escape to cancel Setting the Share Mode feature The Share Mode feature of the ServSelect III switches allows two users to gain access to a primary server To enable Share Mode 1 P...

Страница 47: ... edit access and or delete user accounts Figure 5 1 Security Menu To access the User Setup screen administrator only 1 Click the Enable User Account checkbox in the Security menu The Setup menu will appear 2 Click the OK button 3 Click the User button on the Setup screen to enter the User Setup screen NOTE Clicking the User button on the Setup screen will automatically log out any currently logged...

Страница 48: ... User2 User3 and User4 To edit a user 1 Click the username of the user to be modified 2 Click Edit to change the username and or password of the selected user 3 Click Access to restrict port access for the selected user 4 Click Delete to restore the selected user to the default state default name no pass word no port access 5 Click OK on the User Setup screen to save changes or click the Exit butt...

Страница 49: ...mber and whether the user has access to the listed KVM ports The administrator controls which ports are accessible to which user by clicking in the appropriate checkbox Figure 5 5 User Access Menu Administrator Only The Clear All button allows the administrator to clear access to all ports for a given user instead of deleting the account The Check All button allows the administrator to assign all ...

Страница 50: ...SERVSELECT III INSTALLER USER GUIDE 48 ...

Страница 51: ... file 3 Double click to run the file ApplianceUpdate exe 4 Click the Next button to display the main dialog box 5 In the dialog box that displays select the appropriate COM Port from the COM Port menu 6 Click Update 7 Once the firmware is updated an Update Complete message displays Click the Close button to exit the dialog box 8 The switch automatically reboots after the upgrade is completed Possi...

Страница 52: ... SAM Status Dialog Box NOTE You can automatically upgrade a SAM module connected to your ServSelect III switch by selecting the Auto upgrade box in the SAM Status dialog box 3 Click one or more types of modules to upgrade Click Upgrade 4 The SAM Upgrade dialog box displays Click OK to initiate the upgrade and return to the SAM Status dialog box SAM Upgrade Dialog Box To upgrade SAM firmware indivi...

Страница 53: ...AM information The Target Selection dialog box displays Target Selection Dialog Box 4 Select a SAM to upgrade and click the Version button The Target Version dialog box displays Target Version Dialog Box 5 Click the Load Firmware button The SAM Load dialog box displays ...

Страница 54: ...le SAM Load Dialog Box 6 Click OK to initiate the upgrade and return to the Status dialog box NOTE During an upgrade the SAM status indicator in the Main dialog box will be yellow The SAM is unavailable while an upgrade is in progress When an upgrade is initiated any current connection to the server via the SAM will be terminated ...

Страница 55: ...blinks Use the indicated keys in Table B 1 as you would use the advanced keys on a Sun keyboard Table B 1 Sun Key Emulation Sun Key US PS 2 Key to Enable Sun Key Emulation Compose Application 1 Compose keypad Power F11 Open F7 Help Num Lock Props F3 Front F5 Stop F1 Again F2 Undo F4 Cut F10 Copy F6 Paste F8 Find F9 Mute keypad Vol keypad Vol keypad Command left 2 F12 Command left 2 Win GUI left 1 ...

Страница 56: ... are attached to your Sun servers the Han Zen and Katakana Hiragana keys on Japanese Sun USB keyboards and Hangul and Hanja keys on Korean Sun USB keyboards must be accessed using alternate keystrokes Due to these keyboard specific differences keyboard mapping inconsistencies may be encountered when switching between target devices using Sun SAM VSN and SAM WSN modules and target devices using SAM...

Страница 57: ...NOTES 55 ...

Страница 58: ...NOTES 56 ...

Страница 59: ......

Страница 60: ...0 or fax 724 746 0746 Mailing address Black Box Corporation 1000 Park Dr Lawrence PA 15055 1018 World Wide Web www blackbox com Email info blackbox com Copyright 2007 Black Box Corporation All rights reserved KV21008A R2 KV22008A R2 KV22016A R2 KV21008E R2 KV22008E R2 KV22016E R2 KV21008A KV22008A KV22016A KV21008E KV22008E KV22016E ...

Отзывы: