5
ENGLISH
Using the spray button
The spray feature can be used at any temperature setting
when either steam or dry ironing.
u
Make sure that there is water in the tank.
u
Press the button (6) several times to activate the pump
while you are ironing.
Using the self-clean button
The self-clean function must be used before using the
appliance for the first time and then regularly to remove scale.
u
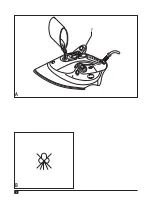
Fill the tank (10) to the maximum filling level (11).
u
Set the temperature control dial (1) to the max position.
u
Plug the appliance in and switch on.
u
Allow the appliance to heat up until the heating light (2)
switches off and then on again.
u
Unplug the appliance and hold it horizontally over the sink.
u
Press the self-clean button (3).
Hot water and steam will come out of the vents. Impurities and
scale will be washed away.
u
Move the iron backwards and forwards while this is
happening.
u
Release the self-clean button.
u
Stand the appliance upright on its heel.
u
Plug the appliance in and switch on.
u
Iron an old cloth or towel to dry the soleplate.
XT2040/XT2200/XT2200CP - Anti-drip
The appliance is fitted with an anti-drip device to enhance
steaming and prevent drips of water from the soleplate.
Vertical steam
The appliance is capable of generating steam even when in
the vertical position. This function is especially useful for
refreshing clothes and curtains.
XT2200CP - Auto shut-off
If the appliance is not moved for 25-30 seconds whilst in the
horizontal position, the appliance will be shut off automatically.
If the appliance is not moved for 8-15 minutes whilst on its
heel, the appliance will be shut off automatically. The heating
light (2) will flash to show that the auto shut-off feature is
active. Move or gently shake the appliance to re-heat the
appliance.
Anti-calc
The appliance is fitted with an anti-calc device to reduce
lime-scale build up in the steam chamber and extend the
product life.
Hints for optimum use
u
Sort the articles to be ironed according to the fabric. Start
ironing with the fabrics requiring the lowest heat setting.
u
The appliance can be used as a dry iron even if there is
water in the tank. Do not fill the tank with water if the
appliance is to be used as a dry iron for an extended period.
u
Avoid ironing over zippers, rivets on jeans etc. as they will
scratch the soleplate.
Cleaning and storage
Warning! Before cleaning and storing, unplug the appliance
and allow it to cool down.
u
Pour out any remaining water after each use by tilting the
appliance forward.
u
Clean the body with a soft damp cloth.
u
Wipe scale and other residues off the soleplate with a
damp cloth.
u
Store in an upright position. The cord can be wound
around the cord storage (12).
Protecting the environment
Z
Separate collection. This product must not be
disposed of with normal household waste.
Should you find one day that your Black & Decker product
needs replacement, or if it is of no further use to you, do not
dispose of it with household waste. Make this product
available for separate collection.
z
Separate collection of used products and packaging
allows materials to be recycled and used again. Re-use
of recycled materials helps prevent environmental
pollution and reduces the demand for raw materials.
Local regulations may provide for separate collection of
electrical products from the household, at municipal waste
sites or by the retailer when you purchase a new product.
Black & Decker provides a facility for the collection and
recycling of Black & Decker products once they have reached
the end of their working life. To take advantage of this service
please return your product to any authorised repair agent who
will collect them on our behalf.
You can check the location of your nearest authorised repair
agent by contacting your local Black & Decker office at the
address indicated in this manual. Alternatively, a list of
authorised Black & Decker repair agents and full details of our
after-sales service and contacts are available on the Internet
at:
www.2helpU.com
Содержание xt2030
Страница 1: ...www blackanddecker eu English 3 Italiano 7 Ελληνικά 12 6 3 2 1 5 4 7 8 13 12 11 10 9 ...
Страница 2: ...2 B 7 A ...
Страница 17: ...17 ...
Страница 18: ......


