background image

4

ENGLISH

u

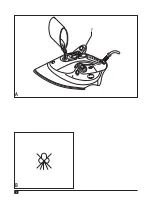
  Hold the appliance at an angle as shown.

u

  Fill the appliance with water using the beaker provided.

u

  Close the water tank cover.

Warning!

 Never fill above the maximum filling level (11). 

Normal tap water can be used, but if you live in a hard water 

area the use of distilled water is recommended. Do not use 

chemically descaled water.

Use

Warning!

 Do not leave the appliance unattended while it is 

connected to the power supply and during the cool down period.

Temperature setting

The required temperature setting depends on the garment 

fabric.

u

  Adjust the temperature control dial (1) to the required 

setting:

 -   

• 

Synthetics

 -   

•• 

Silk/wool

 -   

••• 

Cotton/Linen 

If you are unsure of the fibre content of a garment, start with a low 

temperature setting and test on a small area (seam or inside hem). 

If wrinkles remain, gradually increase the heat setting until you find 

the optimum setting.

Using as a dry iron

u

  Stand the appliance on its heel rest (13).

u

  Plug the appliance in and switch on.

u

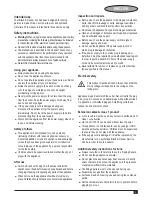
  Set the steam control dial (4) to the no steam position (fig. B).

u

  Adjust the temperature control dial (1) to the required setting.

The heating light (2) will switch off when the appliance has 

reached the required temperature.

Using as a steam iron

u

  Fill the water tank as described above.

u

  Stand the appliance on its heel rest (13).

u

  Adjust the temperature control dial (1) to the required 

steam setting.

The heating light (2) will switch on. When the heating light 

switches off, the iron will be ready for use as a steam iron. The 

heating light will regularly switch on and off whilst ironing.

u

  To create steam, set the steam control dial (4) to the 

required steam position.

u

  Plug the appliance in and switch on.

Using the steam burst button

The steam burst feature can only be used whilst ironing on a 

high temperature setting.

u

  Make sure that there is water in the tank and the 

temperature control dial (1) is set to the steam position.

u

  Lift the appliance and press the steam burst button (5). 

You may need to press a few times to activate the pump.

u

  Let the appliance cool down before leaving it unattended and 

before cleaning or inspecting any parts of the appliance.

u

  The power supply cord should not touch the hot soleplate 

during use or during the cool down period.

u

  Do not touch the soleplate until it has cooled down.

u

  Wait until the appliance has cooled down before emptying 

the water tank as the water may still be hot.

u

  Do not immerse the appliance, cored set or plug in liquids

u

  Always disconnect the appliance from the supply before 

filling, emptying, cleaning, or carrying out any 

maintenance on the appliance.

u

  The plug must be removed from the socket-outlet before 

the water reservoir is filled with water

u

  The iron must be used and rested on a stable surface

u

  The iron is not to be used if it has been dropped, if there 

are visible signs of damage or if it is leaking.

Features

  1. Temperature control dial

  2. Heating light

  3. Self-clean button

  4. Steam control dial

  5. Steam burst button

  6. Spray button

  7. Water tank cover

  8. Spray nozzle

  9. Soleplate

 10. Water tank

 11. Maximum filling level indicator

 12. Cord storage

 13. Heel rest

Before first use

Cleaning the soleplate

u

  Make sure that the appliance is unplugged.

u

  Fill the appliance with water as described below.

u

  Use the self-clean system as described below. When 

finished, wipe the soleplate and steam vents with a cloth.

Some parts of the appliance have been lightly greased and as 

a result the appliance may smoke slightly when switched on 

for the first time. This will cease after a short while.

Assembly

Warning!

 Before assembly, make sure that the appliance is 

switched off and unplugged.

Filling the water tank (fig. A & B)

In order to be able to use the steam function or the spray 

feature, you will first need to fill the water tank with water.

u

  Make sure that the appliance is unplugged.

u

  Set the steam control dial (4) to the no steam position (fig. B).

u

  Open the water tank cover (7).

Содержание xt2030

Страница 1: ...www blackanddecker eu English 3 Italiano 7 Ελληνικά 12 6 3 2 1 5 4 7 8 13 12 11 10 9 ...

Страница 2: ...2 B 7 A ...

Страница 3: ...not in use the appliance should be stored in a dry place Children should not have access to stored appliances Inspection and repairs u Before use check the appliance for damaged or defective parts Check for breakage of parts damage to switches and any other conditions that may affect its operation u Do not use the appliance if any part is damaged or defective u Have any damaged or defective parts ...

Страница 4: ...control dial 1 is set to the steam position u Lift the appliance and press the steam burst button 5 You may need to press a few times to activate the pump u Let the appliance cool down before leaving it unattended and before cleaning or inspecting any parts of the appliance u The power supply cord should not touch the hot soleplate during use or during the cool down period u Do not touch the solep...

Страница 5: ...roduct life Hints for optimum use u Sort the articles to be ironed according to the fabric Start ironing with the fabrics requiring the lowest heat setting u The appliance can be used as a dry iron even if there is water in the tank Do not fill the tank with water if the appliance is to be used as a dry iron for an extended period u Avoid ironing over zippers rivets on jeans etc as they will scrat...

Страница 6: ... purchase Black Decker guarantees to replace defective parts repair products subjected to fair wear and tear or replace such products to ensure minimum inconvenience to the customer unless u The product has been used for trade professional or hire purposes u The product has been subjected to misuse or neglect u The product has sustained damage through foreign objects substances or accidents u Repa...

Страница 7: ...ettrodomestico Dopo l uso u Spegnere estrarre la spina dalla presa di corrente e fare raffreddare l elettrodomestico prima di lasciarlo incustodito e prima di cambiare pulire o ispezionare qualsiasi sua parte u Quando non è in funzione l elettrodomestico deve essere conservato in un luogo asciutto Inaccessibile ai bambini Ispezione e riparazioni u Prima dell uso verificare che non vi siano compone...

Страница 8: ...ante di nebulizzazione 7 Coperchio del serbatoio dell acqua 8 Ugello di nebulizzazione 9 Piastra 10 Serbatoio dell acqua 11 Indicatore del massimo livello 12 Alloggiamento del cavo di alimentazione 13 Supporto posteriore Prima di usare l elettroutensile per la prima volta Pulizia della piastra u Assicurarsi che la spina dell elettrodomestico sia disinserita u Riempire l elettrodomestico con acqua ...

Страница 9: ...a acqua nel serbatoio u Premere più volte il pulsante 6 per attivare la pompa durante la stiratura Utilizzo del pulsante di pulitura automatica La funzione di pulitura automatica deve essere utilizzata prima di adoperare l elettrodomestico per la prima volta e in seguito regolarmente per rimuovere le incrostazioni u Riempire il serbatoio 10 fino al livello massimo 11 u Impostare sulla posizione ma...

Страница 10: ...onsente il riciclaggio e il riutilizzo dei materiali Riutilizzare i materiali riciclati aiuta a prevenire l inquinamento ambientale e riduce la richiesta di materie prime In base alle normative locali i servizi per la raccolta differenziata di elettrodomestici possono essere disponibili presso i punti di raccolta municipali o presso il rivenditore al momento dell acquisto di un nuovo prodotto Blac...

Страница 11: ...o u Il prodotto non sia stato usato in modo improprio o scorretto u Il prodotto non abbia subito danni causati da oggetti o sostanze estranee oppure incidenti u Il prodotto non abbia subito tentativi di riparazione non effettuati da tecnici autorizzati né dall assistenza Black Decker Per attivare la garanzia è necessario esibire la prova comprovante l acquisto al venditore o al tecnico autorizzato...

Страница 12: ...ιδιά πρέπει να επιτηρηθούν για να βεβαιωθείτε ότι δεν παίζουν με τη συσκευή Μετά τη χρήση u Σβήστε τη συσκευή αφαιρέστε το φις από την πρίζα και αφήστε τη συσκευή να κρυώσει πριν την αφήσετε χωρίς επιτήρηση και πριν αλλάξετε καθαρίσετε ή επιθεωρήσετε οποιαδήποτε τμήματά της u Όταν δεν χρησιμοποιείται η συσκευή θα πρέπει να αποθηκεύεται σε ξηρό χώρο Τα παιδιά δεν πρέπει να έχουν πρόσβαση στις αποθη...

Страница 13: ...ίδερο πρέπει να χρησιμοποιηθεί και τοποθετηθεί σε μια σταθερή επιφάνεια u Το σίδερο δεν πρέπει να χρησιμοποιηθεί αν έχει πέσει αν υπάρχουν φανερά σημάδια φθοράς ή αν υπάρχει διαρροή Χαρακτηριστικά 1 Περιστροφικός διακόπτης θερμοκρασίας 2 Φωτεινή ένδειξη θέρμανσης 3 Κουμπί αυτόματου καθαρισμού 4 Περιστροφικός διακόπτης ατμού 5 Κουμπί ριπής ατμού 6 Κουμπί ψεκασμού 7 Καπάκι δοχείου νερού 8 Ψεκαστήρας...

Страница 14: ...σμός μπορεί να χρησιμοποιείται σε οποιαδήποτε ρύθμιση θερμοκρασίας όταν χρησιμοποιείτε το σίδερο ως ατμοσίδερο ή ως απλό σίδερο u Βεβαιωθείτε ότι υπάρχει νερό στο δοχείο νερού u Πατήστε το κουμπί 6 μερικές φορές για να ενεργοποιήσετε την αντλία ενώ σιδερώνετε Χρήση του κουμπιού αυτόματου καθαρισμού Η λειτουργία αυτόματου καθαρισμού πρέπει να χρησιμοποιηθεί πριν τη χρήση της συσκευής για πρώτη φορά...

Страница 15: ...ιμοποιημένων προϊόντων και συσκευασιών επιτρέπει την ανακύκλωση υλικών Η επανάχρηση ανακυκλωμένων υλικών βοηθάει την προστασία του περιβάλλον και μειώνει την ζήτηση για σπάνια υλικά Οι τοπικοί κανονισμοί μπορεί να παρέχουν ξεχωριστή συλλογή ηλεκτρικών προϊόντων από κατοικίες δημοτικές τοποθεσίες απορριμμάτων ή από τον έμπορα όταν αγοράσατε το καινούργιο προϊόν Η Black Decker δίνει τη δυνατότητα συ...

Страница 16: ... ενοικιαστεί u Εχει γίνει εσφαλμένη χρήση του προϊόντος ή αν έχει παραμεληθεί u Το προϊόν έχει υποστεί βλάβη από άλλα αντικείμενα από ουσίες ή λόγω ατυχήματος u Εχει γίνει προσπάθεια επισκευής από μη εξουσιοδοτημένα κέντρα επισκευών ή από προσωπικό που δεν ανήκει στο προσωπικό της Black Decker Για να ισχύσει η εγγύηση πρέπει να υποβάλετε απόδειξη αγοράς στον πωλητή ή το εξουσιοδοτημένο κέντρο επισ...

Страница 17: ...17 ...

Страница 18: ......

Страница 19: ... il prodotto www blackanddecker it productregistration Registrate il prodotto online su www blackanddecker it productregistration o inviate nome cognome e codice del prodotto al centro Black Decker del vostro paese ΕΛΛΗΝΙΚΑ Μην ξεχάσετε να καταχωρίσετε το προϊόν σας www blackanddecker gr productregistration Καταχωρίστε το προϊόν σας σε σύνδεση στη σελίδα www blackanddecker gr productregistration ή...

Страница 20: ...gen Italia Black Decker Italia SpA Tel 039 23871 Viale Elvezia 2 Fax 039 2387592 2387594 20052 Monza MI Numero verde 800 213935 Nederland Black Decker Benelux Tel 0164 283000 Joulehof 12 4622 RG Bergen op Zoom Fax 0164 283100 Norge Black Decker Norge A S Tlf 22 90 99 00 Postboks 4814 Nydalen 0422 Oslo Fax 22 90 99 01 Internet www blackanddecker no Österreich Black Decker Vertriebsges m b H Tel 01 ...

Отзывы: