


EN
G
LI
SH
ENGLISH
THICK WALL INSTALLATION
THIN WALL INSTALLATION
6
7
8
9
Go To Step 10
STOP
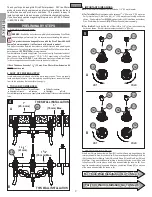
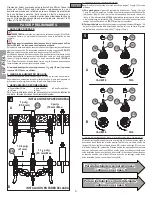
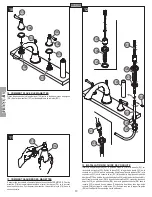
6 DIVERTER INSTALLATION
From above deck, place Washer (
6A
) and slide and thread Diverter Body (
6B
) into Main
Body (
6C
). Be sure to position Diverter Body (
6B
) with Set Screw Hole (
6D
) facing
tub. Secure Diverter Body (
6B
) with Set Screw (
6E
). Thread Rod (
6F
) into Diverter
Body (
6B
).
7 SPOUT INSTALLATION
Assemble and align Quick Connect Spout (
7A
) onto Diverter Body (
7B
) and tighten Set
Screw (
7C
). Place Button (
7D
).
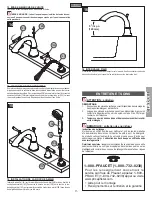
8 SPOUT INSTALLATION
Assemble and align Quick Connect Spout (
8A
) onto Diverter Body (
8B
) and tighten Set
Screw (
8C
). Place Button (
8D
).
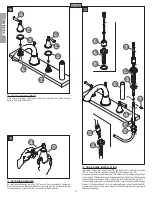
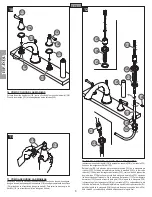
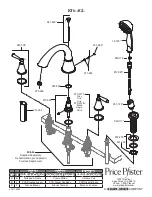
9 KNOB INSTALLATION
Place Knob (
9A
) onto Diverter Stem (
9B
) as shown. Make sure Knob (
9A)
is securely
tighten to Diverter Stem (
9B
).
For pressure testing:
Seal Spray Hose (
9D
) with Plug (
9E
) (Supplied with Rough-In
0X6-44). Run water and perform pressure test. Look for leaks.
WARNING:
Pressure testing is not to exceed 250 PSI (1724 kPa). Make sure
pressure is balanced between hot and cold inlets.
WARNING:
Differential pressure of hot and cold inlets must not exceed 100
PSI (689 kPa).
CAUTION:
Slowly remove Plug (
9D
) to relieve pressure.
3
6B
6A
6C
6E
6D
6F
8D
8C
8A
8B
7D
7A
7C
7B
9A
9B
9D
9E


