background image

14 • ENGLISH

OPERATING INSTRUCTIONS

The Power Inverter must be connected only to batteries 

with a nominal output voltage of 12V. The unit will not 

operate from a 6V battery and will sustain permanent 

damage if connected to a 24V battery. 

Always connect the PI400LA to the 12V DC power source 

before plugging any devices into the unit.

The standard AC and USB outlets allow simultaneous 

operation of multiple devices. Simply plug the equipment 

into the unit and operate normally. Ensure that the 

wattage of all equipment simultaneously plugged into 

the PI400LA does not exceed 400W continuous.

Connection to power source

The power inverter comes equipped with a DC accessory 

outlet plug and battery clips for connection to a power source.

Connecting to a power source using the DC 

accessory outlet plug

The DC Accessory outlet plug is suitable for operating the 

inverter at power outputs up to 100W. The tip of the plug is 

POSITIVE (+) and the side contact is NEGATIVE (–).

Connect the inverter to the power source by inserting the 

DC accessory outlet plug firmly into the accessory outlet 

of a vehicle or other DC power source.

CAUTIONS


f

Connect directly to power source using the included  


battery clips when operating above 100W.


f

Do not use with positive ground electrical systems.


f

Reverse polarity connection will result in a blown fuse  


and may cause permanent damage to the inverter.


Notes: Most vehicle accessory outlet circuits have  


fuses rated at 15A to 20A or greater. To operate  


at full wattage, either use the battery clip cable  


(supplied) or directly wire to the power source with  


user-supplied wire and fuse. The majority of modern  


automobiles, RVs and trucks are negative ground.

Once properly connected to a 12V DC power source and 

switched on, the green Power LED Indicator lights

indicating that the Inverter is functioning properly. If either 

the yellow Input Fault LED Indicator or red Output Fault 

LED Indicator lights, indicating a fault condition exists, 

refer to the “Troubleshooting” section of this Instruction 

manual.

Connecting to a power source using the 

provided battery clips

Use the provided battery clips (with cables) to connect the 

Power Inverter directly to the 12V power source as follows:

1.   Check to make sure the inverter’s Power Pushbutton  


has been pressed OFF (no LEDs are lit) and that no


flammable fumes are present in the installation area.

2.   Connect the red cable to the RED post marked (+) on  


the back of the inverter . Connect the RED Battery  


Clip to the POSITIVE terminal of the battery.

3.   Connect the black cable to the BLACK post marked  


(–) on the back of the inverter. Connect the BLACK  


Battery Clip to the NEGATIVE terminal of the battery.

4.   Make sure that all connections between cables  


and terminals are secure.

Direct hardwiring to power source (optional 

connection method; hardware not included)

 Warning! It is not recommended to install with cables 

longer than 10 feet (3m) as this can adversely effect the

operation of your inverter.

Use #6 AWG wire if the inverter to power source connection 

is 6 feet or less. For cable lengths up to 10ft use #4 AWG 

wire. In either case, protect the positive (+) wire from shorts 

by installing a 35 ANL fuse or circuit breaker close to the DC 

power source (battery) terminal.

1.  Check to make sure the inverter’s Power Pushbutton  


has been pressed OFF (no LEDs are lit) and that no


flammable fumes are present in the installation area.

2.   Identify the POSITIVE (+) and NEGATIVE (–) DC  


power source (battery) terminals.

3.   Install a fuse holder or breaker close to  


 the 

POSITIVE (+) terminal of the DC source (battery).

4.   Connect a length of wire on one side of the fuse holder  


or circuit breaker. Connect the other end of the wire


to the POSITIVE (+) terminal of the inverter.

5.   Connect a length of wire between the inverter’s  


NEGATIVE (–) terminal and the DC power source  


NEGATIVE (–) terminal.

6.   Connect a short length of wire to the other    


terminal of the fuse holder or circuit breaker.  


Mark it “POSITIVE” or “+”.

7.   Connect the free end of the fuse or breaker wire to  


the POSITIVE (+) terminal of the DC power source (battery).

8.   Insert a fuse appropriate to the inverter in the fuse holder.

9.   Test the inverter by turning it on and plugging in  


a 100W lamp or equipment.

10.  If the inverter is not properly operating, then refer  


to the “Troubleshooting” section of this manual.

CAUTION


f

Loose connectors may cause overheated wires  


and melted insulation.


f

Check to make sure you have not reversed the  


polarity. Damage due to reversed polarity is not  


covered by our warranty.

Содержание PI400LA

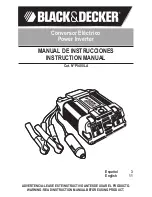
Страница 1: ...éctrico Power Inverter MANUAL DE INSTRUCCIONES INSTRUCTION MANUAL Cat N PI400LA ADVERTENCIA LEASE ESTE INSTRUCTIVO ANTES DE USAR EL PRODUCTO WARNING READ INSTRUCTION MANUAL BEFORE USING PRODUCT Español 3 English 11 ...

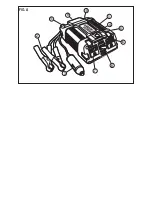
Страница 2: ...FIG A 1 2 3 4 5 6 7 8 9 10 11 ...

Страница 3: ...otección auditiva guantes calzado de seguridad y sistemas de recolección de polvo cuando así se especifique o requiera f f No tire del cable Nunca transporte el aparato por el cable ni lo jale para desconectarlo del tomacorriente Mantenga el cable alejado del calor el aceite y los bordes afilados f f No se estire Conserve el equilibrio y párese adecuadamente en todo momento f f Desconecte los apar...

Страница 4: ...o de sobre calentamiento auto seguro de sobrecarga y protección de corto circuito el indicador LED desplegará directamente la entrada de energía y los errores La unidad no está diseñada para que sea a prueba de agua INSTRUCCIONES IMPORTANTES SOBRE SEGURIDAD Advertencia Para reducir el riesgo de descarga eléctrica f f No conecte al cableado de distribución de CA f f No realice conexiones o desconex...

Страница 5: ...las indicaciones sobre precauciones en estos productos y en el motor INTRODUCCIÓN Gracias por comprar el Sistema de Energía del Vehículo Conversor Eléctrico de 400W con Puerto de Carga USB PI400LA Este conversor puede utilizarse para operar productos electrónicos personales como Computadoras portátiles cámaras digitales o filmadoras reproductores de MP3 teléfonos celulares agendas electrónicas y m...

Страница 6: ...entonces desenchúfelo y busque el asesoramiento del fabricante de su aparato f f Al utilizar un dispositivo recargable supervise la temperatura durante los primeros 10 minutos de uso para determinar si genera calor en exceso f f Si produce calor en exceso esto indica que el dispositivo no debe utilizarse con este conversor f f Este problema no se presenta con la mayoría de los equipos operados con...

Страница 7: ...cable más largas utilice el alambre del AWG 4 En cualquier caso proteja el alambre positivo contra cortocircuitos instalando un fusible o el interruptor de 35 ANL cerca del terminal de la fuente de la potencia CC batería 1 Compruebe para cerciorarse de que se haya extraído el botón de la energía del conversor no se enciende ningunos LED y de que no haya vapores inflamables en el área de instalació...

Страница 8: ... para aparatos y equipos que generen calor como secadores de cabello mantas térmicas hornos de microondas y tostadores Recuerde desconectar la unidad de cualquier fuente de energía cuando no es adentro uso Funcionamiento del puerto de carga USB 1 Conecte el conversor con una fuente de funcionamiento de la potencia CC de 12V según lo descrito en este manual de instruccionne Si usa el adaptador acce...

Страница 9: ...os Este producto no debe desecharse con la basura doméstica normal Si llega el momento de reemplazar su producto Black Decker o éste ha dejado de tener utilidad para usted no lo deseche con la basura doméstica normal Asegúrese de que este producto se deseche por separado La separación de desechos de productos usados y embalajes permite que los materiales puedan reciclarseyreutilizarse Lareutilizac...

Страница 10: ... Ajuste la orientación de los cables de la antena y el cable de alimentación del televisor para reducir al mínimo la interferencia 3 Asegúrese de que la antena conectada al televisor proporcione una señal adecuada sin nieve y que se utilice un cable de antena blindado de alta calidad Problemas frecuentes de potencia de salida Causas posibles Recomendaciónes El voltaje de la batería está por debajo...

Страница 11: ...t all times f f Disconnect appliances Disconnect the appliance from the power supply when not in use before servicing and when changing accessories such as blades and the like f f Avoid unintentional starting Don t carry plugged in appliance with finger on switch Be sure switch is off when plugging in f f Proper cooling is essential when operating the inverter Do not place the unit near the vehicl...

Страница 12: ...he unit or its components while operating your vehicle Not paying attention to the road may result in a serious accident f f Always use the inverter where there is adequate ventilation Do not block ventilation slots f f Always turn the inverter OFF by disconnecting it from the DC accessory outlet when not in use f f Make sure the nominal powering voltage is 12V DC center connection POSITIVE f f Wh...

Страница 13: ...Power inverter output waveform The AC output waveform of this inverter is known as a modified sine wave It is a stepped waveform that has characteristics similar to the sine wave shape of utility power This type of waveform is suitable for most AC loads including linear and switching power supplies used in electronic equipment transformers and small motors The modified sine wave produced by this i...

Страница 14: ...es to connect the Power Inverter directly to the 12V power source as follows 1 Check to make sure the inverter s Power Pushbutton has been pressed OFF no LEDs are lit and that no flammable fumes are present in the installation area 2 Connect the red cable to the RED post marked on the back of the inverter Connect the RED Battery Clip to the POSITIVE terminal of the battery 3 Connect the black cabl...

Страница 15: ...ke sure the ignition accessory switch is actually powering the accessory outlet Some vehicles require the ignition switch to be turned on 5 Plug the 220V AC appliance into one of the inverter s three prong AC outlet and operate normally Note The Inverter will not operate appliances and equipment that generate heat such as hair dryers electric blankets microwave ovens and toasters Remember to disco...

Страница 16: ...you find one day that your Black Decker product needs replacement or if it is of no further use to you do not dispose of it with household waste Make this product available for separate collection Separate collection of used products and packaging allows materials to be recycled and used again Re use of recycled materials helps prevent environmental pollution and reduces the demand for raw materia...

Страница 17: ...zing sound when operated from the inverter because the power supply in the electronic device does not properly filter the modified sine wave produced by the inverter The only solution to this problem is to use a sound system that has a higher quality power supply Problem Television interference The inverter is shielded to minimize interference with TV signals However in some instances some interfe...

Отзывы: