13
ENGLISH
Carefully file the cutting edges of the blade with a fine
tooth file or a sharpening stone, maintaining the original
cutting edge.
Check the balance of the blade, see the instructions for
blade balancing.
Install the blade (36) on the mower and tighten securely,
see the instructions for removing and installing blades.
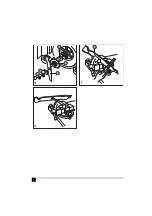
Blade balancing (fig. U)
Check the balance of the blade by putting the centre
hole in the blade on to a nail or a round shank
screwdriver that is clamped horizontally in a vice. If
either end of the blade rotates downward, file that end
of the blade until the blade is balanced.
Lubrication
No lubrication is necessary. Do not oil the wheels. They have
plastic bearing surfaces which require no lubrication.
Cleaning
Release the bail bar (2) to turn the lawnmower off and
wait for the blade to come to a complete stop.
Remove the safety key.
Use only mild soap and a damp cloth to clean the
mower.
Use a blunt tool to clean out any clippings which may
have accumulated on the underside of the mower.
After several uses, check all exposed fasteners for
tightness.
Preventing corrosion
Fertilisers and other garden chemicals contain agents which
greatly accelerate the corrosion of metals. If you mow in
areas where fertilisers or chemicals have been used, the
mower should be cleaned immediately afterward as follows:
Release the bail bar (2) to turn the lawnmower off and
wait for the blade to come to a complete stop.
Remove the safety key (1).
Wipe all exposed parts with a damp cloth.
Transporting and storage
Warning!
The rotating blade can cause serious injury.
Release bail bar to turn mower off and remove the safety key
before lifting, transporting or storing the mower. Store in a
dry place.
Note:
The mower will not be as heavy to lift if the battery
pack is removed first. Do not use the latch as a lift point for
the mower.
Out of season storage
In warm climates, to ensure optimal performance it is
recommended that the battery is maintained on constant
charge.
The battery may be stored with the charger disconnected if
the following conditions are met.
The battery is fully charged before storing.
The average temperature of the storage location is
below 10°C (50°F).
Hints for optimum use
Note:
Storage duration is less than six months.
Lawns should first be mowed in the spring when the grass is
about 63 mm to 76 mm high. Mowing too early in the season
restricts the root systems of the grass which renew
themselves every spring. New grass should be mowed when
it is about 63 mm high.
Do not remove too much grass blade surface at one time,
never more than 1/3 of the leaf height during each cutting.
Cutting too close ‘shocks' sensitive grass blades, resulting in
a shallow root system making it more difficult for your lawn
to reach water in the soil.
Mow your lawn when it is dry to avoid clumping of wet grass.
If you have a choice, late afternoon is the ideal time for
mowing, not only because the grass is dry, but also because
the sensitive new cut area of the grass will not be exposed
to intense sunlight.
Keep the mowing blade sharp for a nice clean cut. This
improves the mower's performance and enhances the look
of your lawn. A dull blade shatters and bruises the tips of the
grass. This impairs the healthy growth of your lawn and
increases the susceptibility to turf diseases. If the grass tips
are bruised it causes a brownish colour which gives your
lawn an unhealthy appearance. A dull blade may also pull up
young grass seedlings.
Try to mow your lawn at a consistent cutting height. While
there are times when you should vary the cutting height with
the changing seasons, a consistent cutting height produces
a healthier, lovelier lawn with generally fewer weeds. Mow
more frequently during periods of fast growth. Frequent
cutting ensures that the lower, less attractive portion of the
grass will not show.
If your lawn has grown too long, during a vacation for
example, mow at a cutting height one or two positions higher
than normal. A second pass at your usual cutting height a
few days later will put your lawn back on schedule. Changing
the cutting height is a simple matter with Black & Decker's
One Touch Wheel Height Adjustment, which simultaneously
adjusts all four wheels at once.
Содержание GRC4700
Страница 1: ...Powerful Solutions TM www blackanddecker eu 1 7 2 4 5 6 3 8 10 9 11 GRC4700 ...
Страница 3: ...3 3 11 12 13 5 14 ...
Страница 4: ...4 15 16 7 1 17 18 19 20 22 21 23 6 9 8 ...
Страница 5: ...5 2 3 28 25 26 27 25 29 30 24 31 33 32 ...
Страница 6: ...6 ...


