background image

11

CAUTION:


Do not turn appliance on when dust cup is removed.

•  In order to keep the suction force optimized, the dust cup and filters must be 

cleaned regularly.

•  Reassemble after cleaning

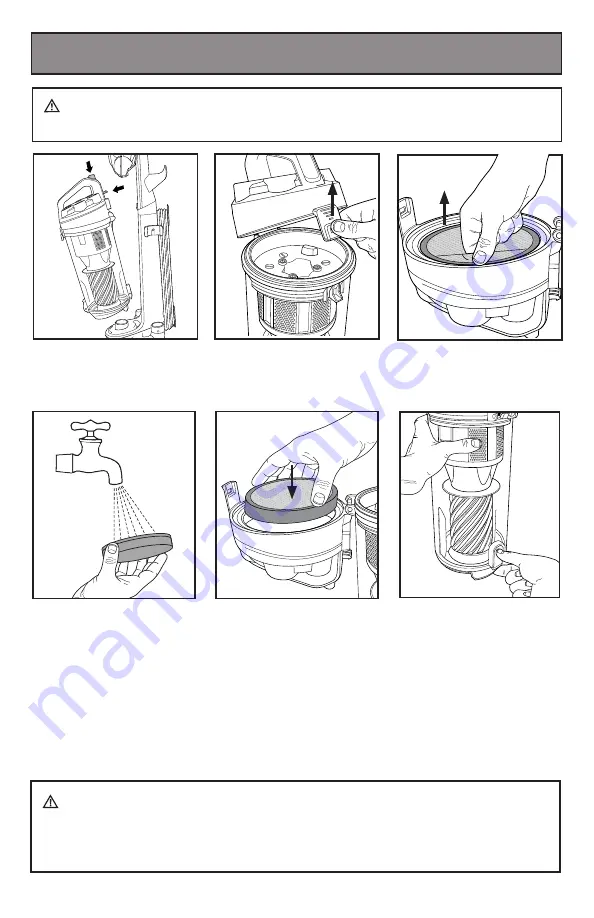
Maintenance And Care - Cleaning Dust Cup Filter

1. Remove the dust cup.

3. Remove the dust   


    cup foam filter.

5. Allow filter to dry 24 hours

    before putting back into

    vacuum cleaner.

4. Hand wash the foam filter.

DO NOT operate without filter installed.

DO NOT wash dust cup in the dishwasher.

DO NOT install filter damp.

2. Open the dust cup      


    filter lid, located on the  


    top of the cup.

WARNING:


Turn off and unplug vacuum cleaner before performing 

maintenance to the vacuum cleaner.

6. Push the release button,

    open the dust cup

    and clean all parts of the

    dust cup.

Содержание BDPSC101

Страница 1: ...e a question or experience a problem with your BLACK DECKER purchase call 1 800 524 6716 from 9 a m to 5 p m EST Mon Fri to speak with an agent Please have the model number available when you call SAVE THIS MANUAL FOR FUTURE REFERENCE MODEL NUMBER BDPSC101 BDPSC102 BDPSC103 BDPSC104 BDPSC105 BDPSC106 To register your new product visit www BlackandDecker com ...

Страница 2: ...ects etc DO NOT pick up flammable or combustible materials i e lighter fluid petrol kerosene etc or use in the presence of explosive liquids or vapor DO NOT pick up toxic material i e chlorine bleach ammonia drain cleaner etc DO NOT vacuum Toner for laser printer copy machines etc as there is a risk of fire and explosion DO NOT vacuum plaster cement etc as the filter can become blocked DO NOT use ...

Страница 3: ...he vacuum DO keep hair loose clothing fingers feet and body parts away from openings or moving parts DO disconnect the appliance from the mains supply before connecting the flexible suction hose DO turn off controls before you connect or disconnect the appliance to or from the mains supply DO disconnect the appliance from the power supply when not in use before changing the filters cleaning the fi...

Страница 4: ...following table shows the correct size to use depending on cord length and nameplate ampere rating If in doubt use the next heavier gauge The smaller the gauge number the heavier the cord IMPORTANT SAFETY INSTRUCTION CONT Minimum Gauge for Cord Sets Volts Total Length of Cord in Feet 120V 0 25 26 50 51 100 101 150 0 7 6m 7 6 15 2m 15 2 30 4m 30 4 45 7m 240V 0 50 51 100 101 200 201 300 0 15 2m 15 2...

Страница 5: ...er cord wrap 10 Hose holder 11 Handle hose 12 Tool holder 13 Handle 14 3 in 1 crevice tool accessory 1 The pet hair cleaning tool 1 is for use when vacuuming pet hair and or ground in debris from carpeted or upholstery surfaces WARNING Injury to pets Do not use pet hair cleaning tool directly on animals 2 3 4 5 6 4 7 14 12 11 8 9 10 13 ...

Страница 6: ...achine and push until it clicks into place Insert the 3 in 1 crevice tool accessory into the on board storage reservoir as shown 2 1 WARNING DO NOT plug in your vacuum cleaner until you have completely assembled it per the following instructions and are familiar with all instructions and operation procedures Remove the screw from the handle Remove the dust cup before installing handle Insert the h...

Страница 7: ...until the other side locks into place Twist the quick release cord hook to release the power cord Place the Pet Tool on the Pet Tool Holder by aligning the bottom hook with the Pet Tool and then pressing the Pet Tool hose connector into the holder Step on the brush cover and pull back on handle to engage for operation Assembly Operation 1 2 ...

Страница 8: ...e to extend the distance Remove hose handle and 3 in 1 crevice tool accessory from the machine LOW HARD FLOOR HIGH Plug in your machine and push ON OFF button to switch on The unit has five height adjust for different ground for example hard floor low carpet high carpet and so on When adjusting the height of the unit the machine is in the upright position ...

Страница 9: ... accessory crevice tool allows for vacuuming in narrow and hard to reach places 3 in 1 Crevice Tool Accessory TURBO Pet Tool For vacuuming pet hair off of all surfaces Don t over fill the dust cup Overfilling the dust cup can clog your filter ...

Страница 10: ... the dust to empty Emptying and cleaning the dust cup Warning Ensure that the unit is in an upright position and power line is off when you remove the HEPA Filter Locate and unlock filter cover as shown Push left to un lock right to lock Open the HEPAcover upwards and remove the HEPAfilter 1 2 3 4 Wash with water when needed Dry for at least 24 hours before re using Gently tap the HEPA Filter over...

Страница 11: ...e dust cup foam filter 5 Allow filter to dry 24 hours before putting back into vacuum cleaner 4 Hand wash the foam filter DO NOT operate without filter installed DO NOT wash dust cup in the dishwasher DO NOT install filter damp 2 Open the dust cup filter lid located on the top of the cup WARNING Turn off and unplug vacuum cleaner before performing maintenance to the vacuum cleaner 6 Push the relea...

Страница 12: ... and remove the plastic locking ring as shown 3 Remove plastic upper cap and clean removing pet hair and debris 2 Pull up on the plastic upper cap of the pet tool as shown UNLOCK LOCK 12 Maintenance And Care Cleaning Dust Cyclone WARNING Turn off and unplug vacuum cleaner before performing maintenance to the vacuum cleaner 1 Remove the dust cyclone 2 Wash with water when needed Dry for at least 24...

Страница 13: ...pe off the moisture on vacuum cleaner components and accessories with a dry cloth Do Not place accessories tools or components in a dishwasher Maintenance And Care Cleaning Vacuum And Tools Maintenance And Care Cleaning Brush Roll Carefully remove any string hair or debris located on the brush roll You can use a tool such as a small knife or scissors to remove and cut any hair or string WARNING Tu...

Страница 14: ... cover 5 Grasp floor brush at both ends and remove by lifting out 6 Clean string hair and other debris from floor brush motor pulley and drive belt 7 Check floor brush for worn areas and replace if needed 8 Check air passageway for obstructions Remove debris from this area 9 When finished cleaning reposition floor brush and drive belt Then replace the brush cover and re install the seven screws 10...

Страница 15: ...f floor brush down into slots on sides as shown 4 Turn floor brush by hand several times in the driection of the motor shaft If properly installed drive belt will align itself on floor brush 5 Replace brush cover and seven screws Maintenance And Care Replace Drive Belt WARNING Turn off and unplug vacuum cleaner before performing maintenance to the vacuum cleaner WARNING The plug must be removed fr...

Страница 16: ...t stretched 7 Check drive belt area and remove obstructions Replace drive belt if necessary 8 Floor brush bristles worn 8 Replace floor brush 9 Floor brush jammed 9 Remove floor brush and clean debris from brush and ends Check drive belt for any damage Troubleshooting Replacement Parts WARNING To reduce the risk of electric shock turn power OFF and disconnect plug from electrical outlet before per...

Страница 17: ...ler s policy for exchanges Proof of purchase may be required Please check with the retailer for its specific return policy regarding time limits for returns or exchanges The second option is to take or send the product prepaid to a BLACK DECKER authorized service agent for repair or replacement at BLACK DECKER s option Proof of purchase may be required This warranty does not apply to accessories T...

Отзывы: