background image


Rev. 1.11 

- 17 - 

SRP-280 

5. Fine Tuning


5-1 Dip Switch Adjustment 

 
The dip switches can be used to select the following printer functions. 


- Emulation 

- Auto Cutter, Font Interval, Auto Line Feed 

- Serial Communications Settings, Hexa-Printing 


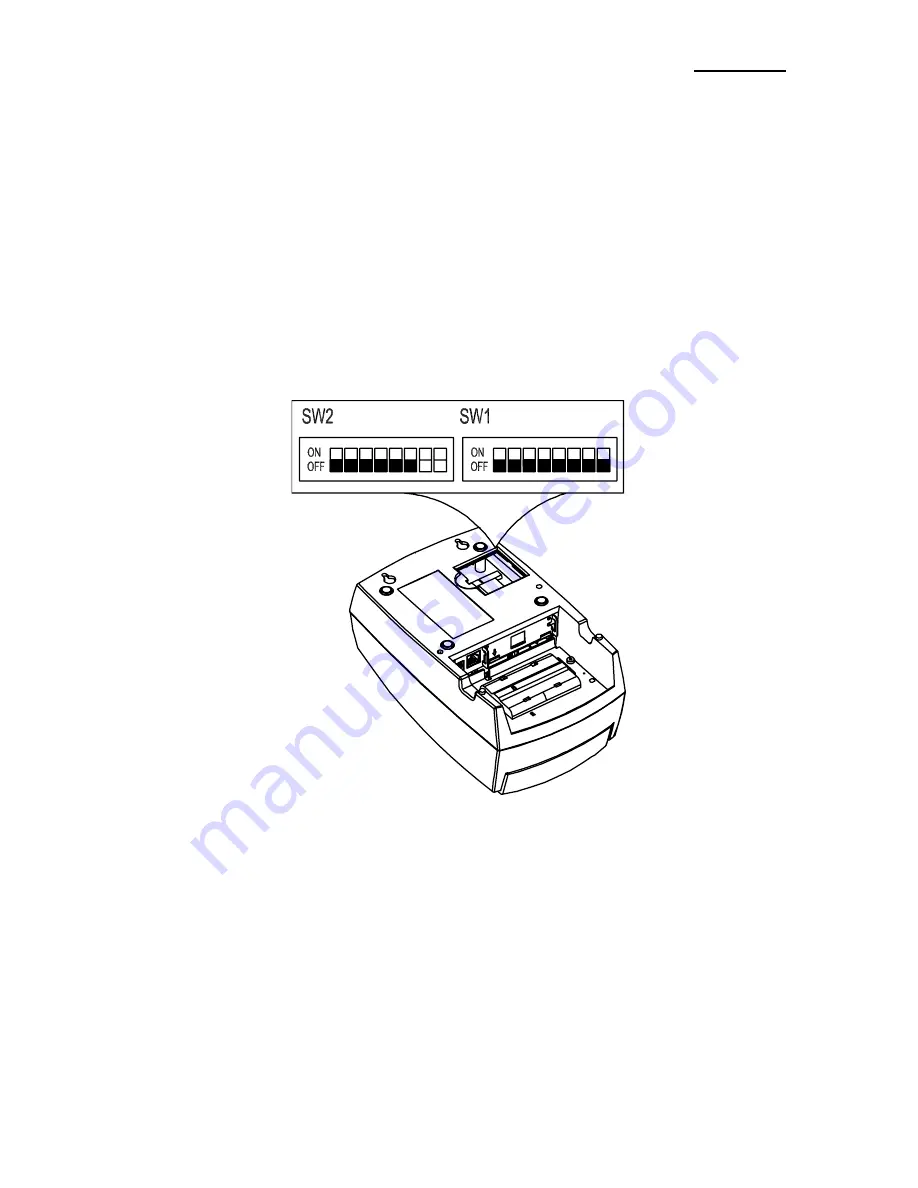
The dip switches are located on the under side of the printer. 


Dip switch adjustment instructions are as follows. 


1) Turn off the printer power. 


2) Turn the printer over and remove the dip switch cover. 


3) Use a pointy edged object to adjust the dip switches. 

      (Refer to the following diagram for functions per switch.) 


4) New settings take effect when turning the printer back on. 

Содержание SRP-280A

Страница 1: ...User s Manual SRP 280 Impact Printer Rev 1 11 http www bixolon com ...

Страница 2: ...ge Installation 12 3 5 Paper Installation 13 3 6 Control Panel Usage 15 4 Self Test 16 5 Fine Tuning 17 5 1 Dip Switch Adjustment 17 5 2 Paper Width Adjustment 19 5 3 Paper Jam Removal 20 6 Appendix 22 6 1 Specifications 22 6 2 RS 232C Serial Interface Cable Specifications 23 6 3 IEEE1284 Parallel Interface Cable Specifications 24 6 4 USB Interface Cable Specifications 25 6 5 Cash Drawer Cable Spe...

Страница 3: ...or this product 2 OPOS Driver Manual This manual provides information on installation and main functions of the OPOS Driver for this product 3 Control Commands Manual This manual provides information on the protocol and functions of the control commands that can be used with this product 4 Code Pages Manual This manual provides information on each character code page that can be used with this pro...

Страница 4: ...tic bag out of children s reach If not a child may put the bag on his head Do not pull the cable to unplug This can damage the cable which is the origin of a fire or a breakdown of the printer You must use only the supplied adapter It is dangerous to use other adapters Do not plug several products in one multi outlet This can provoke over heating and a fire If the plug is wet or dirty dry or wipe ...

Страница 5: ... repair or remodel it for yourself Call your dealer when you need these services Do not touch the blade of auto cutter Install the printer on the stable surface If the printer falls down it can be broken and you can hurt yourself Keep the desiccant out of children s reach If not they may eat it If you observe a strange smoke odor or noise from the printer unplug it before taking following measures...

Страница 6: ...td is not legally liable for any damages resulting from the use of the information in this manual BIXOLON Co Ltd and its affiliates are not legally liable United States excluded for any damages loss costs and or expenses that result from the breakdown malfunction and or misuse of the product due to violation or neglect of the operation and maintenance information and instructions provided by the B...

Страница 7: ...g items should all be contained in the printer package Contact the dealer from which the purchase was made if any item is damaged and or missing SRP 280C SRP 280A Power Cord AC Adapter Paper Roll Ribbon Cartridge Installation Guide CD Two Inch Paper Guide ...

Страница 8: ...Rev 1 11 8 SRP 280 2 Product Part Names Cartridge Knob Printer Cover Ribbon Cartridge Auto Cutter Power Switch Head Cover Paper Feed Button ...

Страница 9: ...w 1 Turn off the printer power switch 2 Check to see that the AC adapter voltage matches that of the power source 3 Connect the AC adapter jack to the printer power connector 4 Connect the power cord to the AC adapter 5 Connect the power cord to a power source outlet Power Connector AC Adapter Power Cord ...

Страница 10: ...mmunications interface standards RS 232C Serial IEEE1284 Parallel USB 1 Turn off the power switch on both the printer and the POS system PC ECR etc 2 Connect the interface cable to the printer interface connector For a Serial cable secure by tightening the screws on both sides For a Parallel cable secure by fastening the clips on both sides Interface Cable Interface Connector ...

Страница 11: ...1 Turn off the power switch on both the printer and the POS system PC ECR etc 2 Connect the cash drawer cable to the printer cash drawer connector CAUTION Do not connect a telephone line to the printer cash drawer connector Doing so may cause damage to the printer and telephone line Cash Drawer Cable Cash Drawer Connector ...

Страница 12: ... ribbon cartridge as shown in the image above and set the ribbon so that is behind the printer head 5 To allow the ribbon to move freely within the ribbon cartridge during insertion turn the cartridge knob clockwise once more CAUTION Using unauthorized ribbon cartridges may result in poor printing quality or malfunction and will void the warranty Refer to page 6 1 of the User Manual for the specif...

Страница 13: ... Installation 1 Turn on the printer power 2 Open the printer cover Remove any core of a fully used paper roll if present 3 Undo the paper roll and make sure that the lower edge is cleanly cut 4 Insert the paper roll as shown below ...

Страница 14: ...per roll into the paper slot as shown below The paper then feeds automatically Automatic cutting is available for printer models equipped with auto cutters SRP 280C For printer models without auto cutters tear off the paper as shown below SRP 280A ...

Страница 15: ... tests and hexa printing Refer to 4 Self Test for details related to self tests Refer to the service manual for information on hexa printing O Power This lamp turns green when the printer power is on O Error This lamp turns red when a printer error occurs O Paper Out This lamp turns red when paper has been fully used ...

Страница 16: ... Test instructions are as follows 1 Check to see that the paper is properly installed 2 Turn off the printer power and close the printer paper cover 3 Press the paper feed button and simultaneously turn on the printer power to commence the self test 4 The test ceases after printing the current printer status and the following message The PAPER LED lamp blinks SELF TEST PRINTING PLEASE PRESS THE FE...

Страница 17: ...cations Settings Hexa Printing The dip switches are located on the under side of the printer Dip switch adjustment instructions are as follows 1 Turn off the printer power 2 Turn the printer over and remove the dip switch cover 3 Use a pointy edged object to adjust the dip switches Refer to the following diagram for functions per switch 4 New settings take effect when turning the printer back on ...

Страница 18: ...e OFF Chart 1 Vertical Alignment SW 5 SW 6 Mode ON OFF Backlash 0 OFF OFF Backlash 1 OFF ON Backlash 2 ON ON Backlash 3 Diagram 2 Dip Switch 2 Settings Switch Function On Off Default SW2 1 Paper Width Selection 2 inch 3 inch OFF SW2 2 Hexa Printing Selection Enable Disable OFF SW2 3 Reserved SW2 4 RS 232C Setting Data Length 7 bits 8 bits OFF SW2 5 RS 232C Setting Parity Check Enable Disable OFF S...

Страница 19: ... printer cover 2 Confirm the location of the hole for the two inch paper guide inside the printer 3 Insert the two inch paper guide into the hole as shown above Affix the two inch paper guide securely so that it does not shake loose 4 Change dip switch 2 1 on the under side of the printer from OFF to ON 5 Turn on the printer power 6 Install the two inch paper roll and use Printer Front Printer Rea...

Страница 20: ...ad cover 6 Push the head to the left and fix in place 7 Turn the paper feed knob and remove the jammed paper 8 Replace the head cover and fasten the screw 9 Place the ribbon cartridge and paper back in their original positions and close the printer cover WARNING The printer head can get hot during printing After printing wait at least 10 minutes to allow cooling before handling the printer interio...

Страница 21: ...al position paper cannot be inserted properly Insert a screwdriver into the hole near the bottom of the auto cutter as shown below and turn the gear within the auto cutter to adjust the cutting edge to its normal position Cutting Edge Normal Position Wrong Position Cutting Edge Position ...

Страница 22: ...h 76 0 5mm 2 inch 57 5 0 5mm Diameter Max 83mm 3 26 Thickness 0 06mm 0 085mm 0 002 0 003 Adapter SMPS AC Input AC100 240V 50Hz 60Hz SMPS Voltage Current DC 24 V 1 5 A Auto Cutter Cutter Type Guillotine type Cutter Width Max 85 mm Cutter Thickness Max 0 1mm Other Total Volume A type 165 X 270 X 130 C type 165 X 270 X 132 Weight Weight printer only Weight with box accessories 1 85kg 2 8kg Reliabilit...

Страница 23: ...s together 2 Cable Specifications Pin No Signal Direction Function 1 FG Frame Ground 2 TxD Output Transmit Data 3 RxD Input Receive Data 4 RTS Output Ready To Send 5 CTS Input Clear To Send 6 DSR Input Data Set Ready 7 SG Signal Ground 20 DTR Output Data Terminal Ready Cash Drawer Connector Serial Interface Power Connector Printer Side 25P Host Side 25P Printer Side 25P Host Side 9P ...

Страница 24: ... 5 8 Host Printer Data 6 Data 6 9 Host Printer Data 7 MSB Data 7 MSB 10 Printer Nack PtrClk PtrClk 11 Printer Busy PtrBusy Data3 7 PtrBusy 12 Printer Perror AckDataReq Data2 6 AckDataReq 13 Printer Select Xflag Data1 5 Xflag 14 Host nAutoFd HostBusy HostBusy 15 NC NC NC 16 GND GND GND 17 FG FG FG 18 Printer Logic H Logic H Logic H 19 30 GND GND GND 31 Host nInit nInit nInit 32 Printer nFault nData...

Страница 25: ... White Data D 3 D Green Data D 4 GND Black Signal Ground Shell Shield Drain Wire Frame Ground 6 5 Cash Drawer Cable Specifications Pin No Signal Direction 1 Frame Ground 2 Cash Drawer Control Signal 1 Output 3 Cash Drawer Operation Confirm Signal Input 4 24V 5 Cash Drawer Control Signal 2 Output 6 Signal Ground Cash Drawer Connector USB Interface Power Connector ...

Страница 26: ...oduct or its literature indicates that the corresponding item should not be discarded at the end of its working life with other household waste To prevent possible harm to the environment or human health from uncontrolled waste disposal please separate marked items from other types of waste and recycle them responsibly to promote the sustained reuse of material resources Household users should con...

Отзывы: