background image

Getting Started 

Page 22 of 42 

Epoch 2

 Instructions for Use 

1771011

 Revision 

A


BioTek Instruments, Inc.


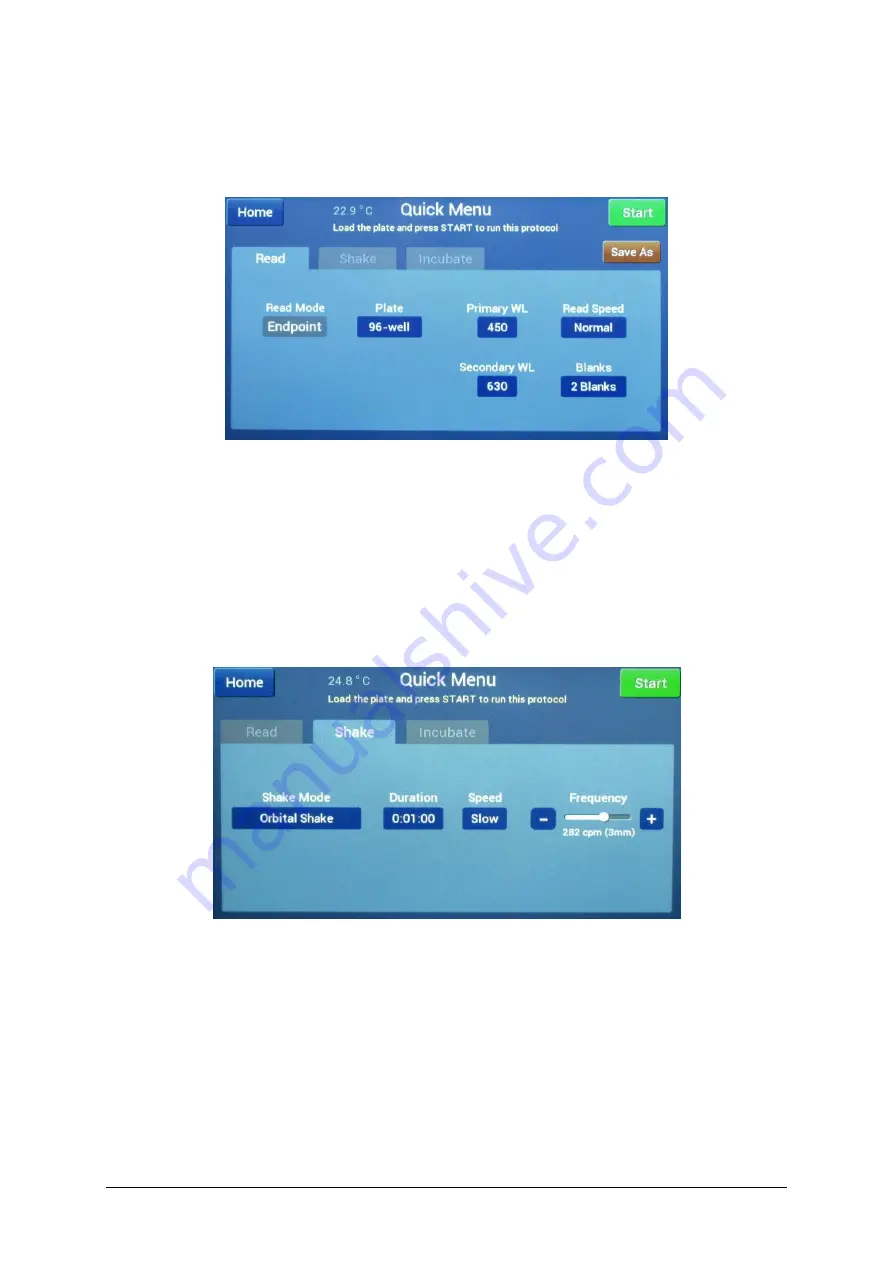
Define and Start a Quick Endpoint Read 

From the 

Main


Menu

, tap 

Quick


1.


Select the 

Plate 

type and define the appropriate settings for your assay. 

2.


Place the plate on the carrier and tap 

Start

 to run the protocol. 

3.


When the read is finished, the results are displayed and ready for output according to 
the settings defined under 

Instrument > Output

Define and Start a Standalone Shake 

From the 

Main Menu

, tap 

Quick

 and select the 

Shake 

tab. 


1.


Set 

Shake Mode

 to Linear (side-to-side), Orbital (circle), or Double Orbital (figure 8). 

2.


Set the 

Duration

, from 1 second to 2 hours 45 minutes. 

3.


For Orbital shake modes, set the 

Speed 

to Slow or Fast. 

4.


Adjust the 

Frequency

, if needed. The cycles per minute updates as the slider moves. 

The measurement in mm indicates the distance the carrier travels during the shake. 

5.


Place the plate on the carrier and tap 

Start 

to shake the plate. 

Содержание Epoch 2

Страница 1: ...Epoch 2 Microplate Spectrophotometer INSTRUCTIONS FOR USE BioTek Instruments Inc 1771011 Revision A ...

Страница 2: ...Preface Page 2 of 42 Epoch 2 Instructions for Use 1771011 Revision A BioTek Instruments Inc Contents Installation 12 Getting Started 17 Maintenance 33 Qualification Specifications 43 39 ...

Страница 3: ...nd Epoch Take3 BioStack and Gen5 are trademarks of BioTek Instruments Inc BioCell is a trademark of BioTek Instruments and is patented under U S patent number 5 963 318 Microsoft Windows and Excel are either registered trademarks or trademarks of Microsoft Corporation in the United States and or other countries All other trademarks are the property of their respective holders Restrictions and Liab...

Страница 4: ...e Phone 49 0 7136 9680 Fax 49 0 7136 968 111 Email info biotek de Instructions for Use Requirements This document fulfills the basic needs of persons operating this device according to the requirements of the In Vitro Diagnostic Directive 98 79 EC for Instructions for Use Some of the device s higher level functions and features as well as certain detailed maintenance and qualification routines are...

Страница 5: ...ations that could result in serious injury these may vary depending on the instrument model See Hazards and Precautions Hazards The following hazard warnings are provided to help avoid injury Warning Internal Voltage Always turn off the power switch and unplug the power supply before cleaning the outer surface of the instrument Warning Power Rating The instrument s power supply or power cord must ...

Страница 6: ...s test data Warning Reader Data Reduction Protocol No limits are applied to the raw measurement data All information displayed on the screen sent to an attached printer or exported via computer control must be thoroughly analyzed by the operator Warning Potential Biohazards Some assays or specimens may pose a biohazard This hazard is noted by the symbol shown here Adequate safety precautions shoul...

Страница 7: ... repackaging the instrument for shipment Caution Disposal Dispose of the instrument according to Directive 2012 19 EU on waste electrical and electronic equipment WEEE or local ordinances Caution Warranty Failure to follow maintenance protocols may void the warranty See Maintenance Caution Electromagnetic Environment Per IEC 61326 2 6 it is the user s responsibility to ensure that a compatible ele...

Страница 8: ...its and methods of the following EN 61000 4 2 Electrostatic Discharge EN 61000 4 3 Radiated Radio Frequency RF Immunity EN 61000 4 4 Electrical Fast Transient Burst Immunity EN 61000 4 5 Surge Immunity EN 61000 4 6 Conducted RF Disturbance Immunity EN 61000 4 11 Voltage Dips Interruptions and Short Variations Directive 2014 35 EU Low Voltage Safety The system has been type tested by an independent...

Страница 9: ... from digital apparatus set out in the Radio Interference Regulations of the Canada Department of Communications User Safety This device has been type tested by an independent laboratory and found to meet the requirements of the following Canadian Standards Association CAN CSA C22 2 No 61010 1 Safety requirements for electrical equipment for measurement control and laboratory use Part 1 General re...

Страница 10: ... or accessories Alternating current Both direct and alternating current Direct current Earth ground terminal Protective conductor terminal On Supply Off Supply Caution refer to accompanying documents Warning risk of electric shock Warning risk of crushing or pinching Warning potential biohazards Warning hot surface Laser radiation Do not stare into beam ...

Страница 11: ...Revision A BioTek Instruments Inc Laser energy Exposure near aperture may cause burns Do not stare directly at the laser during operation In vitro diagnostic medical device Separate collection for electrical and electronic equipment Consult instructions for use ...

Страница 12: ...l Touchscreen Cuvette Port EPOCH2NS EPOCH2NSC EPOCH2TS EPOCH2TSC Package Contents Item Notes A specific model of an Epoch 2 instrument per sales order All required accessories to power the instrument Interface cables if required User manual and or instructions Optional accessories per sales order unless shipped separately ...

Страница 13: ...Installation Page 13 of 42 Epoch 2 Instructions for Use 1771011 Revision A BioTek Instruments Inc Unpack the Box ...

Страница 14: ... models without a touchscreen select an area where temperatures between 18 C and 40 C can be maintained For models with a touchscreen the temperature must be between 18 C and 30 C The reader is sensitive to extreme environmental conditions Avoid excessive humidity excessive ambient light and dust Gen5 control only Prepare the Host Computer Follow instructions in the Gen5 Getting Started Guide to i...

Страница 15: ...Installation Page 15 of 42 Epoch 2 Instructions for Use 1771011 Revision A BioTek Instruments Inc Install the Power Supply Install the Cuvette Holder Models with a cuvette port ...

Страница 16: ...sful Make sure the reader is turned on and the USB cable is secure on both ends Consult the Gen5 Getting Started Guide supplied as a PDF on the Gen5 software USB flash drive for additional troubleshooting information Repackage the Instrument if needed If the reader has been exposed to potentially hazardous material decontaminate it to minimize the risk to all who come in contact with the reader du...

Страница 17: ...oTek Instruments Inc Getting Started External Components Touchscreen Models 1 USB port for data output 2 microplate carrier access door 3 cuvette holder if equipped 4 power on off 5 carrier in out status LED 6 USB port for printer 7 power inlet 8 USB port for host computer if used ...

Страница 18: ... 2 Instructions for Use 1771011 Revision A BioTek Instruments Inc Non Touchscreen Models 1 microplate carrier access door 2 cuvette holder if equipped 3 power on off 4 carrier in out status LED 5 power inlet 6 USB port for host computer ...

Страница 19: ...ls can be saved on the reader at one time excluding the predefined Take3 protocols Protocols created through the touchscreen are limited to a single read step and for Endpoint Kinetic and Take3 protocols up to 12 blank wells Use Gen5 if your assays require more complex reading methods or plate layouts The left side of the Main Menu lists the five most recently used protocols The tabbed sections in...

Страница 20: ...sults Provides access to results for the 12 most recently run protocols Tap a protocol name to view its results and then tap the screen to cycle through the available data sets e g Raw data Delta OD Blanked data Instrument Run a system test define date time settings enable output to a printer and or USB flash drive configure a Take3 plate and control temperature Confirm or Set the Time and Date Fr...

Страница 21: ...e when a secondary wavelength is selected in an absorbance protocol This is the calculated value for each well of the primary wavelength measurement minus the secondary wavelength measurement Blanked The calculated value for each well after subtracting the average of the blank well s Save Format options Report csv file containing raw data Delta OD and or blanked data as available This file can be ...

Страница 22: ... output according to the settings defined under Instrument Output Define and Start a Standalone Shake From the Main Menu tap Quick and select the Shake tab 1 Set Shake Mode to Linear side to side Orbital circle or Double Orbital figure 8 2 Set the Duration from 1 second to 2 hours 45 minutes 3 For Orbital shake modes set the Speed to Slow or Fast 4 Adjust the Frequency if needed The cycles per min...

Страница 23: ...lus 4 C Condensation Control A temperature Gradient can be applied to reduce the risk of condensation when using microplate lids When no gradient 0 is applied the heaters above and below the plate operate at the same setpoint temperature This is recommended if the plate has no lid or condensation is not a problem when lids are used When a gradient 0 1 to 2 0 is applied the heaters above the plate ...

Страница 24: ... the protocol name is limited to 18 characters 3 Set the Read Mode to Endpoint Kinetic or Spectral 4 Define the protocol parameters and then tap Save Endpoint Protocols Plate Options include standard 6 12 24 48 96 and 384 well plates Cuvette if equipped and Take3 if configured Primary WL and optional Secondary WL Define the primary and optional secondary wavelength in the range 200 to 999 nm Micro...

Страница 25: ...ed tap Save The protocol name is added to the Main Menu If your Endpoint assay requires incubation activate Temperature Control before reading the plate From the Main Menu select Instrument and tap the Temperature tab Kinetic Protocols Time Specify the full duration of the kinetic analysis up to 272 15 00 hh mm ss Note You can stop a protocol while it is running before the Time expires results wil...

Страница 26: ...ap the 1 2 3 4 box to change the view Options tap Edit If applicable check Eject the plate when done If unchecked the plate will remain in the chamber after the last kinetic read If the assay requires incubation 1 Check the Active box 2 Define a Setpoint from 18 C to 65 C Heating will begin when you start to run the protocol 3 Check Turn off when done to turn the incubator off after the last kinet...

Страница 27: ...l data points cannot exceed 100 Microplates and Take3 only Calibrate first Set to Yes optimum performance to perform calibration at all of the specified wavelengths when a plate read is initiated Set to No optimum speed to perform calibration at only those wavelengths not yet calibrated since the reader was turned on Shake Before Read Select a shake mode of Linear side to side Orbital circle or Do...

Страница 28: ...late tap Full Plate and select the well s to read Tap Save 3 Press the blue lighted button on the front of the reader to eject the plate carrier 4 Place the microplate on the carrier and tap Start When the read is finished the results are displayed and ready for output according to the settings defined under Instrument Output The reader saves results for the last 10 Endpoint Take3 and last 2 Kinet...

Страница 29: ... to view or output results The results are displayed on the touchscreen Tap the data set name at the top of the screen to view protocol details including the start date time final status and protocol parameters Endpoint Tap the screen to toggle through the available data sets Kinetic Spectral Tap a well to view its kinetic curve or spectral scan If a well displays OVR the measurement exceeds overf...

Страница 30: ...m BSA 6 7 260 320 nm IgG 13 7 260 320 nm Lysozyme 26 4 260 320 nm Define and Align a Take3 Plate Ensure that the glass slide is clean before running the alignment procedure Refer to the Take3 Take3 Trio User Guide for cleaning instructions If you remove or replace the glass slide perform the Pathlength Calibration procedure described in the Take3 Take3 Trio User Guide and then run the alignment pr...

Страница 31: ... Set the value smaller to have a tighter tolerance on the deviation of cleanliness of the microspots or set it higher to relax the tolerance 5 Tap Edit and enter the pathlength values that either came with the Take3 plate or were generated through the Pathlength Correction procedure in the Take3 User Guide 6 When finished tap Back and Home to return to the Main Menu Run a Take3 Protocol 1 On the M...

Страница 32: ...te Invalid blank wells are highlighted in red Tap a well to mask exclude it from blank average and CV calculations When the remaining unmasked blank wells are valid the Approve button illuminates If the number of valid blank wells is sufficient for the assay tap Approve otherwise select Cancel and address the problem e g clean the slides At least one blank well is required If all blank wells are m...

Страница 33: ...t the plate carrier and then turn off and unplug the instrument 2 Moisten a clean cotton cloth with water or with water and mild detergent Wring out the cloth so that liquid does not drip from it Do not soak the cloth 3 Wipe the plate carrier the inside of the plate carrier door and all exposed surfaces of the instrument 4 If the reader is equipped with a cuvette holder remove the holder and clean...

Страница 34: ...h soap or other mild cleaner Deionized or distilled water Lint free disposable towels Protective gloves Lab coat Biohazard trash bags Safety glasses Surgical mask Procedure Do not spray or soak the touchscreen This will cause damage 1 Eject the plate carrier and then turn off and unplug the instrument 2 Moisten a clean lint free disposable towel with water or with water and dish soap Wring out the...

Страница 35: ...ns and methods Each laboratory must ensure that decontamination procedures are adequate for the biohazard s they handle Wear prophylactic gloves when handling contaminated instruments Gloved hands should be considered contaminated at all times keep gloved hands away from eyes mouth and nose Eating and drinking while decontaminating instruments is not advised Mucous membranes are considered prime e...

Страница 36: ...the cloth 4 Wipe the plate carrier and all exposed surfaces of the instrument including the inside of the microplate carrier access door and if equipped the cuvette holder 5 If the instrument is equipped with a touchscreen place the moistened cloth on the touchscreen and it let rest there for 15 minutes then remove it 6 Allow the instrument to dry for 20 minutes for thorough decontamination 7 Mois...

Страница 37: ...7260522 uses NIST traceable neutral density filters to confirm absorbance specifications in the visible range 400 800 nm This test plate also contains precision machined holes to verify mechanical alignment Absorbance Test Plate Part Number 7260551 uses NIST traceable neutral density filters to test performance at 340 nm Define the Absorbance Test Plate Parameters Before the Absorbance Plate Test ...

Страница 38: ...n A BioTek Instruments Inc 5 Click Start Test 6 Place the Absorbance Test Plate on the microplate carrier with well A1 in the proper location 7 Click OK to run the test 8 When the test is complete the results report appears Scroll through the report every result should show PASS ...

Страница 39: ...Dimensions Touchscreen models 31 8 cm x 32 4 cm x 39 4 cm Non touchscreen models 21 6 cm x 32 4 cm x 39 4 cm Operational Temperature Range Touchscreen models 18 C to 30 C Non touchscreen models 18 C to 40 C Humidity 10 to 85 relative humidity non condensing Power Consumption Powered from an external 120W minimum 24VDC power supply compatible with 100 240 volts AC 50 60Hz Temperature Control Range ...

Страница 40: ... 200 999 nm Bandpass 5 nm microplate cuvette Measurement Range 0 000 4 000 OD microplate normal mode cuvette 0 000 3 000 OD microplate sweep mode Resolution 0 001 OD touchscreen control only 0 0001 OD Gen5 control only Increment 1 nm Wavelength Accuracy 2 nm Wavelength Precision 0 2 nm standard deviation Accuracy Tested with certified neutral density glass 96 well plate normal read speed delay aft...

Страница 41: ...dard Deviation STD Tested with certified neutral density glass measured by one standard deviation 8 measurements data point 96 well plate normal read speed delay after plate movement 100 ms 0 000 to 2 000 OD 1 0 0 005 OD 2 000 to 2 500 OD 3 0 0 005 OD 384 well plate normal read speed delay after plate movement 100 ms 0 000 to 1 500 OD 1 0 0 005 OD 1 500 to 2 000 OD 3 0 0 005 OD 96 and 384 well pla...

Страница 42: ...elay Time msec Normal Mode 74 100 Normal Mode Min Delay Time 64 0 Sweep 35 0 at end of row 384 well Normal Mode 192 100 Normal Mode Min Delay Time 154 0 Sweep 42 0 at end of row Kinetic A1 to A1 96 well 450 nm sec MAX Delay Time msec Normal Mode 50 100 Normal Mode Min Delay Time 40 0 Sweep 8 0 at end of row 384 well Normal Mode 170 100 Normal Mode Min Delay Time 131 0 Sweep 14 0 at end of row ...

Отзывы: