BioLite SolarHome 620 Скачать руководство пользователя страница 8

CHARGING IN & POWER USAGE

CONTROLLING YOUR LIGHTS

Your system’s power supply is directly affected by the strength of the sun which will vary by weather, season, and time 
of day. You can see 

Current Sun Strength

 (Screen 3) on your 

Control Box Display

.

View your 

Battery Level

 (Screen 2) on your 

Control Box 

Display

. It will take 4-6 hours to fully charge your system, 

depending on sun strength and if lights are in use.

Power from the Solar Panel is used to run your lights and the 
radio. You can also use this power to charge cell phones and 
other small electronics. Use the the 

USB Port

 on the right side 

of the 

Control Box

 to connect your device. If control box is in 

sleep, press left or right arrow to wake up before charging. 

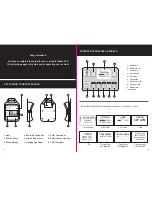
The three lights and Control Box have three brightness settings: 

Low

Medium

, and 

High

. Use diagram below to access 

desired brightness by pressing 

Light Switch

 the correct number of times.

Total run time of your light depends on brightness settings, battery levels, and how many other units or features are 
being used at the same time. 

The LED on the 

Security Light Switch

 will 

illuminate when Motion Sensor is active. 
Security Light will remain on for 30 seconds 
after motion is detected.  

Button Presses

1x

2x

3x

4x

5x

Hanging Lights

Off

Hanging Lights

Low

Medium

High

Motion Sensor On

Off

Low

Medium

High

30 

seconds

4-6 hours

4 lights on 

LOW

hours of light with

4 lights on 

MEDIUM

hours of light with

4 lights on 

HIGH

hours of light with

14

 HOURS 

7

 HOURS 

4.5

 HOURS 

Battery Light

Off

Medium

Low

High

Sun

Sun

14 Hours Light

100%

Battery

ONE FULL DAY’S CHARGE WILL RUN:

13

14

Содержание SolarHome 620

Страница 1: ...SolarHome 620 SHA1001 R6 IM 11 Hours Light 85 Battery...

Страница 2: ...nlight Run cords to Hanging Lights and Control Box to ensure proper length See diagram and quick tips below for help 2 Mount Control Box 1 5 meters off the ground in a central location in your home 3...

Страница 3: ...ol Box will be inside your home 1 4 Avoid shadows caused by trees or buildings this will make less power 1 2 It is okay to leave solar panel on roof when it is raining Rain will help to keep solar pan...

Страница 4: ...ace Control Box over screws and slide down to secure position Do not tighten screws completely into the wall this will allow easy removal of Control Box for future setup and use 2 4 Keep Control Box o...

Страница 5: ...wall with 2x screws or nails 3 4 Connect up to 2 Hanging Lights directly to Control Box Connect third light via Extension Port of previously connected Lights Lights can be connected in any order 3 2 H...

Страница 6: ...urn Control Box to secure position by sliding down over wall screws Extend Radio Antenna above Control Box and wrap around one of the Hanging Light or Solar Panel wires to secure 5 2 Secure Light Swit...

Страница 7: ...On O 7 Previous Screen 8 Display Screen 9 Next Screen 10 Radio On 8 6 7 9 10 1 2 3 4 5 The Control Box Display has eight 8 screens Access by pressing Back or Forward Arrows GET TO KNOW YOUR CONTROL BO...

Страница 8: ...wake up before charging The three lights and Control Box have three brightness settings Low Medium and High Use diagram below to access desired brightness by pressing Light Switch the correct number...

Страница 9: ...redit 13 Days Payments Enter Code Enter Code Success 1 day 18 hours left Bad Code Please try again 1 To set time hold down the RIGHT ARROW until the hour position is highlighted 2 Use BACK 1 and FWD 2...

Страница 10: ...iguration et utilisation futures REMARQUE Maintenez le bo tier de commande au sec et solidement en place afin d viter des dommages 3 INSTALLATION DES LUMI RES SUSPENDUES 3 1 Le SolarHome 620 comprend...

Страница 11: ...1 21 lbs hanglampen elk 300 g 0 66 lbs zonnepaneel 720 g 1 59 lbs GEBRUIKSTIJD VOOR 4 LICHTEN HRS laag 14 uur medium 7 uur hoog 4 5 uur LUMENS 100 lm per lamp totaal 400 lumen totaal LENGTE KABEL zon...

Страница 12: ...te sang 3 Spill av pause 4 Volum ned 5 Volum opp 6 MP3 p av 7 Skjerm som viser 3 sanger Radiokontroller 1 Kanalvelger tilbake 2 Kanalvelger frem 3 Radio p av 4 Volum ned 5 Volum opp 6 Radio p av 7 Skj...

Страница 13: ...veel meer Vollst ndige Bedienungsanleitung Tutorial Videos h ufige Fragen und mehr Manuali di istruzioni completi video tutorial domande frequenti e altro ancora T ydet k ytt ohjeet ohjevideot yleisi...

Отзывы: