


Lightwave UV/Vis Diode Array Spectrophotometer
9
7 Installation & Start-up
Unpack the Lightwave and ensure that you have received the following in
good condition: -
S2000 Lightwave Spectrophotometer
Mains Lead
Starter pack of 10 disposable UV cuvettes
Instruction manual
Warranty Card
Place the unit on a level surface, insert the IEC cable in the rear socket and
then connect to the electricity supply (90-250V 50/60Hz).
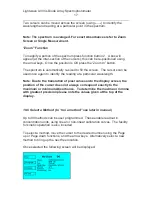
Switch the instrument on using the switch at the rear. The Lightwave logo
should appear followed by a self-diagnostic screen as below:
Check that all tests are passed or contact our sales office/authorised dealer.
Warm Up Time
To allow the optical and electronic components to stabilise it is recommended
to allow a minimum of 10 minutes for the unit to warm up. For minimum drift,
leave the instrument for 45 minutes to 1 hour.
It is best practice to always take a reference measurement prior to making a
TEST, however the Lightwave will remember the last reference until the unit
is switched off or re-referenced.
Lamp Failure
Failure of the lamps indicates either that there was a cuvette in the
compartment when the instrument was switched on (simply remove the
cuvette and switch ON again) or that the lamp has failed or the output is too
low for good performance.


