


EN - 18
6 Putting into operation
BRS-LCi PLC
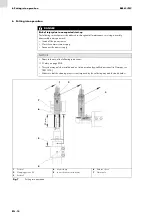
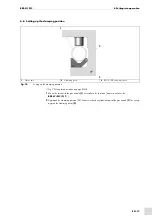
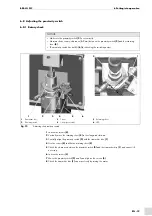
6.7 Setting up the pneumatic motor
Fig. 7 Putting into operation on page EN-14 and Fig. 11 Setting up the pneumatic motor on page EN-18
1
to loosen the pneumatic motor from the guide block
2
Pull back the pneumatic motor
in its fastener.
3
Place the required distance sleeve
.
4
Move the torch with the gas nozzle
to the clamping position (P2).
5
Keep the guide block
in the lower position (stroke down).
6
Place the pneumatic motor
with the distance sleeve
attached against the gas nozzle
7
Secure the motor in the set position using the screws
8
Move the torch out of the clamping device
and remove the distance sleeve
from the reamer
NOTICE
The cleaning station must be and remain without compressed air and tension during setup!
• The clamping prism diameter must match that of the gas nozzle.
• The distance sleeve must match the nominal diameter of the gas nozzle.
• The reamer must be precisely aligned with the torch type.
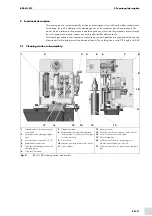
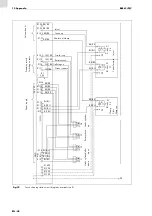
1
Clamping device
2
Gas nozzle
3
Screws
4
Guide block
5
Pneumatic motor
6
Reamer
7
Distance sleeve
Fig. 11
Setting up the pneumatic motor
1
2
3
4
5
6
7
NOTICE
• Make sure that only clean and dry compressed air is used.
The compressed air must be of quality class 4 according to ISO 8573-1 as a minimum.
Содержание BRS-LCi SPS
Страница 4: ...DE 4 1 Identifikation BRS LCi SPS ...
Страница 34: ...EN 4 1 Identification BRS LCi PLC ...
Страница 64: ...FR 4 1 Identification BRS LCi API ...
Страница 94: ...ES 4 1 Identificación BRS LCi PLC ...
Страница 123: ...BRS LCi PLC Notas ES 33 Notas ...


