background image


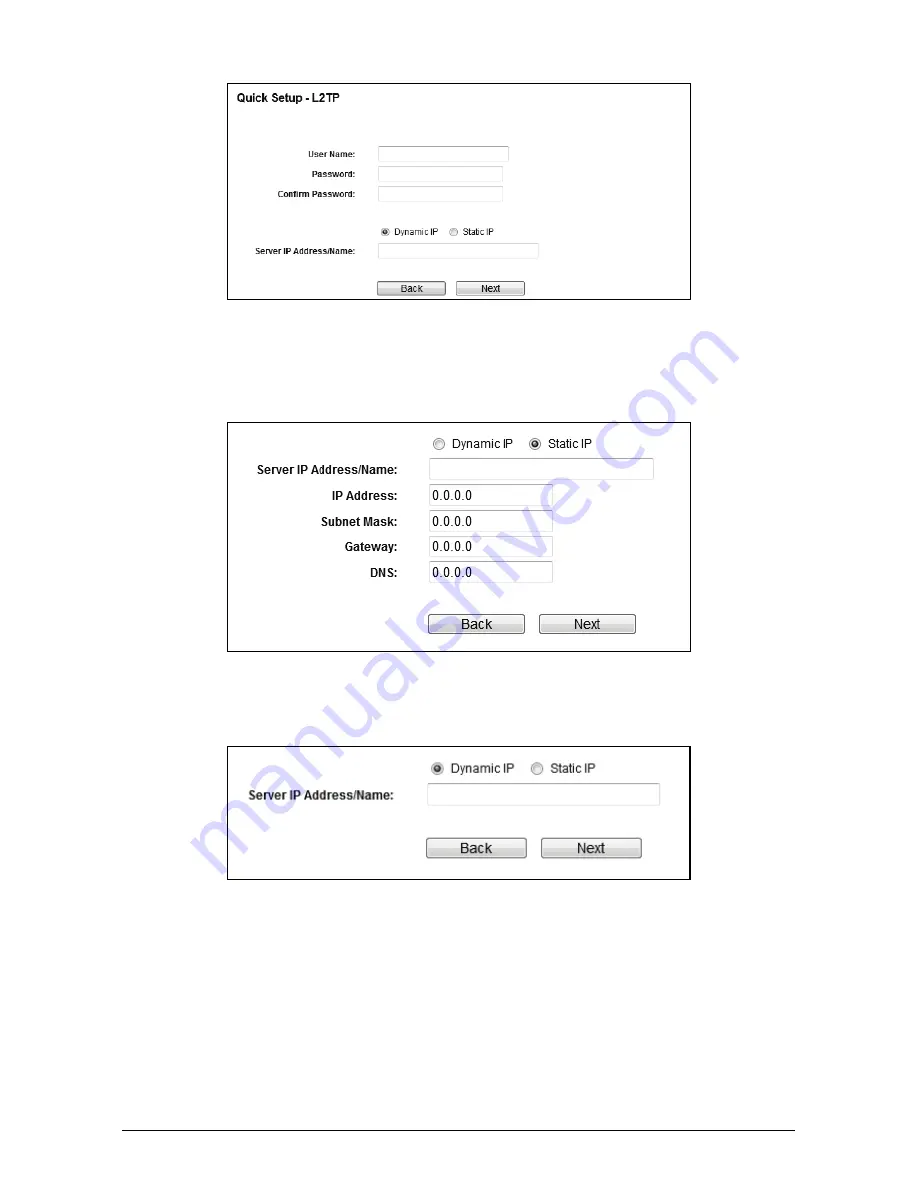
Select 

Static IP

 if the IP Address/ Subnet Mask/ Gateway and DNS server 

address have been provided by your ISP. Then please enter server IP 

address or domain name provided by your ISP, and also enter the 

corresponding parameters. 


Select 

Dynamic IP

 if none of the above parameters are provided. Then 

you just need to enter server IP address or domain name provided by your 

ISP.   


VI  If 

PPTP/Russian PPTP 

is selected, fill the blanks with the  parameters 

provided by your ISP, and then click 

Next.


Содержание WR1505N3

Страница 1: ...Quick Installation Guide WR1505N3 150Mbps Wireless N Router 7109504945 REV1 0 2 ...

Страница 2: ...nnect the power adapter to the power socket on the router and the other end into an electrical outlet The router will start to work automatically After finishing the steps above please choose the operation mode you need and carry out the corresponding steps There are three operation modes supported by this router Standard Wireless Router Repeater and WISP Client Router 1 1 Standard Wireless Router...

Страница 3: ...you repeat a Connect the PC s to the LAN Ports on the router b Power on the PC s or notebook s 1 3 WISP Client Router In WISP mode the router enables multiple users to share Internet connection from WISP On this mode the LAN port devices share the same IP from WISP through Wireless port While connecting to WISP the Wireless port works as a WAN port at WISP Client Router mode a Connect the PC s to ...

Страница 4: ...wser b After a moment a login window will appear Enter admin for the User Name and Password both in lower case letters Then click OK or press Enter Chapter 3 Connecting to the Internet a After successful login you can configure the router using the web browser Please click the Quick Setup link on the left of the main menu and the Quick Setup screen will appear Click Next to continue b The Working ...

Страница 5: ...f you select Auto Detect the Router will automatically detect the connection type your ISP provides The appropriate configuration page will be displayed when an active Internet service is successfully detected by the Router II If Dynamic IP is selected the router will automatically obtain IP parameter from your ISP In most cases there is no need to clone the MAC address You can select No I do NOT ...

Страница 6: ...s provided by your ISP and then click Next IV If PPPoE Russian PPPoE is selected the next screen will appear as shown below Enter the User Name and Password provided by your ISP and then click Next V If L2TP Russian L2TP is selected fill the blanks with the parameters provided by your ISP and then click Next ...

Страница 7: ...dress or domain name provided by your ISP and also enter the corresponding parameters Select Dynamic IP if none of the above parameters are provided Then you just need to enter server IP address or domain name provided by your ISP VI If PPTP Russian PPTP is selected fill the blanks with the parameters provided by your ISP and then click Next ...

Страница 8: ...ed by your ISP and also enter the corresponding parameters Select Dynamic IP if none of the above parameters are provided Then you just need to enter server IP address or domain name provided by your ISP b The Wireless settings screen will appear as the following You can rename your wireless network and create your own password in this page Then click Next to continue ...

Страница 9: ...n see the Finish page Click the Finish button to finish the Quick Setup 3 2 Repeater Mode When you choose Repeater Mode on Working Mode page take the following steps a Wireless Repeater page will appear as shown below ...

Страница 10: ...le the second item is selected The target network s SSID will be automatically filled into the corresponding box c Click Next button and then DHCP Server page will appear as shown below You can configure the LAN IP parameters on this page d Click the Next button You will then see the Finish page Click the Reboot button to make your wireless configuration take effect and finish the Quick Setup ...

Страница 11: ...k Next For advanced settings please refer to 3 1 Standard Wireless Router b Click the Next button You can configure the basic settings for the wireless network on this page c Click Survey button on the Wireless page and then AP List page will appear as shown below Find the SSID of the Access Point you want to access and click Connect in the corresponding row For example the second item is selected...

Страница 12: ...11 d The Finish page is shown below Click the Reboot button to make your wireless configuration take effect and finish the Quick Setup ...

Страница 13: ... explicitly clear that the company is under no obligation to do so in a specified period of time The company ASC reserves the right to retain any part s of the component s replaced at its discretion in the event of defect being noticed in the equipment during the warranty period The warranty entails the purchaser for free of cost repairs of the unit within warranty period and it does not entitle f...

Страница 14: ...13 ...

Отзывы: