background image

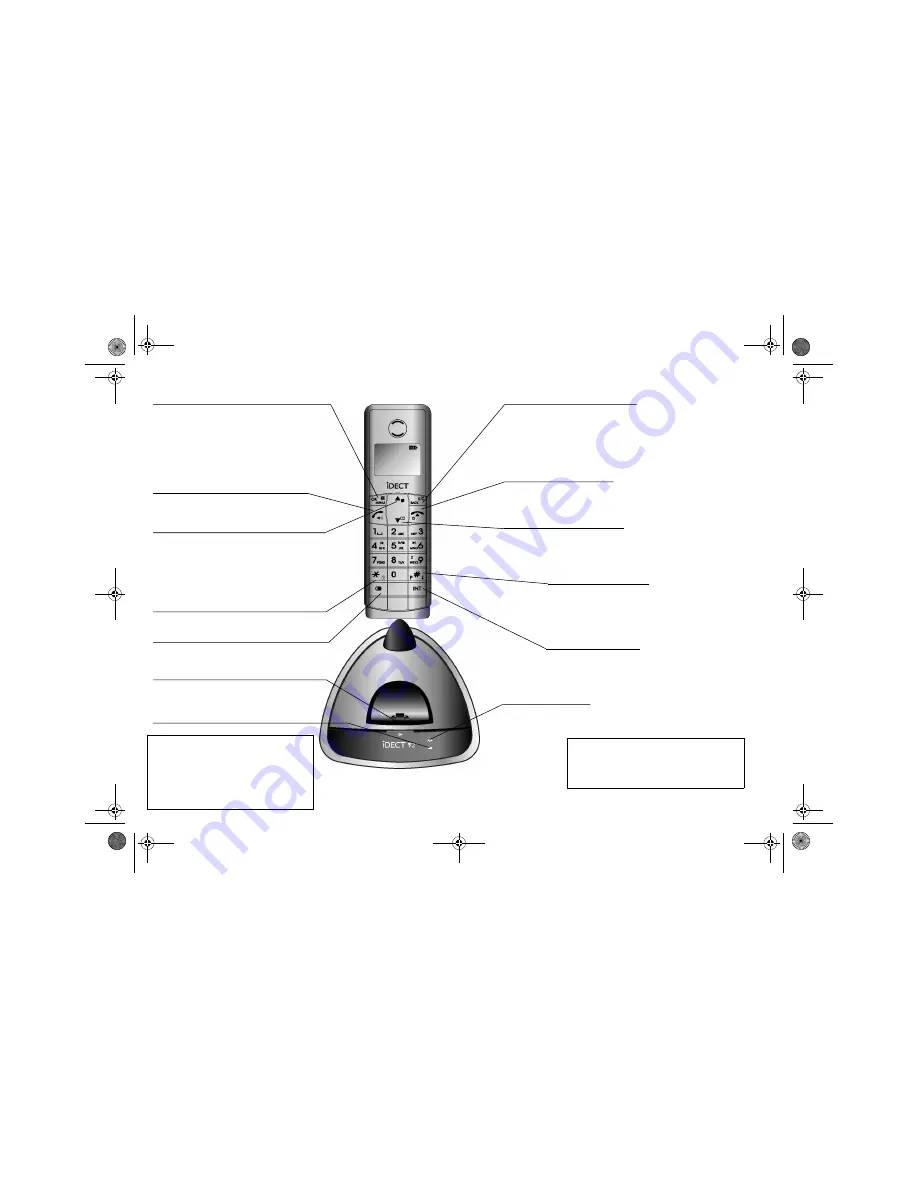
Where to find it

M

 MENU/OK/MUTE button

Press to start using Menu functions
Press while reviewing Redial or Caller Display 
records: to enter sub-menu.
When editing or using Menu functions, press to 
confirm your selection.
Press during a call to mute the mouthpiece so the 
person on the other end can’t hear you.

o

 Phone On/SPEAKERPHONE button

Press to begin or answer a call.
Press to switch the speakerphone on and off. 

u

 UP/Caller Display (CID) button

Press during a call to increase the volume in the 
earpiece or speakerphone. 
Press while using Menu functions to move up 
through the options.
Press during Standby to show the list of Caller 
Display* records.

*

 KEYPAD LOCK button

Press and hold during Standby to lock or unlock the 

keypad.

O

 Last Number Redial button

Press to open a list of the last 10 phone numbers 
you called.

V

 HANDSET LOCATOR (PAGE) button

Press to make all registered handsets ring 

(this is useful if you've forgotten where you 

put a handset).

HANDSET CHARGING light

B

 BACK/R (Recall)/C (Delete) button

Press while using Menu functions, to cancel what you’re doing and return the 
display to Standby mode.
Press to use the Recall function. You may need the Recall function during a 
call if your iDECT V2 is connected to a PBX, or if you use BT’s Select 
Services.
When editing, press to delete a digit or character entered. 

f

 HANG UP/ON–OFF button

Press to end a call.
Press and hold for more than 3 seconds to turn the handset off, and press to 
turn the handset on.

d

 DOWN/Phonebook button

Press during a call to turn down the volume in the earpiece or speakerphone. 
Press while using Menu functions to move down through the options.
Press during Standby to open the Phonebook.

#

 Ringer off/Pause button

Press and hold during Standby to turn the handset ringer on or off.
Press and hold while dialling to insert a pause (you might need this 

on a PBX).
Press while entering phonebook names to switch between upper and 

lower case.

I

 INT (Intercom) button

Press to inititate an internal call (if you have more than one handset).  
Press during a call to hold the line and page another handset or 
toggle between an external and internal call. Press and hold to start a 
conference call.

IN USE light

This comes on when you have a connection to the telephone line, 
and flashes when you have new Caller Display* records or the base 
is paging or in registration mode.

* To subscribe to network features like Caller 
Display and Call Waiting, simply call your network 
service provider (the company that supplies your 
line). You don’t need to do anything special on your 
iDECT V2 phone to set these features up.

The navigation 

buttons

In the instructions, these 
buttons are represented 
by arrows, as shown 
here.

UP

DOWN

U

u
d

D

iDect_V2_IFU_master.book  Page 1  Friday, April 4, 2008  4:05 PM

Содержание IDECT V2

Страница 1: ...ease read these instructions carefully THIS EQUIPMENT IS NOT DESIGNED FOR MAKING EMERGENCY TELEPHONE CALLS WHEN THE POWER FAILS ALTERNATIVE ARRANGEMENTS SHOULD BE MADE FOR ACCESS TO DIAL EMERGENCY SER...

Страница 2: ...rdless handset up to four depending on which iDECT V2 system you ve bought the base unit two batteries and a battery compartment cover for each handset a telephone line cable for the base unit a mains...

Страница 3: ...g press to delete a digit or character entered f HANG UP ON OFF button Press to end a call Press and hold for more than 3 seconds to turn the handset off and press to turn the handset on d DOWN Phoneb...

Страница 4: ...Silenced Appears when the ringer volume is set to zero Redialling Appears when you are in the Last Number Redial list or menu options Keypad Lock Appears when the keypad is locked Battery charge When...

Страница 5: ...redial numbers 18 Using the Phonebook 19 To store a new number 19 To call a stored number 20 To edit a Phonebook entry 20 To delete a Phonebook entry 21 To delete all Phonebook entries 21 Caller Disp...

Страница 6: ...ct exchange line DEL a line connected to a local exchange with its own phone number to an extension socket connected to a DEL or to an extension on an approved compatible PBX Do not connect the iDECT...

Страница 7: ...ines microwave ovens fluorescent lights TVs etc Radio signals between handset and base unit To use your handset and base unit together you must be able to establish a radio link between them Be aware...

Страница 8: ...d more broadband micro filters contact your broadband supplier Use only STC Electronics Limit Model number SB35 62 1 Input 230VAC 50Hz 31mA Output 9VAC 300mA 2 7W AC DC adaptor or SB35 62BS 1 Input 23...

Страница 9: ...set to OFF 4 If you have one or more charger pods Plug the mains adapter into a 230 V AC 50 Hz mains socket with the switch on the socket set to OFF 5 Switch on at the mains socket s Use the telephon...

Страница 10: ...ttery compartment cover by pressing down on the top of the cover and sliding it down B Plug the battery connector into the socket at the top of the battery compartment C Place the battery in the compa...

Страница 11: ...nit to the telephone line Switch off power at the mains socket Insert the telephone line plug into the socket as shown Switch mains power back on The battery charge level symbol blinks Use the plug to...

Страница 12: ...he sound quality gets worse as you move around while on a call this is probably caused by interference between the handset and the base unit perhaps because you are too near to another phone or other...

Страница 13: ...dset is switched off it can t be used for making calls including emergency calls When the handset is switched off it won t ring for incoming calls but the base unit will ring To answer a call when the...

Страница 14: ...Menu Personal Set 3 M Press the MENU OK button Display shows Personal Set Handset Tones 4 d Press the D button ONCE Display shows Personal Set Handset Name 5 M Press the MENU OK button The display sho...

Страница 15: ...first digit of the time flashing 4 M Key in the time and date in the format HH MM DD MM then press the MENU OK button Remember to use the 24 hour clock and to include any 0s zeroes for example 9 30 a...

Страница 16: ...Use the U or D button to adjust the volume level between Low Medium High or Silence 7 M Press the MENU OK button to select the new level Display shows Handset Tones Ring Volume 8 d M Press the D butto...

Страница 17: ...olume 7 Use the U or D button to adjust the volume level between Ring Vol Low Ring Vol Med Ring Vol High or Silence 8 M Press the MENU OK button to select the new level Display shows BaseTone BS Ring...

Страница 18: ...dialled You can dial the number after you press the PHONE button to get Dial tone first if you prefer but you can t correct any mistakes if you do it this way To answer a call When there s an incomin...

Страница 19: ...ll to mute the mouthpiece so the person on the other end can t hear you M Press the MENU OK button The display shows Mute On To un mute the mouthpiece press the MENU OK button again Last Number Redial...

Страница 20: ...Press the MENU OK button Display shows Enter Name 4 Key in a name of up to 10 letters see page 19 for how to enter letters 5 M Press the MENU OK button Display shows Enter Number and the number 6 If...

Страница 21: ...hear a long confirmation beep 6 f Press the HANG UP button to go back to standby mode To delete all redial numbers 1 O Press the REDIAL button Display shows Redial and the last number dialled 2 M Pre...

Страница 22: ...or Key in the new number 5 M Press the MENU OK button You will hear a long confirmation beep 6 M Press MENU OK again to begin another new phonebook entry You can also pre dial the number you want to s...

Страница 23: ...CE Display shows Phonebook New Entry 2 d Press the D button TWICE The display shows Phonebook Edit Entry 3 M Press the MENU OK button and use the Uor D buttons to find the entry you want to edit e g E...

Страница 24: ...e display shows Phonebook and the entry name 3 M Press the MENU OK button You will hear a confirmation beep and the display returns to the delete entry menu 4 f Press the HANG UP button to go back to...

Страница 25: ...cords X New Call is shown on the display and will only be removed from the standby screen after all new calls have been viewed Here are some examples of Caller Display records A call from someone whos...

Страница 26: ...ps 1 and 2 above to display the record 2 o Press the PHONE button to dial the number To store a Caller Display number in the Phonebook 1 Use steps 1 and 2 above to display the record 2 M d Press the M...

Страница 27: ...the next caller display record 4 f Press the HANG UP button to go back to standby mode To delete all caller display records 1 Use steps 1 and 2 top of page 23 to display the records 2 M d Press the M...

Страница 28: ...onnected to the outside line at once If you try to make a call while another handset is already on the line you ll hear Busy tone To make an intercom call 1 I Press the INT button The numbers of the a...

Страница 29: ...tercom and the numbers of all available handsets Then key in the number of the handset you want to call The outside call is put on hold and the other handset rings When the other handset user answers...

Страница 30: ...call If you press HANG UP while you re connected to the outside call you ll disconnect it To set up a three way conference 1 Make or answer an outside call 2 I Press the INT button to start intercom...

Страница 31: ...ected and you will be connected to the outside call To page all handsets from the base unit To make all registered handsets ring this is useful if you ve forgotten where you put a handset 1 V Press th...

Страница 32: ...change to a setting you can press the BACK button at any point to cancel what you re doing and go back one step When you re keying in numbers if you make a mistake press the BACK button to delete digi...

Страница 33: ...Handset Tones Press the MENU OK button ONCE and the D button TWICE Display shows Handset Tones Key Beep 3 M Press the MENU OK button Display shows Key Beep On 4 Use the U or D button to select On or...

Страница 34: ...D button to select your desired language 5 M Press the MENU OK button You will hear a confirmation beep 6 B f Use the BACK button to exit the menu or press HANG UP to go to standby mode Registration S...

Страница 35: ...Press the MENU OK button Display shows Advanced Set Recall Time 4 M Press the MENU OK button Display shows Recall Time Medium 5 Use the U or D button to select Short Medium or Long 6 M Press the MENU...

Страница 36: ...utton The display shows Main Menu Phonebook 2 d Press the D button THREE times The display shows Main Menu Advanced Set 3 M u Press the MENU OK button then the U button TWICE Display shows Advanced Se...

Страница 37: ...hows Main Menu Phonebook 2 d Press the D button THREE times The display shows Main Menu Advanced Set 3 M u Press the MENU OK button then the U button ONCE Display shows Advanced Set Reset 4 M Press th...

Страница 38: ...ollows Keypad unlocked Redial list empty Caller Display records empty Phonebook empty Earpiece volume 2 speakerphone volume 2 Handset ringer volume High melody 5 Base unit ringer volume Low melody 3 K...

Страница 39: ...blank it may be switched off Press the HANG UP f button to switch it back on Check that the base unit s mains power adapter is plugged in and power is switched on The base unit needs mains power for n...

Страница 40: ...ase unit s mains power adapter is plugged in and power is switched on The base unit needs mains power for normal operation of the phone not just for charging the batteries Make sure you re using the t...

Страница 41: ...caller may have withheld their number by dialling 141 Or they may be calling from a network that does not transmit the Caller ID for example it may be an international call When I try to make a call I...

Страница 42: ...recharge the batteries but I still get a warning that they are low You need to replace the batteries To find out how to obtain replacements call 0845 345 9677 between 9 00 am and 5 00 pm Monday to Fr...

Страница 43: ...de and the number If the fault persists Disconnect all other instruments connected to the same line as the iDECT V2 and see whether you can make a call Disconnect the base unit from the telephone line...

Страница 44: ...one Telecom Plc 1 Apsley Way London NW2 7HF Declare under our sole responsibility that the following product Type of equipment Digital cordless telephone Model Name iDECT V2 Single Twin Triple Quad Qu...

Страница 45: ...it is under Guarantee 1 Disconnect the base unit from the telephone line and the mains electricity supply 2 Pack up all parts of your iDECT V2 using the original packaging Remember to include the main...

Страница 46: ...t connected to the mains power supply is a SELV port with respect to EN41003 The port connected to the telephone line is a TNV port with respect to EN41003 PBX compatibility Timed break recall adjusta...

Страница 47: ...ced Set 3 M d Press the MENU OK button and the D button TWICE Display shows Advanced Set Registration 4 M Press the MENU OK button The display shows Enter PIN The PIN is 0000 unless you ve set a new o...

Страница 48: ...do this in order to replace a faulty handset You can de register the handset you are using If you do this you will need to register it again 1 M Press the MENU OK button The display shows Main Menu Ph...

Страница 49: ...it or your can register other GAP compatible handsets to your iDECT V2 base unit But we do not guarantee that all features or display messages will be available using other manufacturers equipment 1 F...

Страница 50: ...5 8 44 ending a call 15 guarantee 43 HANDSET LOCATOR button 28 handset name 11 handset ringer 13 handset settings 29 installation 6 intercom calls 25 interference 4 9 key beep 30 language 31 Last Numb...

Страница 51: ...conference 27 time and date 12 toggle between calls 27 troubleshooting 36 volume control handset s earpiece 16 Waste electrical products must not be disposed of with household waste This equipment sh...

Отзывы: