background image


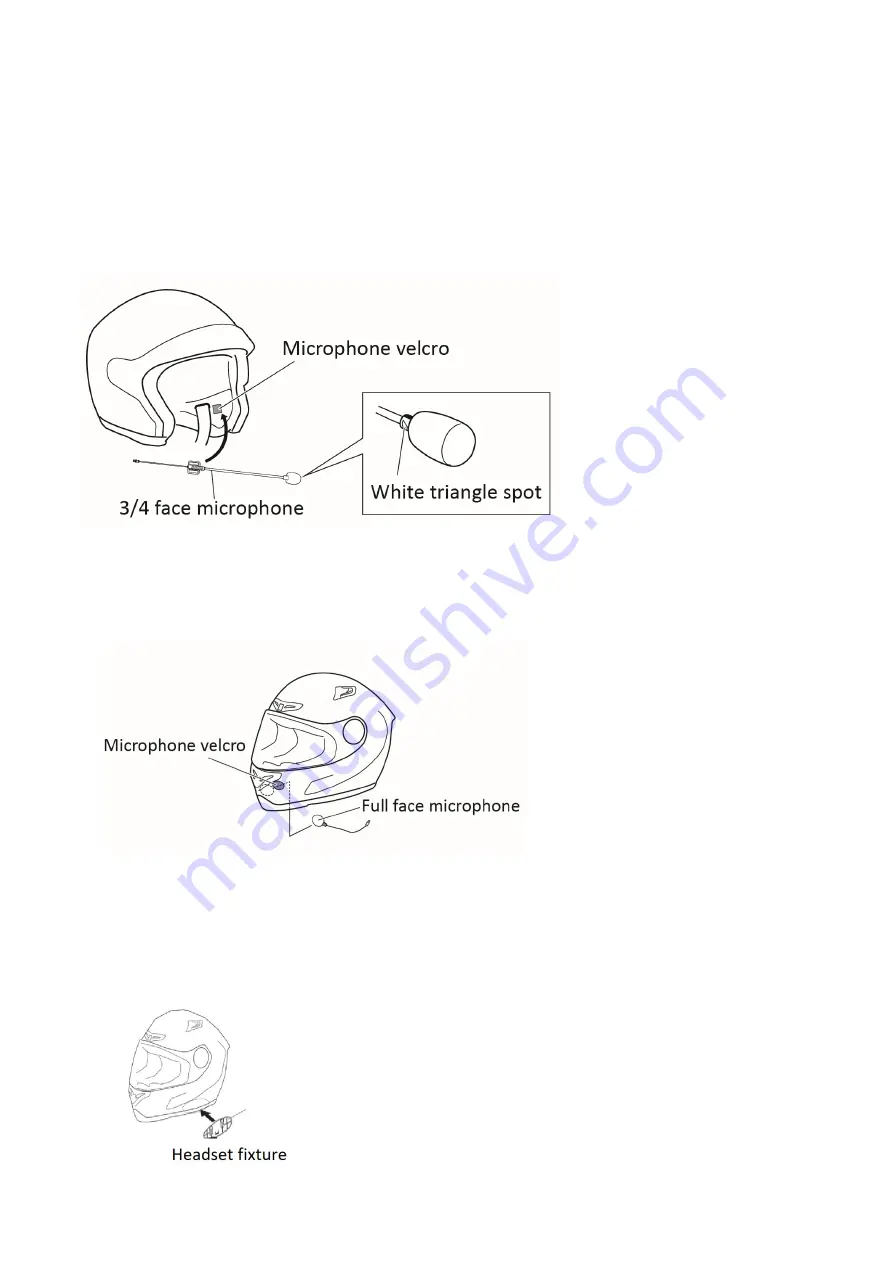
3-2 Microphone installation 
 
3-2-1 Microphone for 3/4 face helmet 

3-2-1.1 Remove the paper on the microphone pad, and attach it to the velcro pad inside the left side of 

the helmet.  

3-2-1.2


 Put back the inner lining. 

3-2-1.3


 Move the microphone white triangle spot toward the mouth position.  

3-2-1.4 Follow the arrow sign to connect the USB Type C microphone cable (yellow connector) with 

the 3/4 open face helmet microphone connector (yellow connector). 


3-2-2


Microphone for open face helmet 

3-2-2.1 Remove the paper on the velcro pad, and attach it to the inside of the helmet chin protector. 

Attach the microphone to the velcro. 

3-2-2.2


 Follow the arrow sign to connect the USB Type C microphone cable (yellow connector) 

with the full face helmet microphone connector (yellow connector). 


3-3 Headset fixture installation 

3-3-1.1 Remove the cover of the adhesive pad on the back of the headset fixture and fix it 

to the helmet. Do not remove the fixture from the helmet for 12 hours to assure 
maximum adhesion.   

Note: Clean the area with a cleaning wipe before applying the adhesive pad. 


Содержание BK-S2

Страница 1: ...1 BK S2 Bluetooth Headset Operation Manual ...

Страница 2: ...adset operation and answering mode settings 13 8 1 Headset answering dialing operation 錯誤 尚未定義書籤 8 2 Phone answering mode operation 14 9 Play music Play the music of BT devices 14 10 Dual music chatting mode Couple mode 14 11 Other BT device operation HFP device 14 12 Instant link mode 15 12 1 Two headsets paired for Instant link mode 15 12 2 Six headsets paired for Instant link mode 15 13 Headset...

Страница 3: ...3 16 Clear pairing data Reset for troubleshooting 錯誤 尚未定義書籤 17 BK S2 voice prompt list 19 ...

Страница 4: ...t under the influence of alcohol drugs nor should you be lacking sleep Note The product is to be used with a helmet Follow the user manual to install the product Keep sharp pointed items away from the product to avoid damage Keep children or pets away from the product to avoid damage Any unauthorized disassembly maintenance or modifications to the products will cause the warranty to be void Batter...

Страница 5: ...receiving antenna Increase the separation between the equipment and receiver Connect the equipment into an outlet on a circuit different from that to which the receiver is connected Consult the dealer or an experienced radio TV technician for help Any changes or modifications not expressly approved by the grantee of this device could void the user s authority to operate the equipment This device a...

Страница 6: ...ranted an Equipment Authorization for this device with all reported SAR levels evaluated as in compliance with the FCC RF exposure guidelines SAR information on this device is on file with the FCC and can be found under the Display Grant section of www fcc gov eot ea fccid after searching on FCC ID WTU 28658913 A5 To ensure that RF exposure levels remain at or below the tested levels use a belt cl...

Страница 7: ...1 Package contents Contact the dealer for any missing items ...

Страница 8: ... the right and the short one is for the speaker on the left 3 1 1 Tear off the paper cover of the speaker pad and paste it to the helmet headphone jack Locate the proper positions for the speakers before pasting 3 1 2 While there is an obvious gap between the ear and the speaker paste the velcro adjustment pad to narrow it 3 1 3 Follow the arrow sign to connect the USB Type C speaker cable red con...

Страница 9: ...low connector 3 2 2 Microphone for open face helmet 3 2 2 1 Remove the paper on the velcro pad and attach it to the inside of the helmet chin protector Attach the microphone to the velcro 3 2 2 2 Follow the arrow sign to connect the USB Type C microphone cable yellow connector with the full face helmet microphone connector yellow connector 3 3 Headset fixture installation 3 3 1 1 Remove the cover ...

Страница 10: ...nd microphone cable 3 3 2 1Connect the USB Type C speaker and microphone cable to the headset and tighten the clasp 3 3 2 2 Untie the clasp to remove the headset from the fixture Clasp 3 3 3 Fix the USB Type C speaker and microphone cable protection cover 3 3 3 1 Remove the paper on the protection cover and attach it to the helmet tightly 3 3 3 2 While not connecting to the headset always fix the ...

Страница 11: ...ndicator Panel The standard panel is black Other colors are optional purchases Reset Remove the panel to access the headset reset button 5 Power on Power off Charge Power on Press A button and V button at the same time for 2 seconds until the LED flashes blue to power on Power off Press A button and V button at the same time for 2 seconds until the LED flashes red to power off The firmware version...

Страница 12: ...notification sound is played When the audio volume reaches the highest level or the lowest level a Bee Bee notification sound is played The audio volume adjustment is independent for each audio source and the adjustment is only effective during the headset operation when using that audio source The adjustment setting will be saved even after powered off 7 Pairing with mobile phone Other BT devices...

Страница 13: ...ce activates pairing operation and searches for other BT devices If a PIN is required by the BT device enter 0000 7 2 3 After the pairing completes a voice prompt Bluetooth device is paired is played and the LED flashes blue slowly 7 2 4 To cancel the pairing operation press the M button for 2 seconds 7 2 5 If the connection between the headset and mobile phone is lost press the M button once to r...

Страница 14: ...music chatting mode In headset power off status Press the A and M buttons for 2 seconds until LED flashes blue 5 times to enter into dual music chatting mode 10 3 Headset A activates intercom with headset B 10 4 Press the M button on headset A for 2 seconds and release and a voice prompt Activate music sharing is played to indicate the operation is completed The music of mobile phones paired with ...

Страница 15: ...ets need to be set as instant link mode With the headset powered off press the A and M buttons at the same time for 2 seconds until the LED flashes blue 5 times to complete the setting Note The pairing data will be erased when the headsets switch between instant link mode and dual music sharing mode while the pairing data between the headset and other BT devices will be kept Make sure the headsets...

Страница 16: ...s the A button End intercom Press the A button for 2 seconds 13 2 When any member of a pairing group presses A button to activate the intercom the group intercom commences immediately Even if any headset of the group leaves the other group members stay on the intercom without being affected When that member rejoins the group again it will resume the intercom automatically 14 To pair and operate BK...

Страница 17: ... mobile phone Pair BK S2 with the mobile phone to establish a connection and use BK S2 Tool App to adjust the settings 15 1 BK S2 Tool Program for computer 15 1 1 Connect BK S2 to the computer via USB cable Open the BK S2 Tool and select COM Port 15 1 2 Speed dial setting Input 3 phone numbers for speedy dialing 15 1 3 A2DP music setting To adjust the volume percentage between intercom voice and m...

Страница 18: ...he BK S2 Tool App to establish a connection and to adjust the settings 16 Clear pairing data Reset for troubleshooting 16 1 Clear pairing data In power off status press the A and V buttons for 8 seconds until the LED flashes red 5 times to clear pairing data and a voice prompt Clear pairing information is played 16 2 Reset for troubleshooting If the BK S2 headset operates abnormally or enters into...

Страница 19: ...s successful Intercom already in use intercom cancelled Connection lost Auto reconnection fail Intercom is activated Intercom is ended Answering Mode Cell phone dialing Answering Mode Automatic Answering Mode Manual Answering Mode Speed Dial Number 1 Speed Dial Number 2 Speed Dial Number 3 Last Number Redialed Cell phone must support AVRCP Play Pause next track previous track Activate music sharin...

Отзывы: