background image

 27 

MODES 

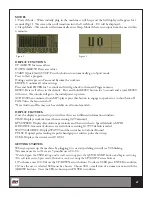
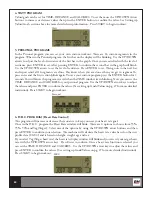
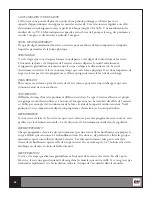
1. Power Mode – When initially plug in the machine it will beep and the full display will appear for 2 

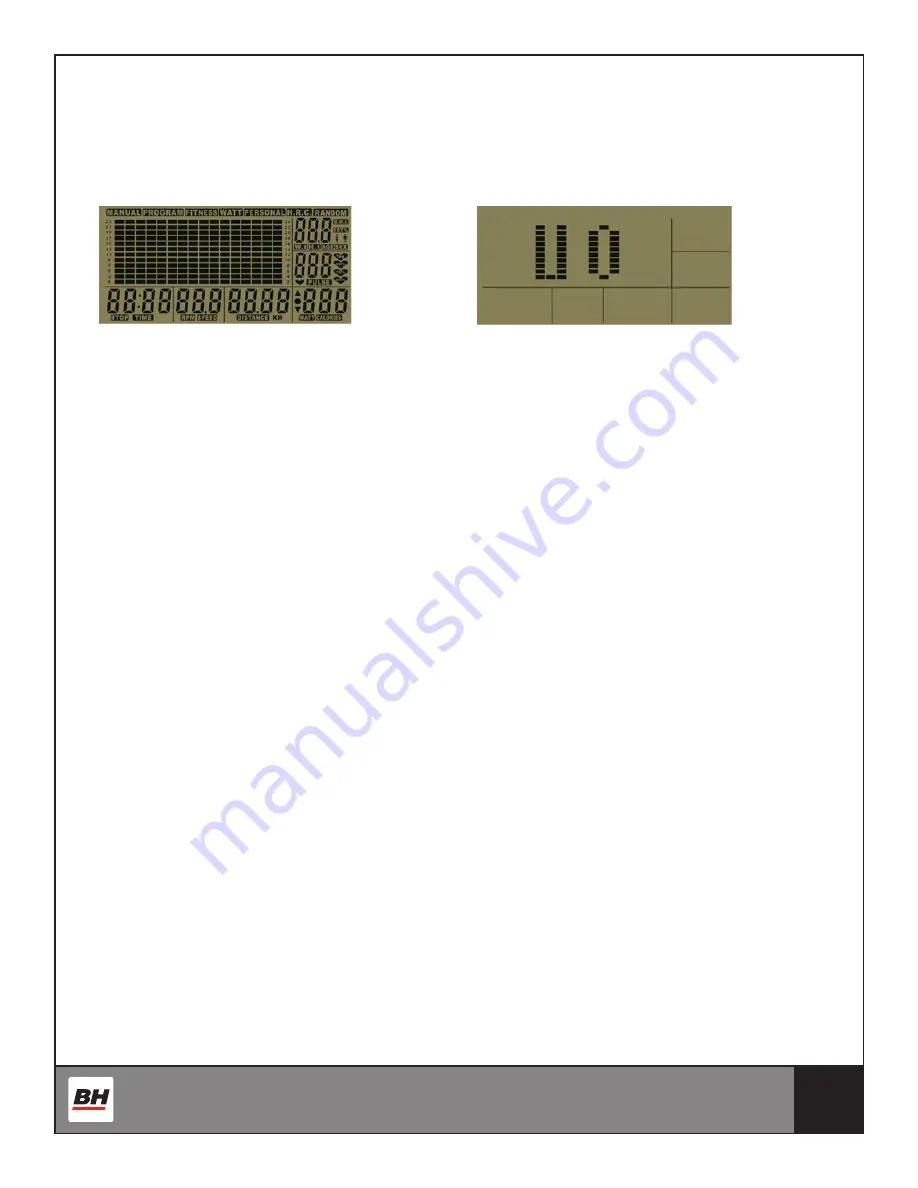
seconds (Fig-1).  The screen then will transition into the User Mode – U0 will be displayed.

2. Sleep Mode – The console will automatically enter Sleep Mode if there is no input from the user within 

4 minutes.

Figure 1

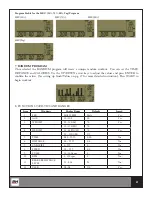
Figure 2

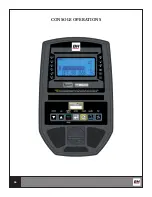
DISPLAY FUNCTIONS:

UP ARROW: Increases values

DOWN ARROW: Decreases values

START (Quick Start)/STOP: Press this button to automatically go to Sport mode. 

Press to Start a program

During exercise press to Pause and Resume the workout.   

ENTER: Confirms all value settings.  

Press and hold ENTER for 5 seconds and it will go back to the main Program menu.

RESET: Resets all values to the default.  Press and hold RESET button for 3 seconds and a total RESET 

will occur.  The console will go to the initial power up screen.

AUDIO: When connected to an MP3 player press this button to engage to speakers or to shut them off.

FAN: Turns the fan on and off

*Note Audio and Fan may not be available on all console models.

DISPLAY FEATURES:

Once the display is powered up you will see there are 6 different information windows:

TIME: Displays workout time when exercising (0-99 minutes) 

RPM/SPEED: Displays Revolutions per minute and then switches to Speed (default is MPH)

DISTANCE: Amount of distance covered while exercising (0-99.99 default is miles)

WATT/CALORIES: Displays WATTS and then switches to Calories Burned

PULSE: Displays pulse reading via pulse hand grips or wireless pulse chest strap

USER: Displays the current user (U0-U4) 

GETTING STARTED:

When you power up the machine by plugging it in or start pedaling you will see U0 blinking.  

This means user zero. There are 5 possible users U0-U4.

*Note to bypass the USER setting and to start exercising press the QUICK START button and begin exercising. 

This will take you to Sport mode. Resistance can be set using the UP/DOWN arrow buttons.

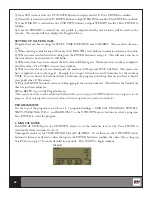
1) To choose a user (U0-U4) use the UP/DOWN arrow buttons. To select a USER press ENTER to confirm. 

2) Once the user is selected SEX must be chosen.  Choose SEX – small icon of a woman or man with the 

ARROW buttons.  Once the SEX is chosen press ENTER to confirm.

Содержание S5RiB

Страница 1: ...ITNESS TOLL FREE 866 325 2339 Important Read all instructions carefully before using this product Retain this owner s manual for future reference BH Fitness 20155 Ellipse Foothill Ranch California 92610 p 949 206 0330 f 949 206 0013 www BHFitnessusa com ...

Страница 2: ...ntroduction 03 Safety Information 04 Exercise Instruction 05 Training Guidelines 06 Suggested Stretches 10 Assembly Instructions 12 Exploded View Drawing 23 Parts List 25 Console Operations 26 Maintenance and Cleaning 34 Warranty 35 ...

Страница 3: ... If you have any questions concerns or product issues please call our Customer Service Team at 1 866 325 2339 or email us at CustomerSupport BHNorthAmerica com Carefully read through the instructions contained in this manual They provide you with important information about assembly safety fitness and use of the machine Please read ALL the safety information contained on the following page ...

Страница 4: ... recommended by BH Fitness Read manual prior to use and follow all warnings and instructions 7 Do not place sharp objects near the machine 8 Any person with physical or coordination limitations should not use the machine without the assistance of a qualified person or doctor Misuse of this machine may result in serious injury 9 Do warm up stretching exercises before using the equipment 10 Do not u...

Страница 5: ...lowly and work your way up to a comfortable pace 9 Be sure to cool down after your workout EXERCISE INSTRUCTION NOTE This equipment has been tested and found to comply with the limits for Class B digital device pursuant to part 15 of the FCC Rules These limits are designed to provide a reasonable protection against harmful interference in a residential installation This equipment generates uses an...

Страница 6: ...without stopping FLEXIBILITY The range of motion of your joints Improving flexibility involves the stretching of muscles and tendons to maintain or increase suppleness and it provides increased resistance to muscle injury or soreness CARDIO RESPIRATORY ENDURANCE The most essential component of physical fitness It is the efficient functioning of the heart and lungs AEROBIC FITNESS Is an exercise of...

Страница 7: ...reate an overload and therefore provide continued improvement SPECIFICS Different forms of exercise produce different results The type of exercise that is carried out is specific to the muscle groups being used and to the energy source involved There is little transfer of the effects of exercise i e from strength training to cardiovascular fitness That is why it is important to have an exercise pr...

Страница 8: ...unt 23 22 22 21 20 19 19 18 18 Beats per Minute 138 132 132 126 120 114 114 108 108 PULSE COUNT The pulse count on your wrist or carotid artery in the neck taken with two index fingers is done for ten seconds taken a few seconds after you stop exercising This is for two reasons a 10 seconds is long enough for accuracy b the pulse count is to approximate your BPM rate at the time you are exercising...

Страница 9: ...will not restrict your movement in any way while exercising Clothes should be light enough to allow the body to cool Excessive clothing that causes you to perspire more than you normally would gives you no advantage The extra weight you lose is body fluid and will be replaced with the next glass of water you drink Always wear a pair athletic shoes BREATHING DURING EXERCISE Do not hold your breath ...

Страница 10: ...or one count Then lift your right shoulder up for one count as you lower your left shoulder Side Stretches Open your arms to the side and continue lifting them until they are over your head Reach your left arm as far upward as you can for one count Feel the stretch up your left side Repeat this action with your right arm Quadriceps Stretch With one hand against a wall for balance reach behind you ...

Страница 11: ...nd hold for 15 counts Hamstring Stretches Sit with your right leg extended Rest the soles of your left foot against your right inner thigh Stretch toward your toes as far as possible Hold for 15 counts Relax and then repeat with left leg extended Calf Achilles Stretches Lean against a wall with your right leg in front of the left and your arms forward Keep your left leg straight and the right foot...

Страница 12: ...12 ASSEMBLY INSTRUCTIONS AND WARNING LABELS ...

Страница 13: ...13 S5RiB ...

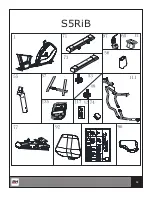
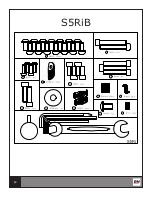
Страница 14: ...14 S5RiB ...

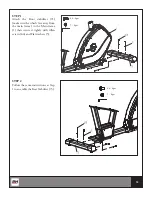
Страница 15: ...ake sure the wheels face away from the main frame to the Main frame 1 then secure it tightly with Allen screws 64 and Flat washers 5 STEP 2 Follow the same instructions as Step 1 to assemble the Rear Stabilizer 73 64 4pcs 5 4pcs 64 4pcs 5 4pcs ...

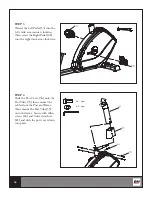
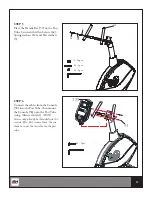
Страница 16: ...ight Pedal 48 into the right crank arm clock wise STEP 4 Slide the Post Cover 56 onto the Post Tube 55 then connect the cables from the Post and Frame Then mount the Post Tube 55 onto the frame Secure with Allen screws 64 and Curved washers 65 and slide the post cover down into place 64 6pcs 65 6pcs ...

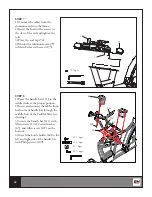
Страница 17: ...the cables from the Console 58 into the Post Tube then mount the Console 58 onto the Post Tube using Allen screws 61 NOTE Screws may already be threaded into the console If so first remove them the use them to secure the console onto the post tube 62 63 5 57 5 Φ 8 Φ16 2PCS 62 M8 45 2PCS 63 Φ 8 5 2PCS 5 16pcs 62 2pcs 63 5pcs 63 5pcs ...

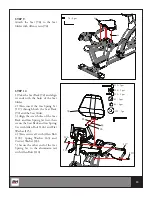
Страница 18: ... saddle slider at the proper position 2 Insert and connect the cables from both sides of handle bar through the middle hole of the Saddle Slider see drawing 3 Secure the handle bar 111 with Allen screws 110 Curved washer 65 and Allen screw 107 on the bottom 4 Attach the bottle holder 60 to the left and right side of the handle bar with Philip screws 109 77 74 75 75 Φ4 75 2pcs 60 111 110 65 109 107...

Страница 19: ...crew holes of the Seat Back and Gas Spring Set first then secure the Seat Back and Gas Spring Set with Allen Bolt 126 and Flat Washer 125 4 Then secure all with Allen Bolt 118 Spring Washer 63 and Curved Washer 65 5 Secure the other end of the Gas Spring Set to the aluminum rail with Allen Bolt 110 94 4 pcs 96 94 94 4pcs 118 110 110 1pcs 126 1pcs 118 2pcs 65 2pcs 63 2pcs 125 1pcs 92 65 63 126 125 ...

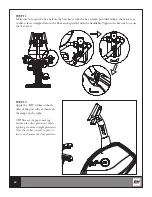
Страница 20: ...n before applying to ensure straight placement Once the sticker is in place press to secure and remove the clear protector STEP 11 Make sure to loosen the hex bolt on the Seat Lever with the hex wrench provided Adjust the Seat Lever so that it faces straight down to the floor and is parallel with the handlebar Tighten the hex nut to secure the Seat Lever ...

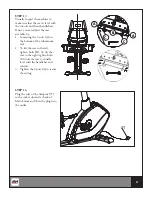
Страница 21: ...at the seat is level with the console and front handlebars If not you can adjust the seat assembly by 1 Loosening the 4 nuts A on the bottom of the Aluminum rail 2 To tilt the seat to the left tighten bolts B To tilt the seat to the right tighten bolts C until the seat is visually level with the handlebar and console 3 Tighten the 4 nuts A to secure the setting A A B C C 97 ...

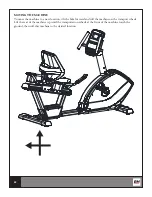
Страница 22: ...e to a new location tilt the bike forward and roll the machine on the transport wheels Lift the rear of the machine up until the transportation wheels at the front of the machine touch the ground then roll rhw machine to the desired location ...

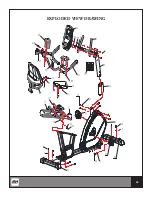
Страница 23: ...23 EXPLODED VIEW DRAWING 56 71 1 73 64 65 64 64 64 5 5 5 48 53 61 135 57 96 55 62 63 5 117 94 74 75 77 65 63 118 92 107 111 65 110 60 110 119 109 125 126 ...

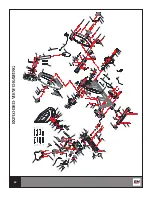
Страница 24: ...24 EXPLODED VIEW DRAWING ...

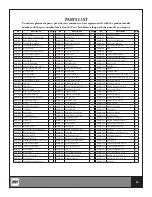
Страница 25: ... M8 40 3 S5RiB 21 Allen bolt D12 M8 44 1 S5RiB 67 Transport wheel 2 S5RiB 111 Handle bar 1 S5RiB 22 Idle wheel bushing 1 S5RiB 68 Transport axle wheel 2 S5RiB 112 Allen bolt M6 15 4 S5RiB 23 Powder bushing Φ16Φ8 6 2 S5RiB 69 Hex nut M10 4 S5RiB 113 Phillips screw M4 15 2 S5RiB 24 Motor fixing plate 1 S5RiB 70 Adjusting pad 4 S5RiB 114 Phillips screw M5 15 2 S5RiB 25 Motor 1 S5RiB 71 Front stabiliz...

Страница 26: ...26 CONSOLE OPERATIONS ...

Страница 27: ...dio and Fan may not be available on all console models DISPLAY FEATURES Once the display is powered up you will see there are 6 different information windows TIME Displays workout time when exercising 0 99 minutes RPM SPEED Displays Revolutions per minute and then switches to Speed default is MPH DISTANCE Amount of distance covered while exercising 0 99 99 default is miles WATT CALORIES Displays W...

Страница 28: ...h This means you have completed your workout goal Example if you input 100 calories and 20 minutes for the workout TIME If you achieved 100 calories before 20 minutes the program would stop because you have achieved your goal value of 100 calories 5 Press the ENTER button if you want to keep going in the current workout This will reset the Value Goal that has just been achieved 6 Press RESET to go...

Страница 29: ...TIME DISTANCE and CALORIES To set them use the UP DOWN Arrow buttons to increase or decrease values then press the ENTER button to confirm the value See setting up Goals Values on pg 27 for more detailed instruction Press START to begin workout 3 FITNESS TEST Once in the Fitness test program press START to begin the test The Fitness test is an 8 minute test that grades you on your physical perform...

Страница 30: ...e the UP DOWN arrow keys to adjust the values and press ENTER to confirm the values See setting up Goals Values on pg 27 for more detailed instruction Press START to begin workout H R C 5 PERSONAL PROGRAMS In the Personal program you can set your own custom workout There are 16 custom segments in the program When in the Personal program the first bar on the display will be blinking Use the UP DOWN...

Страница 31: ...See setting up Goals Values on pg 27 for more detailed instruction Press START to begin workout Item Windows Display Range Default Stored 1 SEX MALE FEM Male Yes 2 AGE 10 100 30 Yes 3 WEIGHT 20 330 Lb 70 Yes 10 150 KG 70 4 HEIGHT 36 84 INCH 70 Yes 90 210 CM 175 5 TIME 0 00 99 59 0 00 No 6 DISTANCE 0 0 99 99 0 0 No 7 CALORIES 0 999 0 No 8 SPEED 0 0 99 9 0 0 No 9 PULSE 30 200 bpm 0 No 10 RPM 0 250 r...

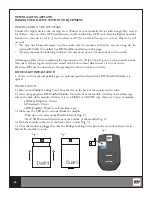
Страница 32: ...orkout data and save it to your device b Some APPs need connection to Google maps in order to function correctly BH DUALKIT INSTALLATION 1 To Access iConcept compatible apps an optional purchased separately BH DualKit Module is re quired INSTALLATION 1 Take out the Phillips Locking Screw from the slot on the back of the console and set aside 2 Select the appropriate BH DualKit Module On the front ...

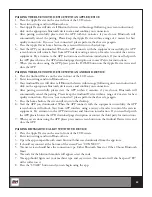
Страница 33: ...range following on screen instructions click on the appropriate bluetooth device name and confirm your connection 4 After pairing successfully please start the APP within 2 minutes if you do not Bluetooth will automatically cancel the pairing Please keep the Android Device within a range of 2 meters for best quality connection If you see not connected please perform the above steps again 5 Press t...

Страница 34: ... standards Apple is not responsible for the operation of this device or its compliance with safety and regulatory standards Please note that the use of this accessory with iPod iPhone or iPad may affect wireless performance iPad iPhone iPod iPod classic iPod nano iPod shuffle and iPod touch are trademarks of Apple Inc registered in the U S and other countries Care has been taken to assure that you...

Страница 35: ...rt or lack of regular maintenance Repairs necessary because of operator abuse or negligence or the failure to operate and maintain the equipment according to the instructions contained in the Owner s Manual WARRANTY BH Fitness BH North America Corporation 20155 Ellipse Foothill Ranch CA 92610 Phone 949 206 0330 Toll Free 866 325 2339 Fax 949 206 0013 Web www BHfitnessusa com Mon Fri 8am 5pm PST FO...

Страница 36: ... FRAIS 866 325 2339 Important Lisez attentivement toutes les instructions avant d utiliser ce produit Conservez le présent Guide d utilisation aux fins de consultation ultérieure BH Fitness 20155 Ellipse Foothill Ranch Californie 92610 tél 949 206 0330 téléc 949 206 0013 www BHFitnessUSA com ...

Страница 37: ...ifs à la sécurité 39 Instructions relatives à l exercice 40 Lignes directrices sur l entraînement 41 Étirements suggérés 45 Instructions d assemblage 47 Croquis en vue éclatée 58 Liste des pièces 60 Fonctionnement de la console 61 Maintenance et entretien 71 Garantie 72 ...

Страница 38: ...t au monde Si vous avez des questions ou en cas de problème relatif à l appareil communiquez avec notre Service à la clientèle au 1 866 325 2339 ou à CustomerSupport BHNorthAmerica com Lisezattentivementlesinstructionsfourniesdansceguide Vousytrouverezdesrenseignements importants sur l assemblage la sécurité la forme physique et l utilisation de l appareil Lisez bien TOUTES les consignes de sécuri...

Страница 39: ...Lisez ce guide avant la première utilisation et respectez toutes les mises en garde et consignes 7 Ne placez pas d objets tranchants près de l appareil 8 Quiconque présente des limitations sur le plan physique ou de la coordination ne doit pas utiliser l appareil sans l assistance d une personne compétente ou d un médecin Un mauvais usage de l appareil peut causer des blessures graves 9 Faites des...

Страница 40: ...augmentez la cadence jusqu à ce que vous atteigniez un rythme où vous vous sentez à l aise 9 Prenez soin de terminer votre séance d entraînement avec des exercices de récupération INSTRUCTIONS RELATIVES À L EXERCICE Remarque Cet appareil a été teste et a été trouver conformant aux limites de la Class B appareil numérique conformément a la partie 15 des règlements de FCC Ces limites sont conçues po...

Страница 41: ...ement de vos articulations Pour améliorer sa flexibilité il faut étirer ses muscles et ses tendons afin de maintenir ou d augmenter sa souplesse laquelle accroît la résistance aux lésions ou douleurs musculaires ENDURANCE CARDIO RESPIRATOIRE L élément le plus important de la forme physique Il s agit du fonctionnement efficace du cœur et des poumons CONDITIONNEMENT PHYSIQUE AÉROBIQUE C est un exerc...

Страница 42: ...insi de vous améliorer SPÉCIFICITÉS Différentes formes d exercice produisent différents résultats Le type d exercice effectué est propre aux groupes musculaires utilisés et à la source d énergie en cause Le transfert des effets de l exercice est faible par exemple de l entraînement de la force à celui de la capacité cardio vasculaire Voilà pourquoi il est si important d adapter son programme d exe...

Страница 43: ...ité L exercice peut toutefois permettre de compenser en partie cette perte naturelle Le tableau qui suit servira de guide à ceux qui entament leur programme d entraînement Âge pour la fréquence cardiaque cible 25 30 35 40 45 50 55 60 65 Compte de 10 secondes 23 22 22 21 20 19 19 18 18 Battements par minute 138 132 132 126 120 114 114 108 108 POULS Le pouls ou nombre de pulsations se calcule au poi...

Страница 44: ... importants votre programme est peut être trop avancé ou vous avez progressé trop rapidement Si vous ressentez de la DOULEUR durant ou après l exercice c est que votre corps vous parle Cessez de faire de l exercice et consultez votre médecin VÊTEMENTS RECOMMANDÉS Portez des vêtements qui ne gêneront aucunement vos mouvements durant l entraînement Ils devraient être assez légers pour laisser le cor...

Страница 45: ...oreille sur un temps Soulevez ensuite l épaule droite sur un temps en abaissant l épaule gauche Étirements latéraux Ouvrez les bras sur le côté puis soulevez les au dessus de la tête Poussez le bras gauche aussi haut que possible sur un temps Sentez l étirement du côté gauche Répétez avec le bras droit Étirement des quadriceps En vous appuyant sur le mur d une main pour garder l équilibre attrapez...

Страница 46: ... 15 temps Étirements des ischiojambiers En position assise étendez la jambe droite Appuyez la plante du pied gauche contre l intérieur de la cuisse droite Étirez vous vers les orteils aussi loin que possible Comptez 15 temps Relâchez puis répétez avec la jambe gauche en extension Étirements des mollets et des tendons d Achille Appuyez vous contre un mur la jambe droite devant la gauche et les bras...

Страница 47: ...47 INSTRUCTIONS D ASSEMBLAGE ÉTIQUETTE D AVERTISSEMENT ...

Страница 48: ...48 S5RiB ...

Страница 49: ...49 S5RiB ...

Страница 50: ...u châssis principal 1 à l aide de vis 64 et de rondelles plates 5 en vous assurant que les roues font dos au châssis principal ÉTAPE 2 Suivez la même procédure que l étape 1 pour assembler le stabilisateur arrière 73 64 4pcs 5 4pcs 64 4pcs 5 4pcs ...

Страница 51: ...re et la pédale droite en direction horaire ÉTAPE 4 Enfilez le protecteur de tige 56 à la tige avant 55 et connectez les câbles reliant la tige au châssis En suite installez la tige avant 55 sur le châssis Fixe là à l aide des clous 64 et des rondelles courbées 65 et tirez le protecteur de tige vers le bas à l endroit désigné 48 53 64 6pcs 65 6pcs ...

Страница 52: ... 6 Installez la console 58 à la tige avant à l aide des câbles fournis et des vis 61 NOTE Les vis peuvent déjà se retrouver sur la console Dans ce cas retirez les Installez la console sur le tige avant et utilisez les pour fixer le tout 62 63 5 57 5 Φ 8 Φ16 2PCS 62 M8 45 2PCS 63 Φ 8 5 2PCS 5 16pcs 62 2pcs 63 5pcs 63 5pcs ...

Страница 53: ...ère de siège 2 Insérez et branchez les câbles connectant les deux côtés du guidon à travers le trou au centre du de la glissière de siège voir illustration 3 Fixez le guidon 111 à l aide des vis Allen 110 de la rondelle courbée et des vis Allen 107 situées en dessous 4 Fixez le porte bouteille 60 sur le côté gauche et droit du guidon à l aide de vis 109 77 74 75 75 Φ4 75 2pcs 60 111 110 65 109 107...

Страница 54: ... et du ressort à gaz Fixez le siège et le ressort à gaz avec à l aide du boulon 126 et de la rondelle plate 125 4 Ensuite fixez le tout à l aide de boulons 118 de rondelles à ressort 63 et de rondelles courbées 65 5 Fixez l autre bout du ressort à gaz au rail de glissade en aluminium à l aide de boulons 110 94 4 pcs 96 94 94 4pcs 118 110 110 1pcs 126 1pcs 118 2pcs 65 2pcs 63 2pcs 125 1pcs 92 65 63...

Страница 55: ...in d assurer une meilleure application Une fois que l autocollant est bien en place appuyez dessus pour augmenter son adhérence et retirez la pellicule transparente ÉTAPE 11 Assurez vous de desserrer légèrement le boulon à six pans du levier du siège à l aide de la clé Ajustez levier du siège afin que celui ci soit orienté vers le plancher tout en étant parallèle avec le guidon Serrez l écrou à si...

Страница 56: ...idon du devant Sinon ajustez le siège de la manière suivantede la manière suivante 1 Desserrez les quatre écrous A au bas du rail de glissade en aluminium 2 Pour inclinez le siège vers la gauche serrez les boulons B Pour inclinez le siège vers la gauche serrez les boulons C jusqu à ce que le siège soit visuellement au bon niveau par rapport au guidon et à la console 3 Serrer les 4 écrous A pour sé...

Страница 57: ...57 DÉPLACEMENT DU TAPIS ROULANT Pour déplacer la machine inclinez le vélo vers l avant et le déplacer à l aide des roues de transport ...

Страница 58: ...58 VUE ÉCLATÉE 56 71 1 73 64 65 64 64 64 5 5 5 48 53 61 135 57 96 55 62 63 5 117 94 74 75 77 65 63 118 92 107 111 65 110 60 110 119 109 125 126 ...

Страница 59: ...59 VUE ÉCLATÉE ...

Страница 60: ...u 1 S5RiB 111 Guidon 1 S5RiB 21 Boulon D12 M8 44 1 S5RiB 67 Roue de transport 2 S5RiB 112 Boulon M6 15 4 S5RiB 22 Bague de roue d arrêt 1 S5RiB 68 Fuseau de rouéede transport 2 S5RiB 113 Vis M4 15 2 S5RiB 23 Bague Φ16Φ8 6 2 S5RiB 69 Écrou à six pans M10 4 S5RiB 114 Vis M5 15 2 S5RiB 24 Plaque de fixation de moteur 1 S5RiB 70 Embout réglable 4 S5RiB 115 Écrou en nylon M5 2 S5RiB 25 Moteur 1 S5RiB 7...

Страница 61: ...61 FONCTIONNEMENT DE LA CONSOLE ...

Страница 62: ...e permet d allumer ou d éteindre les haut parleurs TOUCHE FAN Celle ci permet d activer ou de désactiver le système d aération À noter Ce ne sont pas tous les modèles de console qui possèdent les fonctions AUDIO et FAN FONCTIONNALITÉS D AFFICHAGE Quand l écran est démarré vous verrez 6 différentes fenêtres d information TIME TEMPS Affiche le temps d entraînement durant un exercice 0 99 minutes RPM...

Страница 63: ...r vous convient appuyez sur ENTER pour confirmer votre choix Vos serez alors dirigé vers la prochaine valeur à entrer et qui clignotera 3 Quand toutes les valeurs auront été confirmées la première valeur clignotera encore une fois Cela signifierait que vous avez complété leur entrée Appuyez sur START pour commencer votre entraînement 4 Si l une des valeurs objectifs est atteint la machine émettra ...

Страница 64: ...comme programmes préprogrammés P1 P12 Appuyez sur les touches UP DOWN pour basculer d un programme à un autre Ensuite appuyez sur ENTER pour sélectionner le programme désiré Une graphe du programme s affichera à l écran pour chacun des programmes Voir la section des profils de programmes pour des images de ceux ci Pour configurer le niveau de résistance 1 24 appuyez sur les touches UP DOWN Ensuite...

Страница 65: ...nnalisés dans ce programme Dans ce programme personnalisé il est normal que la première barre clignote Ensuite appuyez sur les touches UP DOWN pour configure le niveau de résistance de la première barre du graphe Quand votre choix pour le niveau de résistance est fait appuyez sur la touche ENTER pour le confirmer Après avoir appuyé sur ENTER pour confirmer la seconde barre du graphe clignotera À l...

Страница 66: ...nsuite appuyez sur ENTER pour le confirmer Quand la valeur du rythme cardiaque est configurée vous pourriez configurer les valeurs TIME TEMPS DISTANCE et CALORIES Pour régler les valeurs appuyez sur les touches UP DOWN et appuyez sur ENTER pour les confirmer Voir Configurer objectifs valeurs à la page 61 pour davantage de consignes Enfin appuyez sur START pour commencer l entraînement H R C Rythme...

Страница 67: ...UTEUR 36 84 inch 70 90 210 cm 175 5 TIME TEMPS 0 00 99 59 0 00 X 6 DISTANCE 0 0 99 99 0 0 X 7 CALORIES 0 999 0 X 8 SPEED VITESSE 0 0 99 9 0 0 X 9 PULSE PULSATION 30 200 bpm 0 X 10 RPM ROTATION PAR MINUTE 0 250 rpm 0 X 11 BRAKE RESISTANCE LEVEL NIVEAU DE RÉSISTANCE DES FREINS L1 L24 L1 X 12 USER UTILISATEUR U0 U4 U0 8 STATISTIQUE ET VARIATION DES FONCTIONNALITÉS ...

Страница 68: ... pour le fixer TÉLÉCHARGEMENT D APPLICATIONS ET ASSOCIATION DE VOTRE APPAREIL ET DE L ÉQUIPEMENT TÉLÉCHARGEMENT DU LOGICIEL Connectez vous à l App Store iTunes à partir d un appareil Apple ou à Google Play à partir d un appareil Android cherchez Pafers lisez les notes des applications et téléchargez l application destinée à l équipement d exercice par exemple Pedal Monitor ou toute autre applicati...

Страница 69: ...utiliser l application appuyez deux fois sur le bouton principal de l appareil Apple pour la fermer ASSOCIATION DE L ÉQUIPEMENT BH DUALKIT CLASSIQUE À UN APPAREIL ANDROID 1 Placez l appareil Android devant l écran à cristaux liquides 2 Accédez aux paramètres et activez la fonction Bluetooth 3 Votre appareil Android détecte tous les appareils Bluetooth à proximité suivez les instructions à l écran ...

Страница 70: ...ération iPod touch 3e génération iPhone 5 iPhone 4S iPhone 4 Mini iPad iPad iPad 2 Les produits BH Fitness i Concept Bluetooth sont compatibles avec les appareils Apple iOS 5 1 ou version ultérieure Pour une expérience utilisateur optimale il est recommandé d installer la version d iOS la plus récente iPad iPhone iPod iPod classic iPod nano iPod shuffle et iPod touch sont des marques de commerce d...

Страница 71: ...ez toutefois nettoyer la surface extérieure Utilisez pour ce faire un linge doux humecté avec de l eau tiède N utilisez pas de flacons en aérosol ou à pompe car ils risqueraient de déposer des sédiments sur la console L utilisation de produits chimiques durs en détruirait la couche protectrice et causerait une accumulation de statique qui risquerait d endommager certains des composants MAINTENANCE...

Страница 72: ...parations devenues nécessaires par suite d un usage abusif de négligence ou d un fonctionnement ou d un entretien non conformes aux instructions formulées dans le Guide d utilisation BH Fitness BH North America Corporation 20155 Ellipse Foothill Ranch CA 92610 États Unis Téléphone 949 206 0330 sans frais 866 325 2339 télécopieur 949 206 0013 Courriel fitness bhnorthamerica com Web www BHFitnessUSA...

Отзывы: