background image


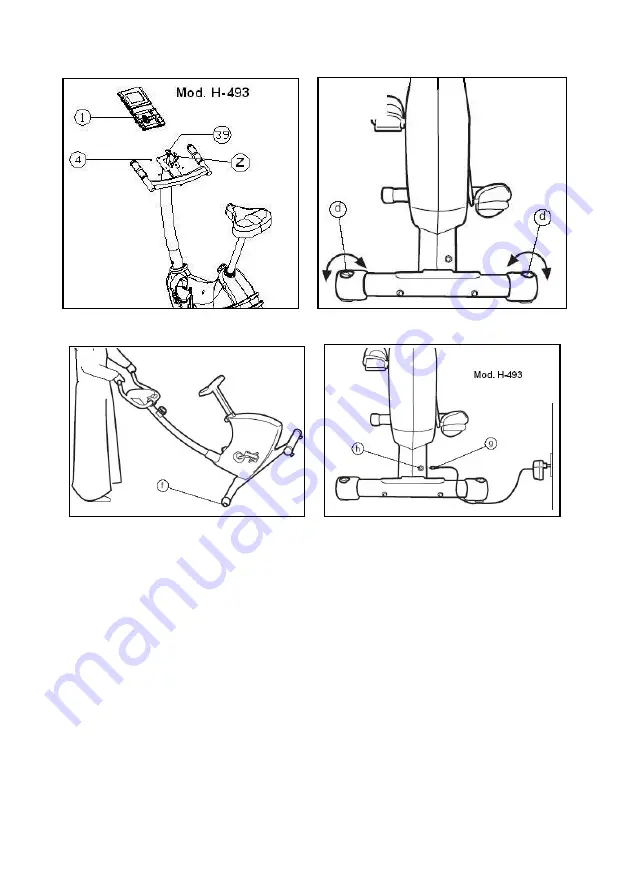
Fig.12                                  Fig.13 


Fig.14                                  Fig.15


Содержание H-491

Страница 1: ...ones de montaje y utilización Instructions for assembly and use Instructions de montage et utilisation Montage und gebrauchsanleitung Instruções de montagem e utilização Istruzioni di montaggio e uso Montage en gebruiksinstrukties ...

Страница 2: ...Fig 1 Fig 2 Fig 2A Fig 3 Fig 4 Fig 4A ...

Страница 3: ...Fig 4B Fig 5 Fig 6 Fig 7 ...

Страница 4: ...Fig 8 Fig 9 Fig 10 Fig 11 ...

Страница 5: ...Fig 12 Fig 13 Fig 14 Fig 15 ...

Страница 6: ...Coja la barra estabilizadora 15 con tacos regulables Y y posiciónela en el caballete trasero de la máquina como muestra la Fig 2 e introduzca los tornillos 10 coloque las arandelas planas 14 y las tuercas 13 apriete fuertemente Coja la barra estabilizadora con ruedas 11 y teniendo en cuenta de posicionar los dos puntos rojos X alineados como muestra la Fig 2A introduzca los tornillos 10 coloque la...

Страница 7: ...mente 6 REGULACIÓN DE LA ALTURA DEL SILLÍN Aflojando un poco el mando regulador de altura sillín 32 Fig 9 en sentido contrario a las agujas del reloj y tirando del mismo hacia atrás introduzca la tija del sillín 16 por el orificio v del cuerpo central A cuando esté a la altura adecuada suelte el mando regulador y se introducirá sobre los agujeros de la tija Apriete el mando en sentido de las aguja...

Страница 8: ...a disminuir la resistencia del pedaleo gire el mando de tensión W en sentido contrario a las agujas del reloj 10 NIVELACION Una vez colocada la unidad en su lugar definitivo para la realización del ejercicio compruebe que el asentamiento en el suelo y su nivelación sean correctos Esto se conseguirá roscando mas o menos los pies regulables d como muestra la Fig 13 11 MOVIMIENTO Y ALMACENADO La unid...

Страница 9: ...insert bolts 10 fit the flat washers 14 and the nuts 13 tighten securely Take the stabiliser bar with wheels 11 and position it so that the two red dots X line up as shown in Fig 2A insert bolts 10 fit the flat washers 14 and the nuts 13 tighten securely 3 Mod H491 Take the screws 8 out of the main body A bring the main post 6 up to the boss on the main body Fig 3 and connect terminals p and p1 In...

Страница 10: ...nd grip cables Z through the inside of the holder in the direction indicated by the arrow as shown in Fig 10 and pulling them out through the upper hole of the post Next take screw 42 and flat washer 40 loosened previously and screw them onto the bottom of the handlebar 2 8 FITTING THE ELECTRONIC MONITOR MOD H 491 Undo screws 4 located at the back of the monitor then slide the monitor onto the pla...

Страница 11: ... make it easier to move The wheels located at the front of your unit make it easier to move it into a chosen position by lifting the rear of the unit up slightly and pushing it as shown in Fig 14 Store your unit in a dry place preferably not subject to changes in temperature 12 MAINS CONNECTION Mod H 493 Insert the jack g on the transformer c into the connection hole h on the main body A bottom re...

Страница 12: ...ets réglables Y et placez la sur le socle arrière de la machine comme indiqué sur la Fig 2 ensuite introduire les vis 10 placez les rondelles plates 14 et les écrous 13 et vissez très fort Prendre la barre de stabilisation 11 qui porte les roulettes et en veillant à ce que les deux points rouges X soient bien alignés comme indiqué sur la Fig 2A introduire les vis 10 placez les rondelles plates 14 ...

Страница 13: ...corps central A Quand la selle sera à la hauteur requise lâchez le bouton de réglage et elle entrera dans les trous du tube Tournez le bouton dans le sens des aiguilles d une montre 7 MONTAGE DU GUIDON Placer le guidon 2 à côté des trous inférieurs du tube rameur 6 en faisant passer les câbles Z du hand grip à l intérieur du support dans le sens de la flèche comme indiqué dans la Fig 10 et en les ...

Страница 14: ...lé la machine à l emplacement qui lui a été réservé pour la réalisation de l exercice vérifiez si l assise au sol et le nivellement sont bons Pour obtenir un bon nivellement tournez les pieds réglables d comme indiqué sur la Fig 13 11 DÉPLACEMENT RANGEMENT Afin de pouvoir la déplacer facilement la machine porte des roulettes f Les roulettes placées en partie avant de la machine permettent de la dé...

Страница 15: ...od H 493 2 Nehmen Sie die Stabiliserungs stange 15 mit Einstellelementen Y und positionieren Sie diese auf dem hinteren Ständer des Geräts Fig 2 Setzen Sie die Schrauben 10 und die flachen Unterlegscheiben 14 sowie die Muttern 13 auf und ziehen Sie sie gut fest Nehmen Sie die Stabiliserungsstange mit Rädern 11 und positionieren Sie sie so dass die beiden roten Punkte X übereinstimmen Fig 2A Setzen...

Страница 16: ...hren Sie das Ende der Fußriemen 1 durch den Schlitz des Pedals 2 passen ihn an ihren Schuh an und befestigen ihn dann an dem Pedalvorsprung 3 Fig 7 5 MONTAGE DES SATTEL Lösen Sie die drei Muttern und Unterlegscheiben des Sattels 19 Fig 8 setzen Sie den Sattel auf das obere Dr eieck der Sattelstange 16 Setzen Sie Unterlegscheiben und Muttern auf und ziehen Sie fest an 6 EINSTELLEN DER SATTELHÖHE Lo...

Страница 17: ...tellungen ermöglicht Fig 11 Um den Pedalwiderstand zu erhöhen drehen Sie den Widerstandsregler W im Uhrzeigersinn bis der gewünschte Widerstand für die Übung erreicht ist Um den Pedalwiderstand zu verringern drehen Sie den Widerstandsregler W gegen den Uhrzeigersinn 10 NIVELLIERUNG Sobald das Gerät an seinem definitiven Aufstellort steht an dem das Training ausgeführt werden soll überprüfen Sie ob...

Страница 18: ...ra estabilizadora 15 com cunhas reguláveis Y e coloque os no cavalete traseiro da máquina como mostra a Fig 2 Introduza os parafusos 10 coloque os anéis planos 14 e as porcas 13 aperte com força Pegue na barra estabilizadora com rodas 11 e tendo o cuidado de colocar os dois pontos vermelhos X alinhados como mostra a Fig 2A introduza os parafusos 10 Coloque os anéis planos 14 es as porcas 13 e aper...

Страница 19: ...ra atrás introduza a tige do selim 16 pelo orificio v do corpo central A Quando estiver à altura adequada solte o comando regulador e este entrará nos buracos da tige Depois deverá apertá lo rodando o comando no sentido dos ponteiros do relógio 7 COLOCAÇÃO DO GUIADOR Coloque o guiador 2 junto aos orifícios inferiores do tubo do remo 6 passando os cabos Z do hand grip pelo interior do suporte na di...

Страница 20: ...elógio 10 NIVELAMENTO Depois de ter colocado a unidade no seu lugar definitivo para a realização do exercício comprove se a colocação no chão e o seu nivelamento são os correctos Poderá conseguí lo enroscando mais ou menos os pés reguláveis d como mostra a Fig 13 11 DESLOCAÇÃO E ARMAZENAMENTO A unidade vem equipada com rodas f o que torna mais fácil a sua deslocação As rodas que existem na parte d...

Страница 21: ... 2 Prenda la barra di stabilizzazione 15 con blocchetti regolabili Y per metterla nel supporto posteriore della macchina come mostra la Fig 2 ed introduca le viti 10 collochi le rondelle piane 14 ed i dadi 13 e stringa con forza Prenda la barra di stabilizzazione con ruote 11 faccendo attenzione a mettere i due punti rossi X allineati come mostra la Fig 2A introduca le viti 10 collochi le rondelle...

Страница 22: ...rovi all altezza corretta lasci il comando di regolazione e questo si introducirà sui fori dell albero Stringa con il comando girando in senso orario 7 COLLOCAZIONE DEL MANUBRIO Collocare il manubrio 2 vicino ai fori inferiori del tubo remo 6 facendo passare i cavi Z dell hand grip dalla parte interna del supporto secondo il verso della freccia come indica la fig 10 e facendoli fuoriuscire dal for...

Страница 23: ...ivo per la realizzazione dell allenamento verifichi che il suo assestamento sul suolo e la sua livellazione siano corretti Questo si ottiene girando più o meno i blocchetti di appoggio d come mostra la Fig 13 11 SPOSTAMENTO ED IMMAGAZZINAGGIO La macchina è munita di ruote f le quali rendono più facile il suo spostamento Le due ruote che si trovano nella parte anteriore della macchina servono per r...

Страница 24: ...tel zoals op Fig 2 is te zien breng de schroeven 10 in plaats de vlakke tussenringen 14 en de moeren 13 en draai alles vast aan Neem de stabiliseerbuis met wielen 11 en plaats de twee rode punten X op één lijn zoals op Fig 2A is te zien breng de schroeven 10 in plaats de vlakke tussenringen 14 en de moeren 13 en draai alles vast aan 3 Mod H491 Haal de schroeven 8 uit het centraal gedeelte A breng ...

Страница 25: ...m naar achteren breng de zadelbuis 16 in de opening v van het centrale deel A aan en wanneer die op de geschikte hoogte is gekomen laat u de hoogteregelaar los en die schuift dan in het gaatje van de buis Draai de regelaar met de klok mee vast 7 PLAATSEN VAN HET STUUR Plaats het stuur 2 op één lijn met de onderste gaten op de hoofdsteun 6 de handgreepkabels Z door de binnenzijde van de houder hale...

Страница 26: ...estel op zijn definitieve plaats staat waar u de oefeningen zult doen controleer dan of het stevig op de grond en op gelijke hoogte staat Dit kunt u verkrijgen door de steunpluggen d meer of minder aan te draaien zoals op Fig 13 wordt getoond 11 VERPLAATSEN EN BEWAREN Dit toestel is met wieltjes f uitgerust zodat het gemakkelijker is te verplaatsen De wieltjes bevinden zich vooraan als u het toest...

Страница 27: ...27 H 491 ...

Страница 28: ...té Bestellung von Ersatzteilen Bitte angeben Maschinenmodell Nr des entsprechenden Ersatzteils Menge Para encomenda de peça de recambio Indicar o modelo da máquina Nº correspondente à peça Quantidade Per ordinare pezzi di ricambio Indicare il modello della macchina Nº che corrisponde al pezzo Quantità Bestellen van vervangingsonderdelen Geef het model van het toestel op Nummer van het onderdeel Ho...

Страница 29: ...29 H 493 ...

Страница 30: ...té Bestellung von Ersatzteilen Bitte angeben Maschinenmodell Nr des entsprechenden Ersatzteils Menge Para encomenda de peça de recambio Indicar o modelo da máquina Nº correspondente à peça Quantidade Per ordinare pezzi di ricambio Indicare il modello della macchina Nº che corrisponde al pezzo Quantità Bestellen van vervangingsonderdelen Geef het model van het toestel op Nummer van het onderdeel Ho...

Страница 31: ... 491L auf die sich diese Erklärung bezieht mit den nachstehenden Normen übereinstimmt EN 957 1 EN 957 5 EN 61000 6 1 und 61000 6 3 Nach den Bestimmungen der folgenden Richtlinie Elektromagnetische Verträglichkeit 2004 108 EG Declaração de Conformidade Nós Exercycle S L declaramos sob nossa única responsabilidade que os produtos H 491 e H 491L aos quais se refere esta declaração estão em conformida...

Страница 32: ...957 1 EN 957 5 EN 61000 6 1 EN 61000 3 2 EN 61000 3 3 und EN 61000 6 3 EN 61558 2 6 und EN 61558 1 Nach den Bestimmungen der folgenden Richtlinien Elektromagnetische Verträglichkeit 2004 108 EG Elektrische Betriebsmittel zur Verwendung innerhalb bestimmter Spannungsgrenzen 2006 95 EG Declaração de Conformidade Nós Exercycle S L declaramos sob nossa única responsabilidade que o produto H 493 a que ...

Страница 33: ...1 949 206 0350 fitness bhnorthamerica com www bhnorthamerica com BH FITNESS MEXICO BH Exercycle de México S A de CV Eje 132 136 Zona Industrial 2A Secc 78395 San Luis Potosi S L P MEXICO Tel 52 444 824 00 29 Fax 52 444 824 00 31 www bh com mx BH SE RESERVA EL DERECHO A MODIFICAR LAS ESPECIFICACIONES DE SUS PRODUCTOS SIN PREVIO AVISO SPECIFICATIONS MAY BE CHANGED WITHOUT PRIOR NOTICE DUE TO OUR PRO...

Отзывы: