background image

6

Operation

Charging Batteries

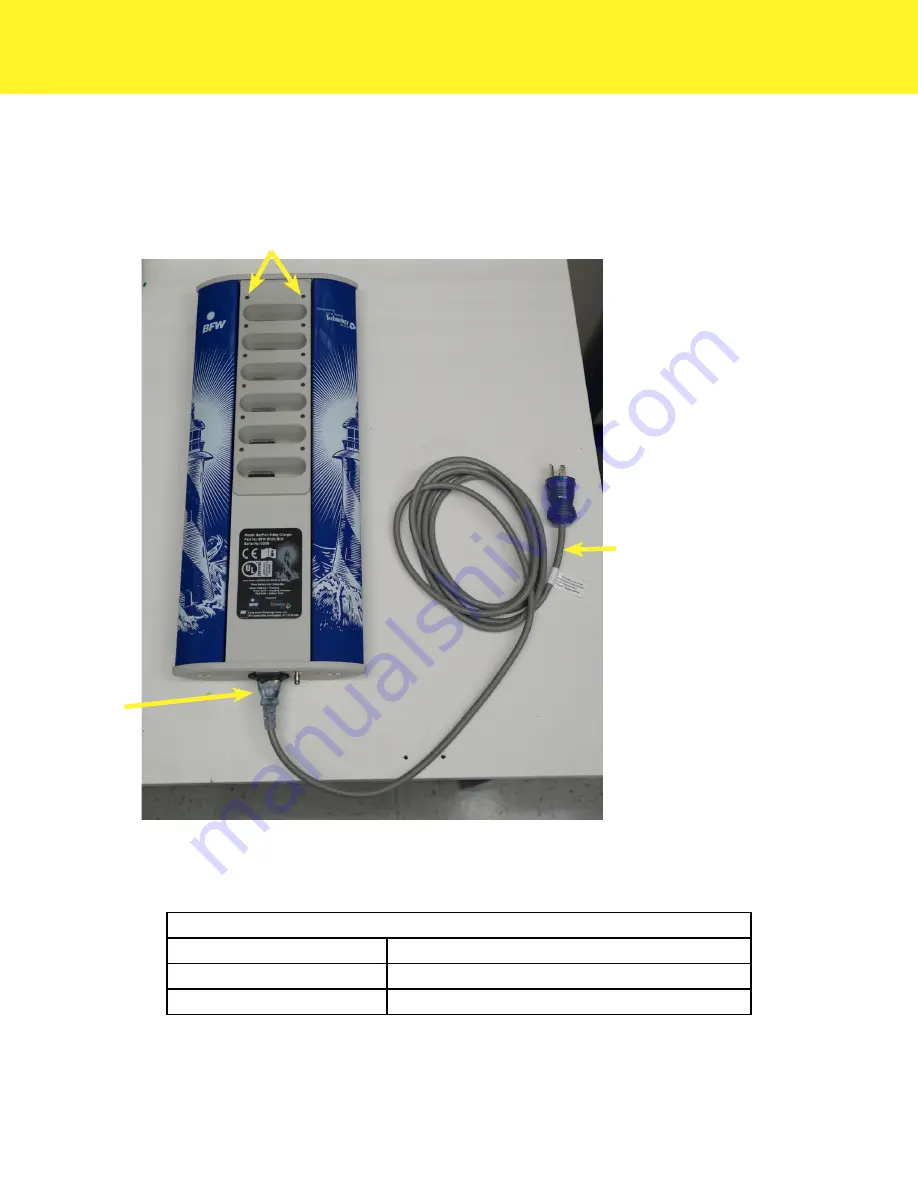
1. Plug the female end of the AC Cable (B) into the AC Power Receptacle (C) on the bottom of the unit.

2. Plug the male end of the AC Cable (B) in an AC Outlet.

3. Flip the main power switch into the On position on the AC Power Receptacle (C).

4. Fully charging the Battery before use, will ensure the longest Battery life.


A

B

C

A.  Charging Indicators (See Table Below)*

B.  AC Cable

C.  AC Power Receptacle

Charging Indicator*

Green Blinking

Battery is currently being charged

Green Solid

Battery is fully charged

Red Blinking

An error has occurred during charing

5. Flip the main power switch into the OFF position on the AC Power Receptacle (C) to turn the unit off.


!

The appliance inlet shall not be blocked during operation. This will make it difficult to disconnect the 

device

Содержание Long Island Technology Group BayPort

Страница 1: ...6 Bay Charger Operating Manual BayPortTM...

Страница 2: ......

Страница 3: ...utions 3 Warnings and Cautions 4 Intended Use 4 Unintended Uses 4 Overview 5 System Description 5 Operation 6 Charging Batteries 6 Cleaning and Maintenance 7 Charging Unit 7 Specifications 8 Electroma...

Страница 4: ...and Directive 2002 95 EC on the restriction of the use of certain hazard ous substances in electrical and electronic equipment The UL mark indicates this product has been tested to and conforms to ap...

Страница 5: ...se it could result in improper operation If such use is necessary this equipment and the other equipment should be observed to verify that they are operating normally USE ONLY components and accessori...

Страница 6: ...of electric shock this equipment must only be connected to a supply main with protective earth Intended Use The BFWTM BayPortTM 6 Bay Charger is intended to only charge BFWTM LITGTM batteries used in...

Страница 7: ...neously and stored easily LEDs indicate the charging status of each battery The principle of operation is charging smart batteries The intended environment for use is for Professional Health Care exce...

Страница 8: ...efore use will ensure the longest Battery life A B C A Charging Indicators See Table Below B AC Cable C AC Power Receptacle Charging Indicator Green Blinking Battery is currently being charged Green S...

Страница 9: ...DO NOT pour cleaning solution directly on the surface of the BayPortTM 6 Bay Charger DO NOT use any sterilization process or cleaning process using excessive heat or humidity as it will damage the de...

Страница 10: ...C Storage 23 Degrees F 0 C to 104 Degrees F 40 C Relative Humidity 45 75 Pressure Altitude 860 1 060 hPa 2 000m Performance Charge Time from Empty 3 hours Mechanical LxWxH 19 25 x 8 125 x 2 5 Weight 1...

Страница 11: ...25GHz 1000 Hz 80 Modulated Test Signal Portable and mobile RF communications equipment should be used no closer to any part of the BayPortTM 6 Bay Charger including cables than the recommended separat...

Страница 12: ...m distance between portable and mobile RF communications equipment transmitters and the BayPortTM 6 Bay Charger as recommended below according to the maximum output power of the communications equipme...

Страница 13: ...lines 100kHz repetition frequency IEC 61000 4 4 2 kV for power supply lines 100kHz repetition frequency Mains power quality should be that of a typi cal commercial or hospital environment Surge IEC 6...

Страница 14: ...es Complies NOTE The EMISSIONS characteristics of this equipment make it suitable for use in industrial areas and hospitals CISPR 11 class A If it is used in a residential environment for which CISPR...

Страница 15: ...hnology Group includes parts and labor The warranty does not cover products damaged by the following Accident misuse abuse or alteration Servicing by unauthorized persons Use with unauthorized accesso...

Страница 16: ...TM Manuals Or Visit http www litgp com manuals Revision 1 1 9 30 2019 Contents are fragile Handle with care Conforms to IEC 60601 1 Edition 3 1 IEC 60601 1 2 Edition 4 AAMI ES60601 1 Edition 1 CSA C22...

Отзывы: