background image


Mounts (Optional)                                                     

The following items are optional and sold separately

.


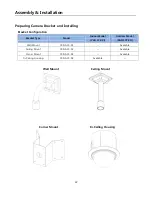
                     Wall Mount 


           Ceiling Mount   


Corner Mount               


  In-Ceiling Housing   


Содержание SD-373C

Страница 1: ...1 SPEED DOME CAMERA User Manual Model SD 373W Outdoor with wall bracket SD 373C Pendant Outdoor SD 373D Ceiling Indoor ...

Страница 2: ...ttings 55 P T 17 Baud Rate Protocol Settings 55 Position Limit 18 21 WTX 1200 Keyboard Instruction Connecting Power Adapter Cable 56 58 Speed Limit Prop P T 22 Assembly Installation 59 Text Area 60 Masking Settings 61 Image Hold 32 Symbols used in the Product 62 OSD Settings 33 Supplying Power 64 Alarm Input 34 OSD Command Function Chart Menu Controls 65 Alarm Aux Output 35 OSD Menu Chart 67 Initi...

Страница 3: ...the power supply when there is a lightning and storm This may cause a fire or product failure Caution Firmly connect the power cord to the power connector before use A loose connection may cause a fire Installation Warning Must use the adapter that is provided when you purchased our product Using other adapters may cause fire electric shock or product failure Caution When installing the camera on ...

Страница 4: ... objects on the product or apply strong impact Keep away from excessive vibration or strong magnetic influence Do not install in a location where temperature is too high 55 or higher or low temperature 40 or below or high humidity May be a cause of fire or electric shock Keep away from heat vents or heating appliances May be a cause of fire or electric shock If you want to relocate already install...

Страница 5: ... interference even though the equipment has been properly installed IC Compliance Notice This Class A digital equipment meets all the requirements of the Canadian Interference Causing equipment Regulations regarding equipment that may cause interference The Proper disposal of the product Electrical electronic equipment disposal classification Means that this product should not be disposed together...

Страница 6: ...ufficient strength of the screw to prevent the product from falling 4 Take extra care while moving the product to prevent damage to the product 5 When connecting power communication video and IR lamp through cable gland seal with tape to prevent infiltration of water 6 Please turn off the product when opening the housing in order to install the product 7 Always use rated adapter 8 Please use the p...

Страница 7: ...ually for detailed controls when monitoring at high zoom ratios Day Night With its daytime nighttime switch and Sens Up functions based on the ICR Infrared Cut filter Removal the camera provides high quality pictures regardless of whether it is day or night Sens Up increases the CCD sensitivity by electrically extending the camera s exposure time Day Night enables you to select between color and B...

Страница 8: ...mponents SD373 D SD373 D Optional Adapter AC 24V 2 5A User Manual Quick Manual Install Base Screw Anti theft Screw L Wrench 2 5 SD373W SD373 C SD373 W C Optional Adapter AC 24V 2 5A User Manual Quick Manual ...

Страница 9: ...9 Mounts Optional The following items are optional and sold separately Wall Mount Ceiling Mount Corner Mount In Ceiling Housing ...

Страница 10: ...10 Product Configuration SD373 D SD373W C Camera Module Dome Cover Main Housing Install Base 1 2 3 ...

Страница 11: ... Board Refer to the image below for product wiring Coaxial communication method does not require additional control signal wiring Main Power Connector Video Output Connector 485 422 Communication Connector Alarm Input Connector 1ch 6ch Alarm Output Connector 1ch 2ch 1 2 3 4 5 ...

Страница 12: ...ly connecting the power and GND to NC NO port will cause short circuit and may cause fire or damage the product Connecting Communication RS 485 Communication SD373 Controller or DVR RS 422 Communication SD373 Controller or DVR For more precise text information refer to the silk screen text of the board ...

Страница 13: ...Signal Input 1 1N C Normal Close 1 IN2 Alarm Signal Input 2 COM1 Common 1 IN3 Alarm Signal Input 3 1N O Normal Open 1 GND Ground 2N C Normal Close 2 IN4 Alarm Signal Input 4 COM2 Common 2 IN5 Alarm Signal Input 5 2N O Normal Open 2 IN6 Alarm Signal Input 6 GND Ground Alarm Output Connector J10 Alarm Input Connector J5 ...

Страница 14: ...ugh DIP SWITCH If the switch is no completely On Off the product may not work properly therefore check again after the setup Coaxial Communication Method Pelco C automatically detects the signal therefore there will not be additional communication setup needed And it can be used through every compatible controller DIP SWITCH Purpose S1 ID Setup S2 Termination Resistor 422 485 RESPONSE BAUDRATE Pro...

Страница 15: ...FF as default Each switch has a unique value and the ID is the sum of the values S1 DIP 1 2 3 4 5 6 7 8 Value 1 2 4 8 16 32 64 128 Example of Camera ID Settings On Off Example 1 Example 2 Example 3 0 0 0 ID 1 2 4 6 ID 6 1 2 4 8 16 32 128 191 ID 191 Use a unique ID for each Camera If the summation value is 0 it is recognized to ID as 1 S1 S1 ...

Страница 16: ...troller communication loop Terminal Resister S2 1 S2 2 ON OFF ON OFF RS 422 RX RS 485 Terminated Not Terminated RS 422 TX Terminated Not Terminated Communication Method Settings Select a communication method for the camera Function ON OFF S2 3 Communication Mode Switch RS 422 4Wire RS 485 2Wire Communication Response Settings Select a communication response method for the camera Function ON OFF S2...

Страница 17: ...OFF OFF 1 Pelco D P OFF OFF OFF ON 2 SAMSUNG T OFF OFF ON OFF 3 SAMSUNG E OFF OFF ON ON 4 Panasonic OFF ON OFF OFF 5 Vicon OFF ON OFF ON 6 Honeywell OFF ON ON OFF 7 AD OFF ON ON ON 8 GE ON OFF OFF OFF 9 BOSCH ON OFF OFF ON 10 DONGYANG ON OFF ON OFF 11 CYBERSCAN ON OFF ON ON 12 Reserved ON ON OFF OFF 13 Reserved ON ON OFF ON 14 Reserved ON ON ON OFF 15 All Automatic ON ON ON ON Major Automatic PELC...

Страница 18: ...y Press down the button for 2 3sec to Power off 2 LCD DISPLAY Camera ID Protocol baud rate Etc will be displayed 3 Numbers ID or PRESET number can be saved and played 4 Controller Function Keys HOLD System locking Unlocking 4 digit password AUX Aux 1 Wiper on off Aux 2 Light on off SET PTZ 1 SET MAIN 2 SET OPEN OSD menu enter CLOSE OSD menu escape 5 Function Keys F1 Preset F2 Group F3 Pattern F4 S...

Страница 19: ...date Controller Function Settings Preset F1 Button Assigning a PRESET Number Button F1 Button for 2 3sec Executing the PRESET Number Button F1 Button Group F2 Button Executing the Group Number Button F2 Button Pattern F3 Button Assigning a Patter Number Button F3 Button for 2 3sec Press MENU Button to complete the Patter settings Executing the Pattern Number Button F3 Button Scan F4 Button Executi...

Страница 20: ...nt corresponding functions Protocol Preset Number Description PELCO D P 92 Camera menu open 95 Camera menu open 62 65 Run Scan 1 4 66 Run Preset Status 67 Run Auto Pan 71 Run DIS 72 77 Run Group 1 6 81 Run Pattern 82 85 Run Pattern 1 4 86 88 Aux 1 ON 70 90 Aux 1 OFF 87 89 Aux 2 ON 80 100 Aux 2 OFF 92 Run Home Position 93 Run Freeze 95 Run Day Night 96 Run Home Position ...

Страница 21: ...unication if you are using Coaxial Communication to control the camera Common Video Amp will not transfer the Coaxial Communication Signal Communication Cable RS 485 422 Communication line is needed in order for the camera to communicate with the controller In order to improve the distance and accuracy of the communication Twist Pair Cable such as UTP cable is recommended The communication distanc...

Страница 22: ...nfiguration Bracket Type Model Indoor Model CAD 37Z XI Outdoor Model CAD 37Z XO Wall Mount CXD ACC 01 Available Ceiling Mount CXD ACC 02 Available Corner Mount CXD ACC 03 Available In Ceiling Housing CXD ACC 04 Available Wall Mount Ceiling Mount Corner Mount In Ceiling Housing ...

Страница 23: ...the install base as shown below After the installation open the hinge door attached to the install base in the direction of the arrow Use 3 screws included Terminal Wiring Connect cables from the ceiling to the board attached on the hinge door After the wiring is done close the hinge door in the direction of the arrow Refer to the Installation Connection on page 11 for detailed wiring ...

Страница 24: ...or details Coupling the Safety Cable Connect the Safety Cable in the Install Base as shown in the figure below The Safety Cable is installed in the Install Base Pull the Safety Cable from the Install Base and connect to the Safety Cable Loop at the bottom of the product body Not coupling the Safety Cable may have danger of the camera falling and cause injury ...

Страница 25: ...e Align the triangle shaped indicator on both the Main Body and the Install Base and insert the Main Body into the Install Base in the direction of black arrow After inserting the Main Body into the Install Base turn the Main Body clockwise to finish ...

Страница 26: ...26 Fastening the Anti Theft Screw In order to prevent theft fasten the Main Body and the Install Base with a bolt Use the Set Screw and a Wrench included in the product package ...

Страница 27: ...stall the outdoor product SD 373W and install the mount For detailed installation instruction of each mounts refer to the installation manual included with each mounts Separating the Install Base Use Driver to unfasten the screw and rotate the Main Body counter clockwise to disassemble the Main Body from the Install Base ...

Страница 28: ...tall Base clockwise After the installation has finished open the Hinge door in the direction of the arrow Terminal Wiring Connect cables which wired through the mount to the board on the Hinge door After the wiring has finished close the Hinge door in the direction of the arrow For wiring details refer to the Installation and Connection on page 11 ...

Страница 29: ...29 ID 485 422 Communication DIP Switch Settings Setup the ID 485 422 DIP Switch at the bottom of the Main Body For details refer to the Installation and Connection on page 11 ...

Страница 30: ...dy and the Install Base and insert the Main Body into the Install Base in the direction of black arrow After inserting the Main Body into the Install Base turn the Main Body clockwise and fasten 3 Screws which you initially unfastened to disassemble the Main Body from the Install Base to finish assembling ...

Страница 31: ...31 Connecting the Safety Cable Connect the Safety cable from the Main Body to the Install Base as shown in the figure below Not connecting the Safety Cable may cause the camera to drop and cause injury ...

Страница 32: ... will be flickering at the upper right corner of the display Current Alarm Input Port display according to Input ports based on the priority One of signs from to will be flickering Displaying current alarm port is available only when the sequence function is running Preset Number Display Settings means that the Preset has already saved H means that the relevant Preset is set as Home Position When ...

Страница 33: ... to 180 minutes depending on the conditions Prior to connecting the Power Make sure the system and other components are closely installed This is important for the product to normally operate Make sure that all the parts are firmly fastened under the safety condtion Initial Display When the system is turned on the protocol version information and etc will be displayed as below Displays for 2 secon...

Страница 34: ...ICON Protocol GE Protocol Entering Camera OSD Preset 95 Set OSD Key 3 Auxilary ON IRIS OPEN IRIS OPEN Exiting Camera OSD IRIS CLOSE FOCUS NEAR 3 Auxilary OFF IRIS CLOSE IRIS CLOSE ENTER IRIS OPEN FOCUS FAR IRIS OPEN IRIS OPEN IRIS OPEN ESC IRIS CLOSE FOCUS NEAR IRIS CLOSE IRIS CLOSE IRIS CLOSE The OSD menu commands are as follows Command Function Joystick up down left right OSD Menu up down left r...

Страница 35: ...Sequence Preset 1 to 255 Scan Pan Scan Tilt Scan P T Scan 1 to 8 Group 1 to 6 Pattern 1 to 4 Auto Run Mode Time Power Resume OFF ON MANUAL MD Dwell Time OFF ON P T PAN TILT Position Limit Pan Tilt Speed Limit Limit Speed Index Prop P T Text Area 1 to 8 Masking 1 to 8 Image Hold ON OFF OSD ID ON OFF Name ON OFF Preset No ON OFF Preset Name ON OFF Status ON OFF Position ON OFF Alarm Aux ON OFF Langu...

Страница 36: ... Zoom action Auto Focus function may not normally operate under conditions listed below Flashing lights such as bright lighting neon sign Illumination in the surveillance area is low Slow Shutter action Dark Subject Illumination in the surveillance area is too bright If distant and near objects are in the surveillance area If there is no contrast such as the sky and a wall Staring at the thin hori...

Страница 37: ... in Manual Focus mode OFF Perform Zoom without Focus action Full Manual Mode Speed SLOW MEDIUM FAST Zoom Speed Control Digital Zoom Setting the maximum value of the Digital Zoom Digital Zoom can be set from 2 X 16 X and in conjunction with the Optical Zoom performs up to 592 X Zoom The resolution of the Digital Zoom decreases as the magnification increases ...

Страница 38: ...e color of the camera to current lighting condition May need readjustment if the lighting condition changes MANUAL Manually adjusts the Red gain and Blue gain of the camera The White Balance may not normally work under following conditions The environment surrounding the subject is out of color temperature correction range Clear Sky Sun Set When the subject s surroundings are dark If the camera is...

Страница 39: ...LK Use this function when the screen flickers due to discordance between surrounding illumination and the frequency MANUAL Manually adjusts the shutter speed of the camera Sens Up AUTO Accumulates video frame to restore brightness when the shutter speed has dropped considerably at night or in low light environments Sens Up Limit Select maximum accumulated magnification When the accumulation factor...

Страница 40: ...e user s backlight correction function WDR Only for SD 373 Series Obtains clean image video through simultaneously shooting and correcting both the bright and dark area Limit Adjusts the WDR function by 3 levels Low Medium High The WDR function is not available while in OFF condition A R Anti Rolling The greater the sensitivity lower the brightness difference between bright and dark area Mode INDO...

Страница 41: ...light from headlamp of the car intrudes the lens more than certain area to remove the High Light and properly adjust the brightness of the license plate Level Adjusts the sensitivity of HLC function Mask Color Able to adjust the Mask Color of the High Light area Even if you are using this function the license plate may not be recognized due to installation angle brightness etc The HLC function wil...

Страница 42: ...de Decreases the area of boundary region AGC Auto Gain Control Settings AGC Automatic Gain Control controls the brightness by controlling the control sensitivity of video Gain when the brightness of the video is under certain level due to the subject has film under dark lights OFF No AGC function LOW MEDIUM HIGH Increasing step toward the High level adjusts the video to be brighter in dark environ...

Страница 43: ...is dramatic maintains the bright area and increases the brightness of the dark area to balance the overall brightness Mode Activate of deactivate the SSDR function Range Able to setup the area where the function will be applied Level Able to adjust the level based on the difference between bright and dark area ...

Страница 44: ... that needs external Sync through Burst signal in B W mode Duration The sensitivity can be adjusted as the following chart According to the camera installation environment the Switch Illumination may vary Dwell Time In order to activate switching of Day Night mode you can determine the duration of each mode If the AGC is at OFF or MANUAL the Auto mode cannot be activated The Auto mode can only be ...

Страница 45: ...hite wall Image Adj Sharpness You can adjust the overall sharpness of the video Color You can adjust the overall color density of the video Freeze Pauses or plays the video SSNR Function which attenuates the low light background noise OFF No noise reduction effect LOW Low noise reduction effect but rarely no after image MEDIUM The most common effect will be expected Properly reduces the noise and ...

Страница 46: ...lecting the Preset Setting menu brings up a screen as shown below Move the joystick in all four directions to select the desired number up to 319 Depends on Protocol and Using Controller Number of Preset is limited in using Hot Key Valid Preset H Home Preset No Protocol No of Preset 0 Automatic 1 CyberScan I 255 2 SAMSUNG T 255 3 SAMSUNG E 255 4 Pelco D 255 5 Pelco P 255 6 Panasonic 255 7 Vicon 25...

Страница 47: ...r switching Zoom Focus Use ENTER and ESC key Edit With this feature you can edit or save the camera scene related settings Focus Mode Refer to the section entitled Setting Up Your Camera Brightness Refer to the section entitled Setting Up Your Camera Iris Refer to the section entitled Setting Up Your Camera Back Light Refer to the section entitled Setting Up Your Camera Day Night Refer to the sect...

Страница 48: ...48 When each preset setup starts there will not be any key recognize until the setup finishes ...

Страница 49: ...ation While in Sequence mode operation the actual movement can be slower than the specified when moving the camera in the direction of Pan and Tilt at the same time Clear Deletes saved Preset location Status Checks saved Preset Map Location where Preset is saved will be indicated with ...

Страница 50: ...Tilt action Scan Setting Execute Clear Enter Scan menu to setup the Scan Select 2 preset locations by using the joystick Speed indicates the camera s movement speed Dwell Time indicates the camera s duration of stay at a preset location Execute Executes the Swing operation Clear Deletes data in the Swing memory While in Sequence operation the actual movement can be slower than the specified moveme...

Страница 51: ...he joystick to enter desired preset numbers into the PSET section DWT indicates the camera s duration of stay at a preset location SPD shows the camera s movement speed by 64 different levels Execute Executes the group operation Clear Deletes the selected group While in Sequence mode operation the actual movement can be slower than the specified when moving the camera in the direction of Pan and T...

Страница 52: ... of PTZ operations of your choice When the memory is up to 600 events it will be stopped You can stop Memorizing by using the OSD Key Using other protocols Protocol Representative Model Stop saving the trace CyberScan I GSC 3000J Menu PELCO D P KDB300A Ack Iris Open SAMSUNG E SSC 5000 OSD ON Iris Open PANASONIC WV CU161C OSD ON VICON V1300X DVC Iris Open HONEYWELL HTX 3000 Iris Open AD OSD ON Iris...

Страница 53: ...Preset Menu PRESET Auto run a selected preset number SCAN Auto run a selected Swing mode GROUP Auto run a selected Group mode PATTERN Auto run a selected trace mode A PAN Auto run a 360 degree pan To activate the panning command you need to set up the camera s tilt angle and auto pan speed manually Time Enables setup of Auto Run duration The duration can be 10 60 seconds or 1 60 minutes ...

Страница 54: ...tion Even if power failure happens the last position can be recovered If it is at manual mode Sequence Function restores mode works MD Dwell Time This function is used when Motion Detection function is set under Preset Edit command and operating Group function While the camera is performing a sequence action if motion is detected from a selected Preset location the camera stops the sequence action...

Страница 55: ...imits the Pan and Tilt range Position Limit In the Position menu move the joystick left and right to select a movement range from the starting point to the end in order ON OFF Configures Pan Tilt Limit function to use or not ...

Страница 56: ...d Original Speed Limit Value 100 no speed limit Speed Index Only valid when absolute location command relative location command and sequence moving location command If you select linear Speed function is Step Speed Max Speed Speed Step 64 DPS max speed speed step 64 DPS ...

Страница 57: ...129 75 13 20 20 15 15 45 184 184 138 138 14 22 22 16 5 16 5 46 196 196 147 147 15 24 24 18 18 47 219 219 164 25 164 25 16 26 26 19 5 19 5 48 223 223 167 25 167 25 17 29 29 21 75 21 75 49 238 238 178 5 178 5 18 32 32 24 24 50 254 254 190 5 190 5 19 35 35 26 25 26 25 51 271 271 203 25 203 25 20 38 38 28 5 28 5 52 289 289 216 75 216 75 21 41 41 30 75 30 75 53 308 308 231 231 22 44 44 33 33 54 328 328...

Страница 58: ...y according to the current zoom ratio Moving the joystick clockwise Tele slows down and counterclockwise Wide accelerates the Pan and Tilt speed allowing detailed adjustments Turning this Off executes the function the optical 1x zoom speed regardless of how far the lens is zoomed in ...

Страница 59: ...ected Area Name You can add names to selected areas Names can be up to 12 characters and can be entered via joystick and the Enter key Once a name is entered use the joystick and the Enter key to perform the Set command and save the name Position As shown in the picture above move the joystick to select the upper left corner and lower right corner ON OFF Activates or deactivates the display functi...

Страница 60: ...ure above move the joystick to select the upper left corner and lower right corner ON OFF Activates or deactivates the Area Masking function If the tilt angle from zero increases or decreases the masking has more error in accuracy The effective range is between 40 and 40 in the tilting angle If your desired area does not being mask enlarge mask area ...

Страница 61: ...Image Hold While in Group sequence displays image of previous preset position as a freeze frame until it gets to the next preset position This feature is useful to prevent observer s perspective confusion ...

Страница 62: ... name through joystick and enter key Name Opens sub menus for setup Preset Number Displays or hides Preset Numbers on the screen Preset Name You can assign a name for each Preset Sequence Status Displays or hides the status of a sequence action in process Position Displays or hides the status of the Pan Tile and Zoom action in process Alarm Aux Displays or hides the Alarm and Aux event signal Lang...

Страница 63: ...upply any power it may damage the product or cause electric shock P Priority Set the priority of Alarm Inputs If more than one alarm is simultaneously activated the alarm with the highest priority activates before the others Once the alarm is canceled the next highest priority alarm activates SEQ Enable setting up a sequence action for the camera in response to an alarm Available sequence actions ...

Страница 64: ...and Aux Output can be setup Setting 1 2 The Alarm Output method can be selected 1 6 of each section MD indicates the relevant alarm input and motion For each alarm input and MD you can set the alarm output You can also assign more than one alarm input and MD to one alarm output port Timer 1 2 On When an alarm event occurs the alarm will be activated for set time Minimum 1 sec Maximum 60 hours can ...

Страница 65: ...rate the camera s peripheral devices such as floodlight and speaker through the controller and switches as well as through network communications On Off Activates or deactivates the Aux settings Time Able to setup the duration for the Aux output when the Aux command is transmitted from the controller The duration can be set from 1 sec 60 min Connecting the power and GND incorrectly to the NC NO CO...

Страница 66: ...he product to Factory Default The existing data will be lost Camera Default Set When replacing the camera Zoom Module to a new one use this function to upload the settings from previous camera module Change the camera module while the power is not connected and execute this command ...

Страница 67: ...the camera MOTION VER S W version of the main board PROTOCOL Protocol Settings CONTROLLER Communication mode settings D Duflex Response mode for commands Depending on the protocol there may not be response data S Simplex There is no data response for manual commands INNER VER MCU F W version of Base Expansion Board TEMPERATURE Current temperature of the Main body SERIAL NO Product s Serial Informa...

Страница 68: ...ens IRIS is closed Adjust the lens IRIS menu Check Adjust the Shutter speed The picture is too Bright Dark Check Adjust the Brightness menu White image displayed on the monitor Check if the IRIS is open and adjust the menu The video is out of Focus Check if the cover or the camera lens is spoiled if so clean them Check the distance environment between the object and the camera If the background is...

Страница 69: ...r is correctly connected Check if the video cable is correctly connected and check the system controller manual Check if the Pan Limit or the Tilt Limit is set Deactivate the setting Motor or lens might be overheated contact the service manager The camera s position differs from the set preset position This may happen since the motors have a margin error of 0 1 The Sequence setting is not working ...

Страница 70: ...o times consecutively CAN NOT FIND CAMERA appears Open housing check SCM X370 module camera cable consult your dealer Coaxial communication is not working Make sure that the camera and coaxial controller are installed within Max 500 m According to intalling condition working range is different Use the video amplifier equivalent to coaxitron if the recommended installation distance is exceeded Chec...

Страница 71: ... Weight on Video Output CVBS 1 0Vp p 75Ω Zoom Ratio 37X Optical 16X Digital Focal Length 3 5 129 5mm Optical x37 Min Object Distance 1 500mm Angular Field of View H Appr 55 5 Wide to 1 59 Tele V Appr 42 5 Wide to 1 19 Tele Focus AUTO MANUAL ON push Zoom Speed 2 5 sec Fast 3 1sec middle 5 6sec slow IRIS AUTO MANUAL Lens Reset Built In Pan Range 360 Endless Pan Speed Preset 600 sec Manual 0 01 sec 6...

Страница 72: ...communication Coaxitron Pelco C Protocol Pelco D Pelco P SAMSUNG T SAMSUNG E Panasonic Honeywell AD Vicon GE Bosch CyberScan Bandi Dongyang Automatic Mode1 Pelco D P Samsung T E Panasonic Mode2 All Protocol Alarm 4 In 2 Out NO NC relay out Operating Temp Humidity 50 C to 50 C Less than 90 RH Storage Temp Humidity 50 C to 60 C 20 to 95 RH Input Voltage AC24V 10 DC24V 10 DC12V 5 Only CAD 37Z XI Powe...

Страница 73: ...73 DIMENSIONS SD 373D ...

Страница 74: ...74 DIMENSIONS SD 373W SD 373C ...

Страница 75: ...75 Ceiling Mount Wall Mount ...

Страница 76: ...76 In ceiling Housing BETTINI S r l Via E H Grieg 23 21047 Saronno VA Tel 39 0289651000 Fax 39 0293182042 E mail info bettinivideo com http www bettinivideo com ...

Отзывы: