background image

12 

Booster function 

The booster function [ P ] grants a boost of power to the  selected heating zone. 

If this function is activated the heating zones works during 5 minutes with an ultra-high power. 

The booster is foreseen for example to heat up rapidly big quantities of water, like nuddles cooking. 


Start-up / Stop the booster function : 

Action 


Control panel 


Display 

Zone selection 


Press selection zone key   


[ 0 ] 

Increase power 


Press key [ + ] 


[ 1 ] to [ 9 ] 

Start up the booster  


Press key [ + ] 


[ P ] during 5 min 

Stop the booster 


Press key [ - ] 


[ 9 ] 

Bridge function 

This function allows to use the 2 cooking zones at same time with the same features as a single 

cooking zone. 


Action 


Control panel 


Display 

Activate the hob 


Press key [   ] 


[ 0 ] or [ H ] 

Activate the bridge   


Press simultaneously the two 


selection keys 


 ] appears on the 

rear area and [ 0 ] on  

the front area 

Increase bridge 


Press key [ + ] 


[ 1 to 9 ] 

Stop the bridge 


Press simultaneously the two 


selection keys 


[ 0 ] or [ H ]


Grill function 

This function is a shortcut for the bridge function with a cooking level of 4. 


Action 


Control panel 


Display 

Activate the hob 


Press key [   ] 


[ 0 ] or [ H ] 

Activate the grill 


Press simultaneously the two 


selection keys during 3 seconds   

 ] appears on the 

rear area and [ 4 ] on 

the front area  

Stop the grill  


Press simultaneously the two 


selection keys during 3 seconds   

[ 0 ] or [ H ]


Содержание P603IC1B2GNEE

Страница 1: ...INSTRUCTION OF USE MANUALE D ISTRUZIONE NOTICE D UTILISATION INSTRUCCIONES DE USO P603IC1B2NEE P603IC1B2GNEE P604IC1B2NEE P604IC1B2GNEE P604IC2B2NEE ...

Страница 2: ......

Страница 3: ...ICAL CHARACTERISTICS 7 CONTROL PANEL 8 USE OF THE APPLIANCE 8 DISPLAY 8 VENTILATION 8 STARTING UP AND APPLIANCE MANAGEMENT 9 BEFORE THE FIRST USE 9 INDUCTION PRINCIPLE 9 SENSITIVE TOUCH 9 STARTING UP 9 PAN DETECTION 10 RESIDUAL HEAT INDICATION 10 TIMER 10 CONTROL PANEL LOCKING 11 BOOSTER FUNCTION 12 BRIDGE FUNCTION 12 GRILL FUNCTION 12 POWER MANAGEMENT 13 POWER LIMITATION CONFIGURATION 13 COOKING ...

Страница 4: ...e any extension cable to connect it The appliance cannot be used above a dishwasher or a tumble dryer steam may damage the electronic appliances The appliance is not intended to be operated by means of external timer or separate remote control system Using the appliance Switch the heating zones off after using Keep an eye on the cooking using grease or oils that may quickly ignite Be careful not t...

Страница 5: ...roceramic Do not hit the edges of the glass with saucepans Make sure that the ventilation of the appliance works according to the manufacturer s instructions Do not put or leave empty saucepans on the vitroceramic hobs Sugar synthetic materials or aluminium sheets must not contact with the heating zones These may cause breaks or other alterations of the vitroceramic glass by cooling switch on the ...

Страница 6: ...zone The bottom of the pot should cover as much as possible of the cooking zone For the users of cardiac pacemakers the magnetic field may influence the operation We recommend getting information from the retailer or the doctor Do not place aluminium or synthetic material containers on the hob they could melt on residual hot cooking zones NEVER try to extinguish a fire with water but switch off th...

Страница 7: ...n Ø 100 mm Ø 100 mm Nominal power 1400 W 1400 W Booster power 1850 W 1850 W Standardised cookware category C C Energy consumption ECcw 172 7 Wh kg 172 7 Wh kg Rear right heating zone Ø 180 mm Minimum detection Ø 100 mm Nominal power 1400 W Booster power 1850 W Standardised cookware category B Energy consumption ECcw 164 0 Wh kg Front right heating zone Ø 200 mm Ø 180 mm Minimum detection Ø 110 mm ...

Страница 8: ...t L Locking Control panel locking P Booster The boosted power is activated Bridge 2 cooking zones are combined Ventilation The cooling system operates continuously He starts when turning on the hob and speeds up when the hob is used intensively The cooling fan reduces its speed and stops automatically when the electronic circuit is cooled enough Control light timer key Selection key Timer and Powe...

Страница 9: ...utomatically the size of the pan With a too small diameter the pan doesn t work This diameter is varying in function of the heating zone diameter If the pan is not adapted to the induction hob the display will show U Sensitive touch Your ceramic hob is equipped with electronic controls with sensitive touch keys When your finger presses the key the corresponding command is activated This activation...

Страница 10: ...nes and don t put any heat sensitive object on them There are risks of burn and fire Timer The timer is able to be used simultaneous with all heating zones and this with different time settings from 0 to 99 minutes for each heating zone Setting and modification of the cooking time Action Control panel Display Zone selection Press selection zone key 0 Increase power Press key 1 to 9 To select Timer...

Страница 11: ...s enough to press any key Control panel locking To avoid modifying a setting of cooking zones in particular with within the framework of cleaning the control panel can be locked with exception to the On Off key Locking Action Control panel Display Start Press key 0 or H Hob locking Press simultaneously and selection key from the front right zone No modification Repress selection key from the front...

Страница 12: ...llows to use the 2 cooking zones at same time with the same features as a single cooking zone Action Control panel Display Activate the hob Press key 0 or H Activate the bridge Press simultaneously the two selection keys appears on the rear area and 0 on the front area Increase bridge Press key 1 to 9 Stop the bridge Press simultaneously the two selection keys 0 or H Grill function This function i...

Страница 13: ...sure there is no more pot on the hob Disconnect the appliance from the grid by removing the fuse or turning the circuit breaker off Reconnect the table to the grid Start the procedure within 2 minutes after reconnecting the hob to the grid Make sure all cooking zones are off Procedure To set the power limitation you must 1 Press simultaneously the two key of the bottom zones during 3 seconds A bee...

Страница 14: ... induction heating zone set at level 9 This water must heat in a few seconds A magnet stucks on the bottom of the pan Certain pans can make noise when they are placed on an induction cooking zone This noise doesn t mean any failure on the appliance and doesn t influence the cooking operating Pan dimension The cooking zones are until a certain limit automatically adapted to the diameter of the pan ...

Страница 15: ...with cold water and dry the surface thoroughly Highly corrosive or abrasive detergents and cleaning equipment likely to cause scratches must be absolutely avoided Do not ever use any steam cleaner or pressure washer Do not use any object that may scratch the ceramic glass Ensure that the pan is dry and clean Ensure that there are no grains of dust on your ceramic hob or on the pan Sliding rough sa...

Страница 16: ...n it on again The control panel displays E3 The pan is not adapted change the pan The control panel displays E5 Defective network Control the voltage of the electrical network The control panel displays E6 Defective network Control the frequency of the electrical network The control panel displays E8 The air inlet of the ventilator is obstructed release it The control panel displays U400 The hob i...

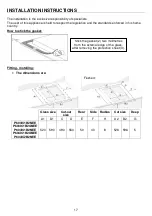
Страница 17: ...ed in his home country How to stick the gasket Fitting installing The dimensions are Glass size Cut out size Rear Side Radius Cut size Deep A1 B1 C D E F H A2 B2 G P603IC1B2NEE P603IC1B2GNEE P604IC1B2NEE P604IC1B2GNEE P604IC2B2NEE 520 590 490 560 50 40 8 526 596 5 Stick the gasket 2 two millimetres from the external edge of the glass after removing the protection sheet 3 Flushed ...

Страница 18: ... ensure good air circulation of the electronic device maintain a space of 20 mm under the bottom of the hob casing If a drawer is placed under the work avoid putting flammable objects in this drawer for example sprays or non heat resistant objects Materials which are often used to make worktops expand on contact with water To protect the cut out edge apply a coat of varnish or special sealant Part...

Страница 19: ...ect the connection diagram The connection box is located underneath at the back of the hob casing To open the cover use a medium screwdriver Place it in the slits and open the cover calculated with the simultaneous factor following the standard EN 60 335 2 6 Connection of the hob Setting up the configurations For the various kinds of connection use the brass bridges which are in the box next the t...

Страница 20: ...LO 26 USO DELL APPARECCHIO 26 DISPLAY 26 VENTILAZIONE 26 PRIMA ACCENSIONE E UTILIZZO DELL APPARECCHIO 27 PRIMA DEL PRIMO UTILIZZO 27 PRINCIPIO DELL INDUZIONE 27 TASTI A SFIORAMENTO 27 PER INIZIARE 27 IDENTIFICAZIONE DELLA PENTOLA 27 INDICATORE DI CALORE RESIDUO 28 TIMER 28 BLOCCO DEL PANNELLO DI CONTROLLO 29 FUNZIONE BOOSTER 29 FUNZIONE PONTE 29 FUNZIONE GRILL 29 POWER MANAGEMENT 30 CONFIGURAZIONE...

Страница 21: ...icurezza vigenti in materia Questo elettrodomestico è progettato esclusivamente per la cottura di cibo con l espressa esclusione di ogni altro uso domestico commerciale o industriale Rimuovere tutte le etichette adesive dal vetro Non apportare alcuna modifica o alterazione all apparecchio La superficie in vetro dell apparecchio non può essere utilizzata come zona di appoggio o di lavoro L apparecc...

Страница 22: ...getti magnetici carte di credito floppy discs calcolatrici non devono essere piazzati vicino all apparecchio quando questo è acceso Questi oggetti potrebbero danneggiarsi Gli oggetti metallici quali coltelli forchette cucchiai e coperchi non devono essere piazzati sull apparecchio perché potrebbero diventare incandescenti Gli oggetti metallici quali cucchiai e coperchi non devono essere piazzati s...

Страница 23: ...caso accendere immediatamente l apparecchio e rimuovere l oggetto dalla zona di cottura prendendo le opportune precauzioni per non ustionarsi Pericolo di incendio Non appoggiare alcun oggetto sul piano di cottura Non piazzare mai un contenitore bollente sul pannello di controllo L elettronica sotto il vetro potrebbe danneggiarsi Se sotto il piano cottura incassato c è un cassetto assicurarsi che l...

Страница 24: ...ile deve coprire il più possibile la zona di cottura Per gli utilizzatori di pace makers il campo magnetico dell apparecchio potrebbe influenzare il funzionamento del pace maker Si raccomanda di richiedere preventivamente informazioni al venditore dell apparecchio e o al medico curante Non utilizzare contenitori di alluminio o di materiali sintetici Potrebbero fondere se appoggiati alle zone acces...

Страница 25: ...100 mm Ø 100 mm Potenza nominale 1400 W 1400 W Potenza booster 1850 W 1850 W Categoria standard di pentola C C Consumo di energia ECcw 172 7 Wh kg 172 7 Wh kg Posizione posteriore destra Ø 180 mm Identificazione minimo Ø 100 mm Potenza nominale 1400 W Potenza booster 1850 W Categoria standard di pentola B Consumo di energia ECcw 164 0 Wh kg Posizione anteriore destra Ø 200 mm Ø 180 mm Identificazi...

Страница 26: ...e Due zone di cottura sono collegati Ventilazione Il sistema di raffreddamento è completamente automatico La ventola entra in funzione a basso regime di rotazione quando il calore interno raggiunge un determinato livello La ventilazione arriva ad elevati regimi di rotazione se l apparecchio è utilizzato intensivamente La ventola rallenta e si spegne automaticamente quando la temperatura interna de...

Страница 27: ...ettronici azionati tramite tasti a sfioramento Quando il dito tocca il tasto il comando corrispondente viene attivato L attivazione è confermata dalla spia relativa o da una lettera o un numero sul display e o da un segnale acustico Nell utilizzo normale premere unicamente un tasto per volta Per iniziare Accensione spegnimento dell apparecchio Azione Pannello di controllo Display Per accendere pre...

Страница 28: ...o è confermato e la cottura inizia Per arrestare il tempo di cottura Azione Pannello di controllo Display Selezione piastra premere tasto selezione spia accesa Selezionare Timer premere simultaneamente e il tempo residuo Disattivare Timer premere Mostra 00 poi si arresta Arresto automatico alla fine del tempo di cottura Quando viene raggiunto il tempo impostato per la cottura il display del timer ...

Страница 29: ...ta Il Booster serve ad esempio per riscaldare rapidamente grandi quantità d acqua Accensione Spegnimento della funzione Booster Azione Pannello di controllo Display Selezione piastra premere tasto selezione 0 Aumentare la potenza premere da 1 a 9 Attivare il booster premere P per 5 minuti Arrestare il booster premere 9 Funzione ponte La funzione consente di collegare due zone di cottura come se si...

Страница 30: ...o dalla corrente togliendo il fusibile o girando l interruttore spento Ricollegare il piano cottura alla corrente Avviare la procedura entro 2 minuti dopo aver ricollegato il piano di cottura alla corrente Assicurarsi che tutte le zone di cottura sono spente procedimento Per impostare la limitazione della potenza è necessario 1 Premere contemporaneamente i due tasti delle zone inferiori per 3 seco...

Страница 31: ...sulla piastra a induzione a livello di potenza 9 L acqua si deve scaldare in pochi secondi Un magnete calamita deve aderire al fondo della pentola Alcune pentole possono fare rumore quando vengono utilizzate sulla piastra a induzione Questo rumore non comporta alcun malfunzionamento dell apparecchio e non ne influenza il funzionamento e o l efficacia di cottura Dimensioni delle pentole Le piastre ...

Страница 32: ...enti altamente abrasivi e corrosivi che possono causare graffi devono assolutamente essere evitati Non utilizzare mai apparecchi a vapore o a pressione per pulire l apparecchio Non utilizzare alcun oggetto che potrebbe graffiare il vetro ceramico Assicurarsi che la pentola sia asciutta e pulita Assicurarsi che non vi siano granelli di polvere sul vetro ceramico o sulla pentola Far scivolare pentol...

Страница 33: ... apparecchio è surriscaldato lasciare raffreddare prima di riaccenderlo Il pannello di controllo indica E5 La pentola non è adatta sostituirla Il pannello di controllo indica E6 Collegamento errato Controllare Tensione e voltaggio del collegamento elettrico Il pannello di controllo indica E6 Collegamento errato Controllare Frequenza e voltaggio del collegamento elettrico Il pannello di controllo i...

Страница 34: ...razioni di acqua o altri liquidi nel mobile sottostante l apparecchio La sua installazione deve essere fatta attentamente seguendo il disegno qui sotto Inserimento installazione Le misure di incasso sono Dimensione del vetro Dimensione di taglio Indietro Lato Angolo Dimensione di taglio a filo Profondità A1 B1 C D E F H A2 B2 G P603IC1B2NEE P603IC1B2GNEE P604IC1B2NEE P604IC1B2GNEE P604IC2B2NEE 520...

Страница 35: ...superfici lisce Non installare l apparecchio al di sopra di un forno non opportunamente ventilato o di una lavastoviglie Il piano di appoggio deve essere in grado di sostenere il peso del piano di cottura a induzione che è di circa 20 kg Per garantire che il piano cottura a induzione aderisca correttamente al piano di lavoro dopo aver applicato la guarnizione silicone posizionare pesi distribuiti ...

Страница 36: ... Hz Collegare sempre il cavo di terra Rispettare il diagramma di connessione La morsettiera si trova sul lato posteriore del fondo dell apparecchio cassetta Per aprire il coperchio utilizzare un cacciavite medio Posizionarlo nelle fessure e aprire il coperchio Rete Connessione Diametro cavo Cavo Fusibile di protezione 230V 50 60Hz 1 Phase N 3 x 2 5 mm H 05 VV F H 05 RR F 25 A 400V 50 60Hz 2 Phase ...

Страница 37: ...TERISTIQUES TECHNIQUES 42 BANDEAU DE COMMANDE 43 UTILISATION DE L APPAREIL 43 AFFICHAGE 43 VENTILATION 43 MISE EN ROUTE ET GESTION DE L APPAREIL 44 AVANT LA PREMIERE UTILISATION 44 PRINCIPE DE L INDUCTION 44 TOUCHES SENSITIVES 44 MISE EN ROUTE 44 DETECTION DE RECIPIENT 45 INDICATEUR DE CHALEUR RESIDUELLE 45 FONCTION MINUTERIE 45 VERROUILLAGE DU BANDEAU DE COMMANDE 46 FONCTION BOOSTER 47 FONCTION B...

Страница 38: ...es aliments à l exclusion de toute autre utilisation domestique commerciale ou industrielle Enlevez toutes les étiquettes et autocollants du verre vitrocéramique Ne pas transformer ou modifier l appareil La table de cuisson ne doit pas servir de support ou de plan de travail La sécurité n est assurée que si l appareil est raccordé à une terre de protection conforme aux prescriptions en vigueur Pou...

Страница 39: ... ils peuvent devenir chauds De façon générale ne placez aucun objet métallique autre que les récipients de chauffe sur la surface vitrée En cas d enclenchement intempestif ou de chaleur résiduelle celui ci risquerait selon le matériau de chauffer de fondre ou de commencer à brûler Ne jamais couvrir l appareil d un chiffon ou d une feuille de protection Il pourrait devenir très chaud et prendre feu...

Страница 40: ... d aluminium ne touchent les zones chaudes Ces substances peuvent au refroidissement provoquer des cassures ou d autres modifications de la surface vitrocéramique Eteindre l appareil et enlevez les immédiatement de la zone de cuisson encore chaude attention risque de brûlures MISE EN GARDE Risque d incendie ne pas entreposer d objets sur la surface de cuisson Ne placez jamais de récipients chauds ...

Страница 41: ...zone de cuisson Le fond de la casserole doit autant que possible couvrir la zone de cuisson Pour les utilisateurs portant un régulateur de rythme cardiaque le champ magnétique pourrait influencer son fonctionnement Nous recommandons de se renseigner auprès du revendeur ou du médecin N utilisez pas de récipients en matière synthétique ou en aluminium ils pourraient fondre sur des foyers encore chau...

Страница 42: ... 100 mm Puissance nominale 1400 W 1400 W Puissance du booster 1850 W 1850 W Catégorie de la casserole standard C C Consommation d énergie ECcw 172 7 Wh kg 172 7 Wh kg Foyer arrière droit Ø 180 mm Détection minimum Ø 100 mm Puissance nominale 1400 W Puissance du booster 1850 W Catégorie de la casserole standard B Consommation d énergie ECcw 164 0 Wh kg Foyer avant droit Ø 200 mm Ø 180 mm Détection ...

Страница 43: ...ge La table est sécurisée P Booster La puissance turbo est activée Bridge 2 zones de cuisson sont combinées Ventilation Le ventilateur de refroidissement a un fonctionnement permanent Il se met en route dès l allumage de la table de cuisson La ventilation enclenche sa seconde vitesse lorsque l appareil est utilisé intensivement Elle s arrête automatiquement lorsque la table de cuisson est éteinte ...

Страница 44: ... induction prend automatiquement en compte la taille du récipient utilisé Avec un diamètre trop petit le récipient ne fonctionne pas Ce diamètre varie en fonction du diamètre de la zone de cuisson Lorsque le récipient n est pas adapté à la table de cuisson le symbole U reste affiché Touches sensitives Votre appareil est équipé de touches sensitives permettant de commander les différentes fonctions...

Страница 45: ... sans danger Tant que les témoins de chaleur résiduelle sont allumés ne touchez pas les zones de cuisson et ne posez aucun objet sensible à la chaleur Risque de brûlure et d incendie Fonction minuterie La minuterie peut être affectée simultanément aux 4 foyers de cuisson et ceci avec des réglages de temps de minuterie différents de 0 à 99 minutes pour chacune des zones Réglage ou modification de l...

Страница 46: ...tant 00 et un signal sonore retentit Pour stopper le son et le clignotement il suffit d appuyer sur une touche Verrouillage du bandeau de commande Pour éviter de modifier une sélection de la table de cuisson notamment dans le cadre du nettoyage de la vitre le bandeau de commande à l exception de la touche marche arrêt peut être verrouillé Verrouillage Action Bandeau de commande Afficheur Mise en r...

Страница 47: ...P Stopper le booster appuyer sur 9 Fonction Bridge Cette fonction permet de combiner 2 zones avec les mêmes fonctionnalités qu une seule zone Action Bandeau de commande Afficheur Mis en route Appuyer sur 0 ou H sur les 4 afficheurs Activer le bridge Appuyer sur 2 zones 0 sur la zone avant et sur la zone arrière Augmenter le bridge Appuyer sur 1 à 9 Arrêter le bridge Appuyer sur 2 zones 0 ou H sur ...

Страница 48: ...table du réseau électrique enlever le fusible ou couper le disjoncteur Rebrancher la table au réseau électrique remettre le fusible ou rebrancher le disjoncteur Démarrer la procédure en moins de 2 minutes après le branchement au réseau électrique S assurer que toutes les zones de chauffes sont éteintes Pour configurer la limite de puissance il faut 1 Appuyer simultanément sur les touches de sélect...

Страница 49: ... secondes Placez un aimant sur le fond externe de la casserole il doit rester collé Certaines casseroles peuvent faire du bruit lorsqu elles sont placées sur une zone de cuisson à induction Ces bruits ne traduisent en aucun cas un défaut de l appareil et n influent nullement sur son fonctionnement Dimension des casseroles Les zones de cuisson s adaptent automatiquement à la dimension du fond de la...

Страница 50: ...t du commerce conseillé pour la vitrocéramique N utilisez en aucun cas d appareils à vapeur ou à pression Ne pas utiliser d objets qui risqueraient de rayer la vitrocéramique tel que tampon abrasifs ou pointe de couteau N utilisez pas de produits de nettoyage abrasifs qui pourraient endommager l appareil Séchez l appareil avec un chiffon propre Enlevez immédiatement le sucre et les mets contenant ...

Страница 51: ...bole E2 ou EH s affiche La table est en surchauffe laissez la refroidir puis rallumez la Le symbole E3 s affiche La casserole n est pas adaptée changez de casserole Le symbole E5 s affiche Réseau électrique défectueux Contrôlez la tension et la tension du réseau électrique Le symbole E6 s affiche Réseau électrique défectueux Contrôlez la fréquence et la tension du réseau électrique Le symbole E8 s...

Страница 52: ...uble Sa mise en place doit être effectuée avec un grand soin suivant le croquis ci dessous Encastrement La découpe du plan de travail sera suivant le modèle de table de Dimension du verre Dimension de découpe Arrière Côté Angle Dimension de découpe à fleur Profondeur A1 B1 C D E F H A2 B2 G P603IC1B2NEE P603IC1B2GNEE P604IC1B2NEE P604IC1B2GNEE P604IC2B2NEE 520 590 490 560 50 40 8 526 596 5 Coller ...

Страница 53: ...iqué le joint d étanchéité silicone placez des poids uniformément répartis sur la table de cuisson des casseroles remplies d eau peuvent être utilisées Garantir entre le fond du caisson de l appareil un espace de 20 mm pour assurer une bonne circulation de l air de refroidissement de l électronique Si un tiroir se trouve sous le plan de cuisson éviter d y ranger des objets inflammables par exemple...

Страница 54: ...isson Pour ouvrir le capot servez vous d un tournevis moyen Placez le dans les 2 fentes situées à l avant des 2 flèches Réseau Raccordement Diamètre câble Câble Calibre de protection 230V 50 60Hz 1 Phase N 3 x 2 5 mm H 05 VV F H 05 RR F 25 A 400V 50 60Hz 2 Phases N 4 x 1 5 mm H 05 VV F H 05 RR F 16 A calculé avec le coefficient de simultanéité suivant standard EN 60 335 2 6 Branchement de la table...

Страница 55: ...59 ZONA DE MANDOS 60 UTILIZACIÓN DEL APARATO 60 INDICACIONES 60 VENTILACIÓN 60 PUESTA EN MARCHA Y USO DEL APARATO 61 ANTES DE LA PRIMERA UTILIZACIÓN 61 PRINCIPIO DE LA INDUCCIÓN 61 TECLAS TÁCTILES 61 PUESTA EN MARCHA 61 DETECCIÓN DEL RECIPIENTE 62 INDICADOR DE CALOR RESIDUAL 62 FUNCIÓN TURBO 62 FUNCIÓN TEMPORIZADOR 63 BLOQUEO DE LA ZONA DE MANDOS 64 FUNCIÓN DE PUENTE 64 FUNCIÓN GRILL 64 GESTIÓN DE...

Страница 56: ...n no debe servir como soporte ni como superficie de trabajo La seguridad sólo está asegurada si el aparato está conectado a una toma de tierra de protección conforme a los reglamentos vigentes No utilice alargadoras para la conexión a la red eléctrica El aparato no debe utilizarse encima de un lavavajillas o de una secadora de ropa los vapores de agua desprendidos podrían deteriorar la electrónica...

Страница 57: ...peligros que puedan implicar Los niños no deben usar éste electrodoméstico para jugar La limpieza o el uso de éste aparato no debe realizarse por niños sin supervisión Precauciones para no deteriorar el aparato Las cacerolas con base sin pulir fundición no esmaltada o estropeadas pueden dañar la vitrocerámica La presencia de arena u otros materiales abrasivos puede dañar la vitrocerámica Evite dej...

Страница 58: ...rica y avisar al servicio posventa Las reparaciones sólo pueden ser realizadas por personal especializado En ningún caso abra el aparato usted mismo ADVERTENCIA Si la superficie está agrietada apagar el aparato para evitar la posibilidad de descargas eléctricas Otras precauciones Verificar que el recipiente esté lo más centrada posible a la zona de cocción La parte inferior del recipiente debe de ...

Страница 59: ...mm Potencia nominal 1400 W 1400 W Potencia de refuerzo 1850 W 1850 W Categoría estandarizada de utensilios de cocina C C Consumo energético ECcw 172 7 Wh kg 172 7 Wh kg Zona de calefacción trasera derecha Ø 180 mm Diámetro mínimo Ø 100 mm Potencia nominal 1400 W Potencia de refuerzo 1850 W Categoría estandarizada de utensilios de cocina B Consumo energético ECcw 164 0 Wh kg Zona de calefacción del...

Страница 60: ...te de 70ºC II Pausa La pausa está activada Bridge 2 zonas de cocción se combinan Ventilación El ventilador de enfriamiento tiene un funcionamiento totalmente automático Se pone en marcha a velocidad baja a partir del momento en que el calor desprendido por el sistema electrónico sobrepasa un cierto umbral La ventilación activa su velocidad más alta cuando la placa de cocción se usa de forma intens...

Страница 61: ... inoxidable no ferro magnético La zona de cocción por inducción tiene automáticamente en cuenta el tamaño del recipiente utilizado Con un diámetro demasiado pequeño el recipiente no funciona Este diámetro varía en función del diámetro de la zona de cocción Cuando el recipiente no es adecuado para la placa de cocción queda encendido el símbolo U Teclas táctiles Su aparato está provisto de teclas tá...

Страница 62: ... Mientras los testigos de calor residual estén encendidos no toque las zonas de cocción ni ponga encima ningún objeto sensible al calor Peligro de quemadura y de incendio Función turbo La función turbo P proporciona un refuerzo de potencia en la zona de cocción seleccionada Si se activa esta función estas zonas de cocción funcionan durante 5 minutos con una potencia notablemente más alta El turbo ...

Страница 63: ...la de selección de la zona 1 9 Seleccionar Temporizador Pulsar simultáneamente y Tiempo restante Desactivar Temporizador Pulsar Pasa a 00 y después se apaga Cuando hay varios temporizadores activados basta repetir la operación Paro automático al final de la cocción Cuando ha transcurrido el tiempo de cocción seleccionado el temporizador lo indica centelleando 00 y produciendo una señal sonora Para...

Страница 64: ...inguno Función de puente Esta función le permite utilizar las 2 zonas de cocción al mismo tiempo con las mismas funciones que una sola zona de cocción Acción Zona de mandos Indicador Puesta en marcha Pulsar 0 o H Activar el puente Presione simultáneamente los dos Π aparece en el área teclas de selección Trasera y 0 en el área frontal Aumentar puente Pulsar 1 to 9 Pare el puente Presione simultánea...

Страница 65: ... o cortar el disyuntor Descolgar la mesa a la red eléctrica devolver el fusible o descolgar el disyuntor Empezar el procedimiento en menos de 2 minutos después de la acometida a la red eléctrica Asegurarse que todas las zonas de caldeos hogares son apagadas extinguidas Para configurar el límite de potencia hace falta 1 Apretar simultáneamente las teclas de Selección de ambas zonas inferiores que c...

Страница 66: ... a nivel 9 Este agua debe calentarse en algunos segundos Ponga un imán sobre el fondo externo de la cacerola debe quedarse pegado Algunas cacerolas pueden hacer ruido al colocarlas sobre una zona de cocción por inducción Estos ruidos no representan en ningún caso un defecto en el aparato ni tienen influencia en su funcionamiento Dimensión de las cacerolas Las zonas de cocción se adaptan automática...

Страница 67: ...ducto lavavajillas o un producto comercial aconsejado para vitrocerámica No utilice productos de limpieza abrasivos que podrían dañar el aparato Seque el aparato con un trapo limpio Retire inmediatamente el azúcar o materiales que contengan azúcar No utilice en ningún caso aparatos a vapor o a presión No utilice objetos que comporten riesgo de rayar la vitrocerámica como estropajos abrasivos o pun...

Страница 68: ...ece en la pantalla La placa se ha sobrecalentado deje que se enfríe y vuelva a ponerla en marcha El símbolo E3 aparece en la pantalla El recipiente no es adecuado cambie la cazuela o sartén El símbolo E6 aparece en la pantalla Redeléctricadefectuosa Controlar la frecuencia y la tensión de la redeléctrica El símbolo E8 aparece en la pantalla Entrada de aire al ventiladorobstruida Libérela El símbol...

Страница 69: ... en el mueble Su colocación debe efectuarse con gran cuidado según el croquis adjunto Encaje La abertura en la superficie de trabajo será según el modelo de Tamaño del vidrio Dimensión de corte Trasera Lado Ángulo Dimensión de corte Profundidad A1 B1 C D E F H A2 B2 G P603IC1B2NEE P603IC1B2GNEE P604IC1B2NEE P604IC1B2GNEE P604IC2B2NEE 520 590 490 560 50 40 8 526 596 5 Pegar la junta 2 sobre el rebo...

Страница 70: ...a la superficie correctamente se sugiere colocar pesas como ollas cubetas con agua o arena después de haber instalado la placa con el pegamento silicona Asegure un espacio de 20 mm entre el fondo de la caja del aparato y la pared para asegurar una buena circulación de aire para la refrigeración de la electrónica Si hay un cajón debajo de la superficie de cocción evite guardar en él objetos inflama...

Страница 71: ...stalación fija segun las reglamentaciones de la instalación El cable de alimentación debe colocarse de manera que no toca las partes calientes de la placa de cocción Atención Este aparato está diseñado sólo para una alimentación de 230 V 50 60 Hz Conecte siempre la toma de tierra de protección Siga el esquema de conexión La caja de conexión se encuentra debajo de la placa de cocción Para abrir la ...

Страница 72: ...26064 3 ...

Отзывы: